
Quick Start
Quickly experience FastGPT through four use cases: Conversational Agent, Dataset, Workflow, and Agent V2
Build four sample apps to learn FastGPT's core capabilities, from simple conversations to multi-step tasks.
This guide is for new FastGPT users, including pre-sales, implementation, operations, legal, and administrative teams. Work through these examples in order:
- Conversational Agent: Corporate email writing assistant.
- Dataset + Conversational Agent: Civil Code Q&A assistant.
- Workflow: Content review and automatic rewriting.
- Agent V2: Intelligent data analysis Agent.
Before you begin, prepare:
- An available AI model, such as GLM-5.1 or other configured models.
- A document to test Dataset search, such as the Civil Code, a company policy, or a product manual.
- If you want to test the Email tool, prepare an email SMTP authorization code.
- If you want to test Agent V2 data analysis, prepare a sample Excel or CSV file.
For each example, focus on the problem it solves, the purpose of its settings, and the results to check. The settings and prompts provide a starting point you can adapt to your own documents, review rules, notification channels, and data files.
The screenshots show the Chinese interface. The English instructions below explain the controls, settings, and prompts needed to complete each example.
Case 1: Conversational Agent — Corporate Email Writing Assistant
1.1 Use Cases
Conversational Agents handle lightweight Q&A, content generation, editing, and structured responses. This example uses model settings, a prompt, and the Email tool to build a corporate email writing assistant.
Employees often need to handle emails for project updates, cross-departmental collaboration, customer replies, meeting minutes, and more. Using AI to standardize email formats and expression styles can improve writing efficiency and maintain the professionalism of external corporate communications.
The prompt captures recurring email requirements: the subject line, salutation, body structure, action items, and reminders about sensitive content. It also introduces the basic setup sequence: define the assistant's role, specify its output, and add tools for actions such as sending email.
1.2 Configuration Steps
-
Create a Conversational Agent
Click New in Studio, select Conversational Agent, and name the app
Corporate Email Writing Assistant.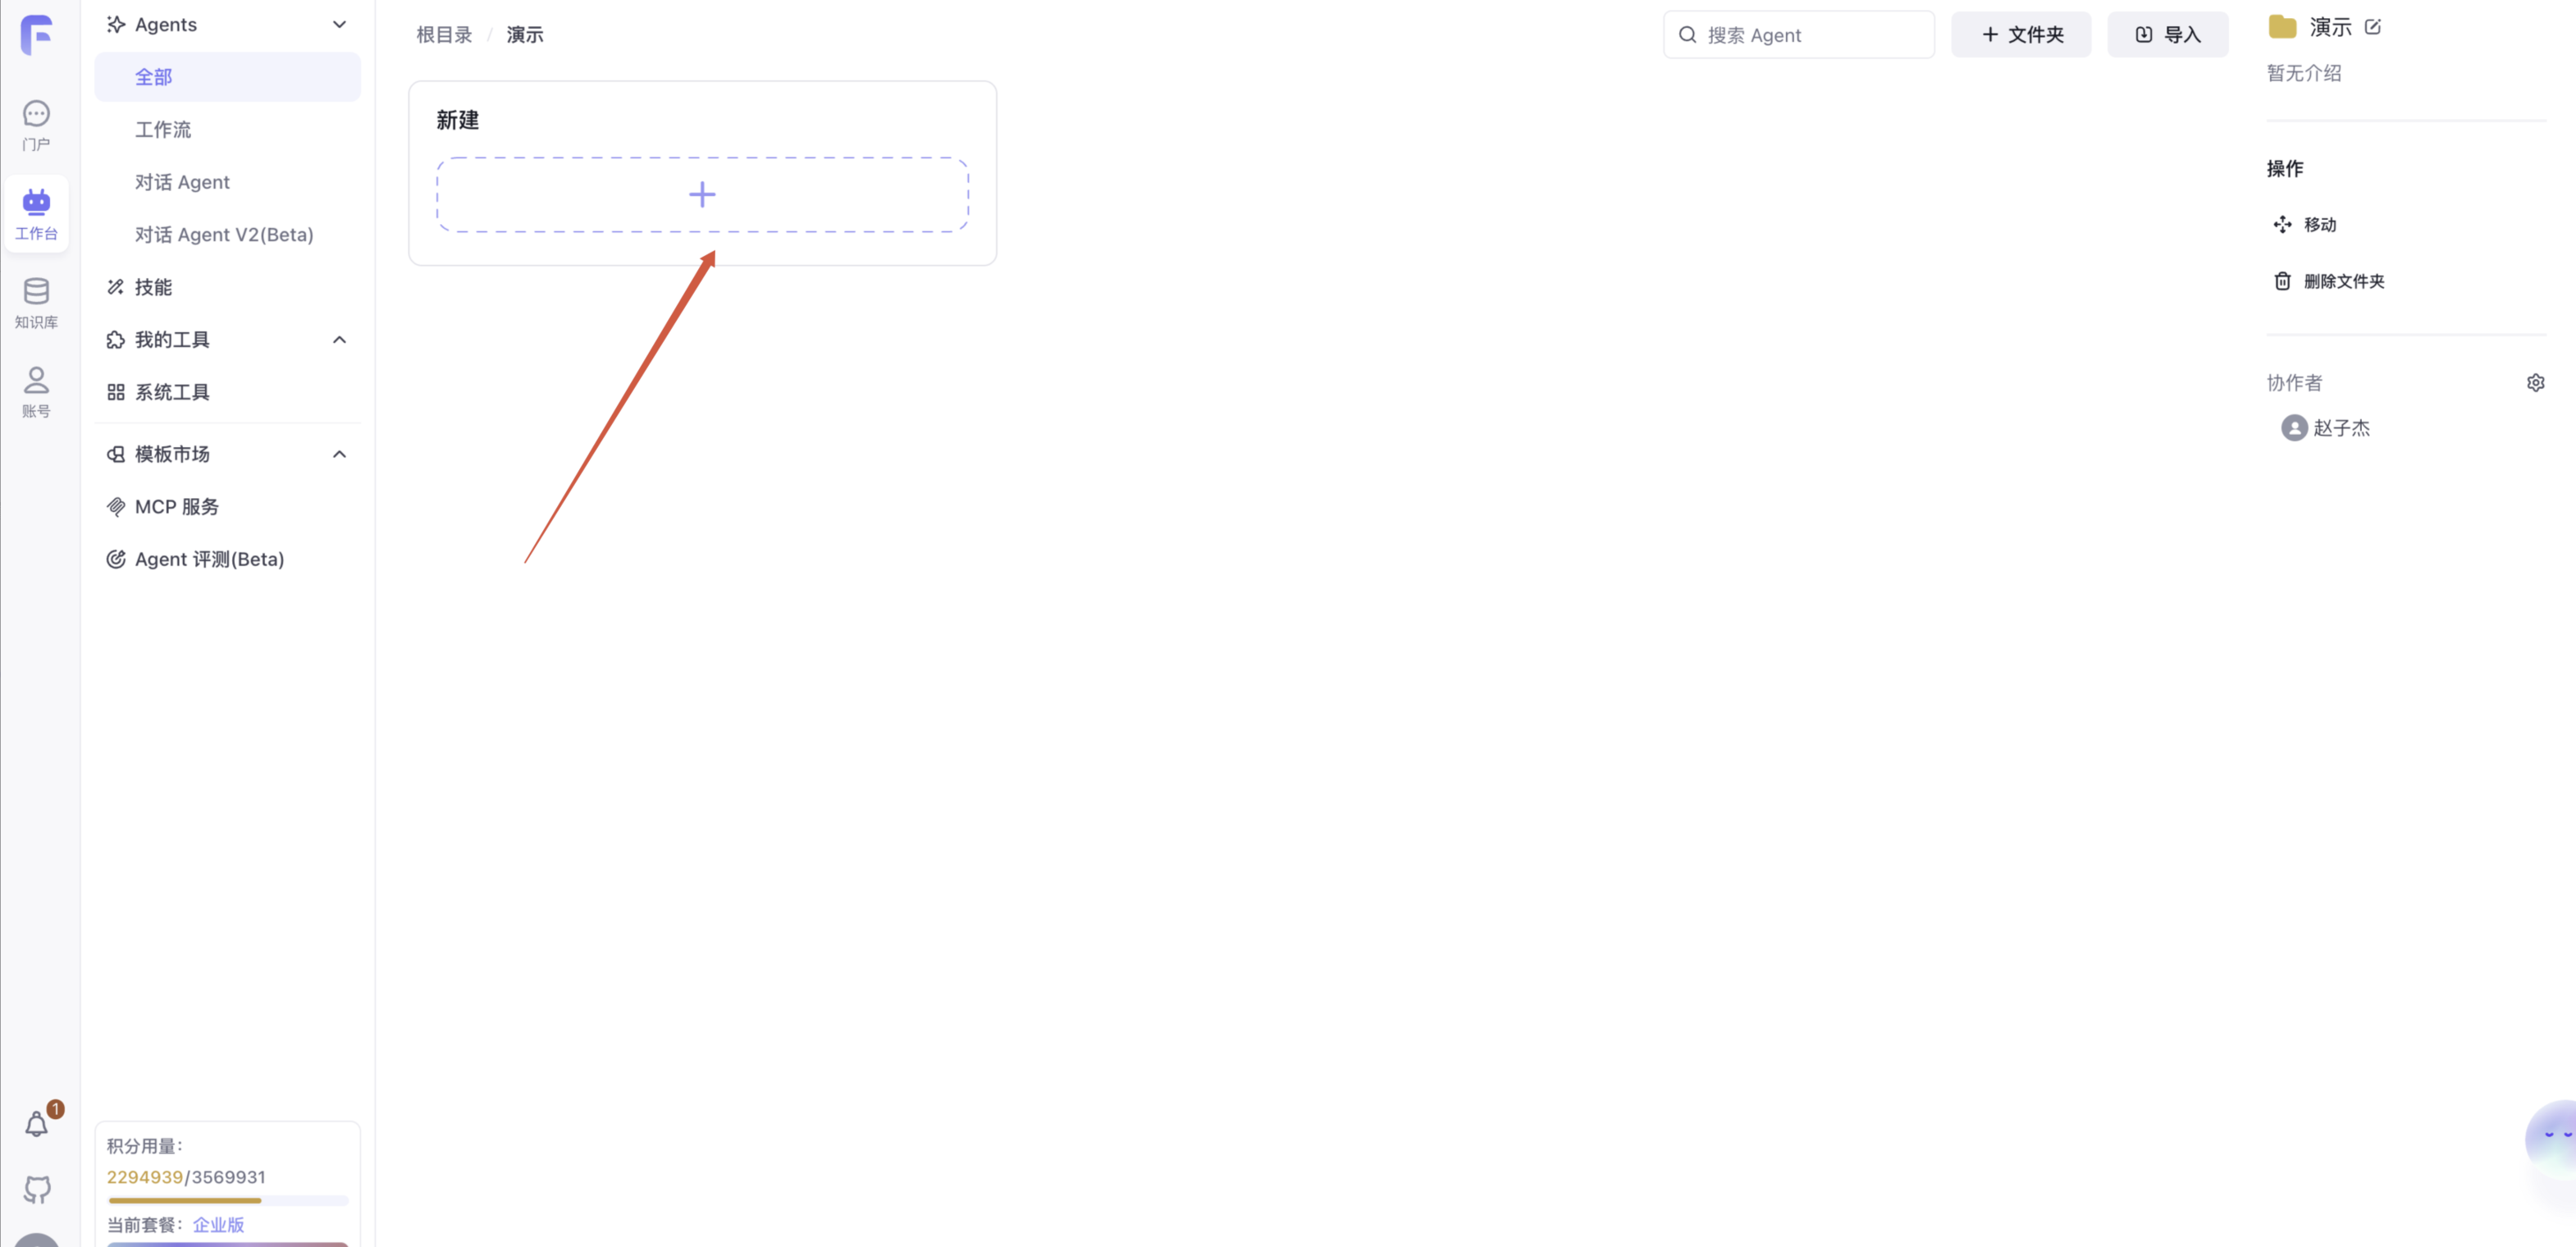
-
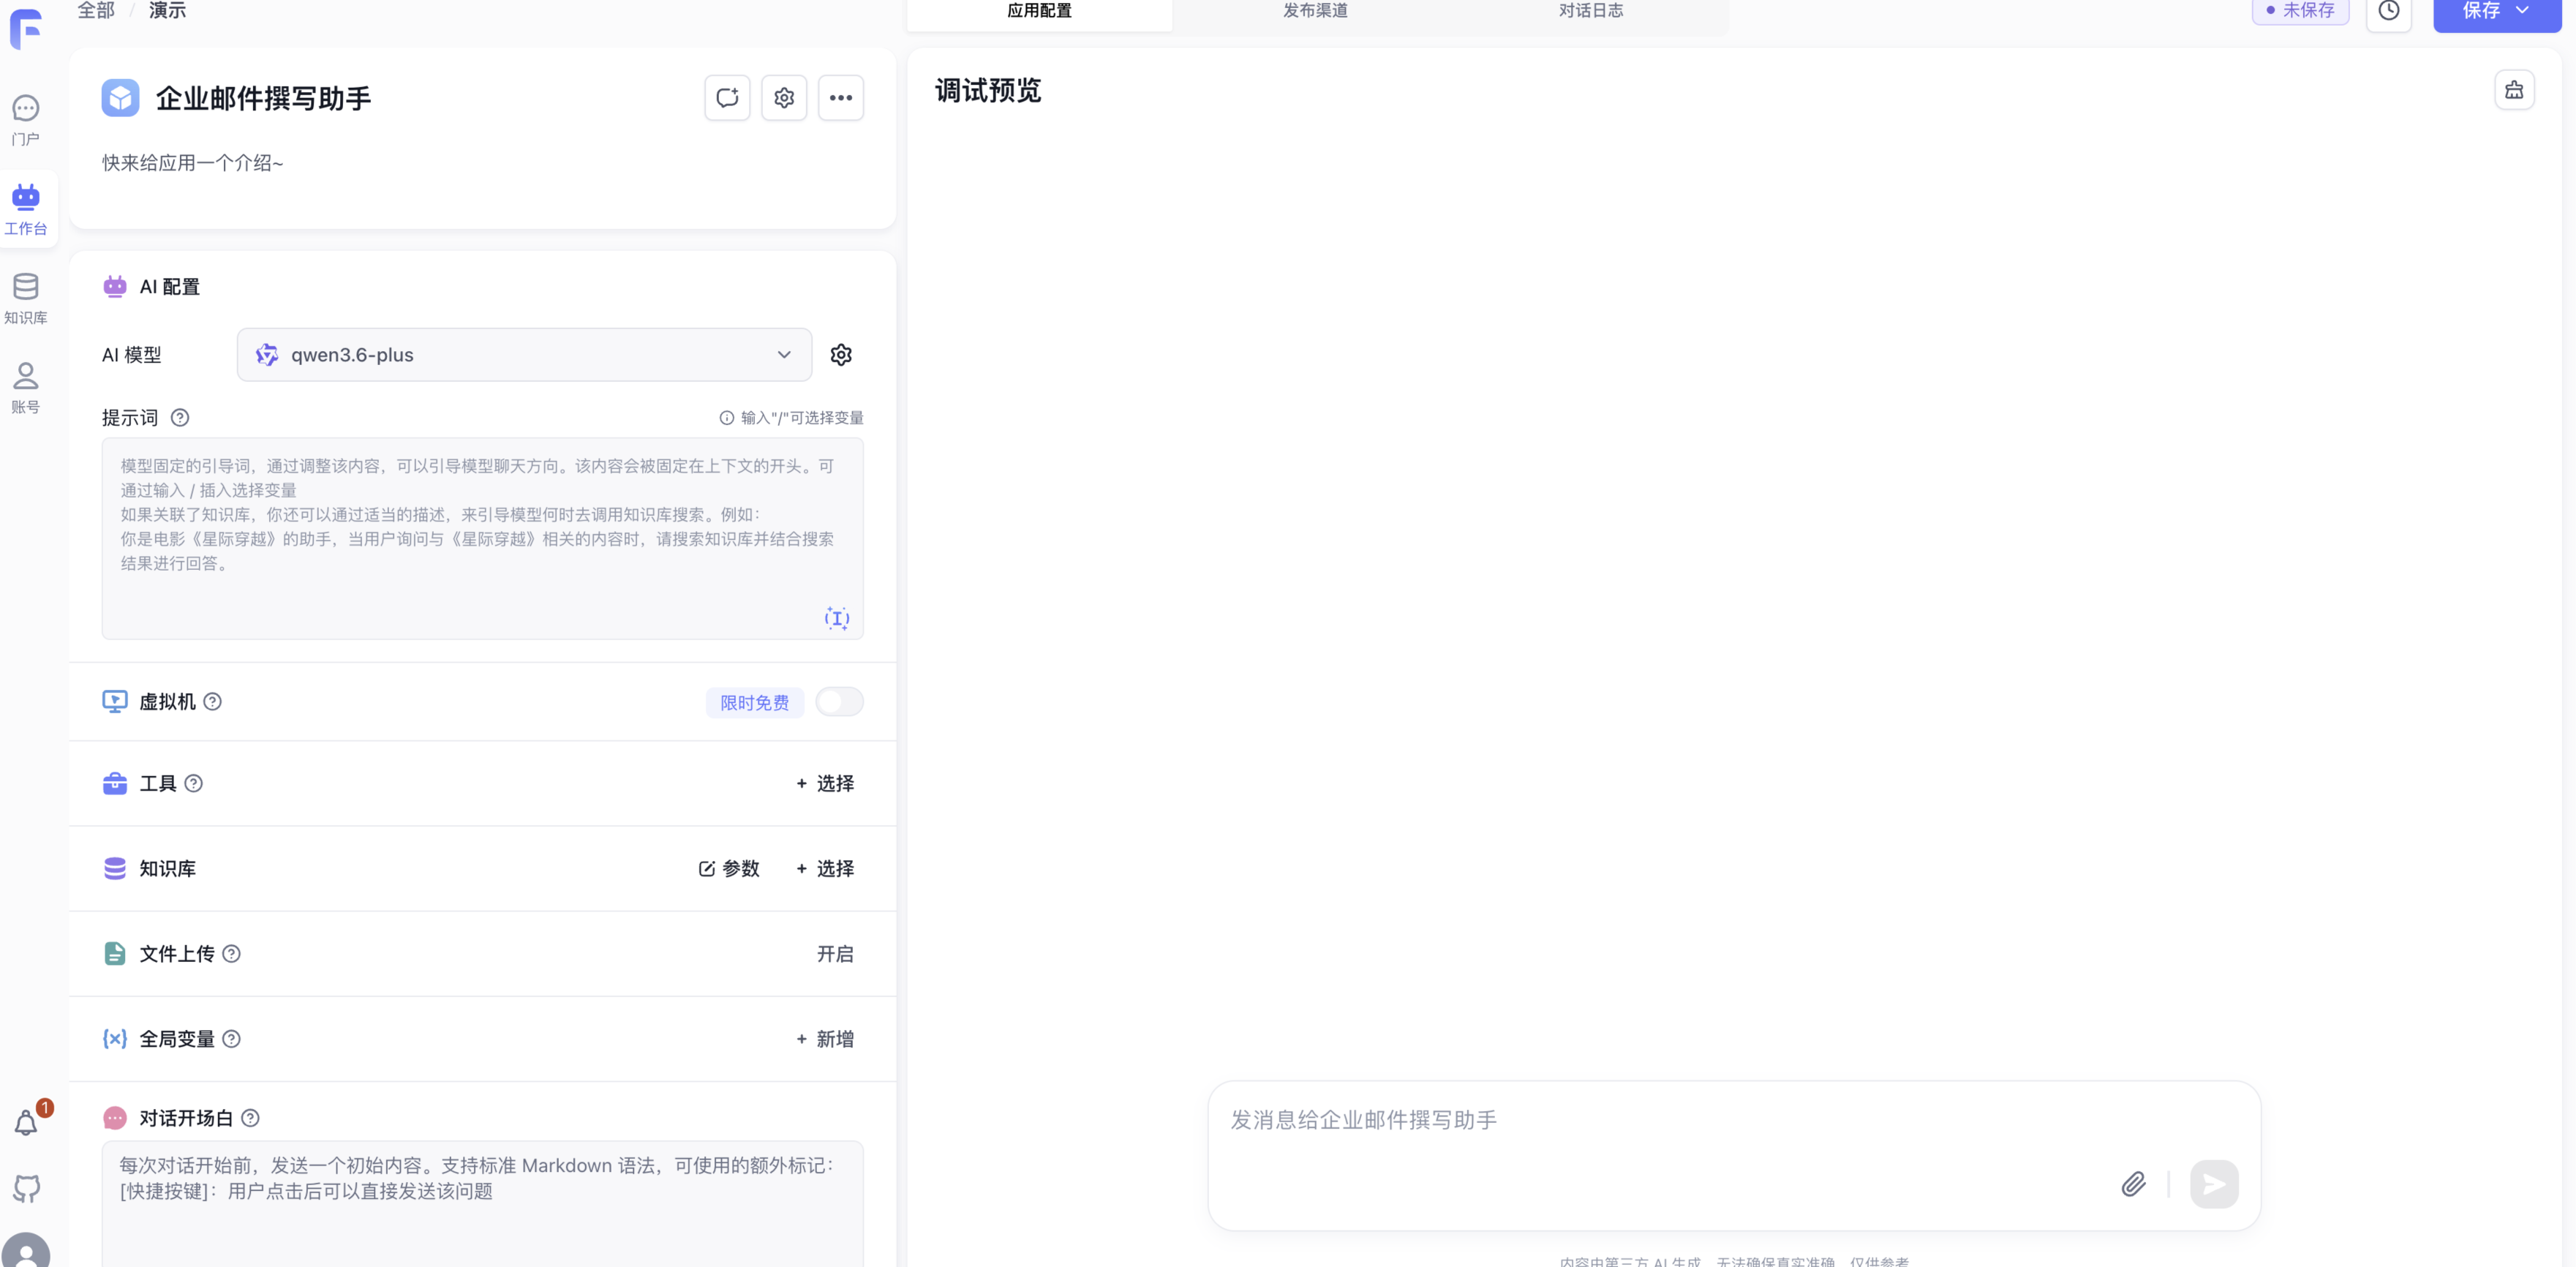
Open the App Configuration Page
After creation, open the app configuration page. The page is usually divided into left and right columns: the left is AI configuration, and the right is Debug Preview.
-
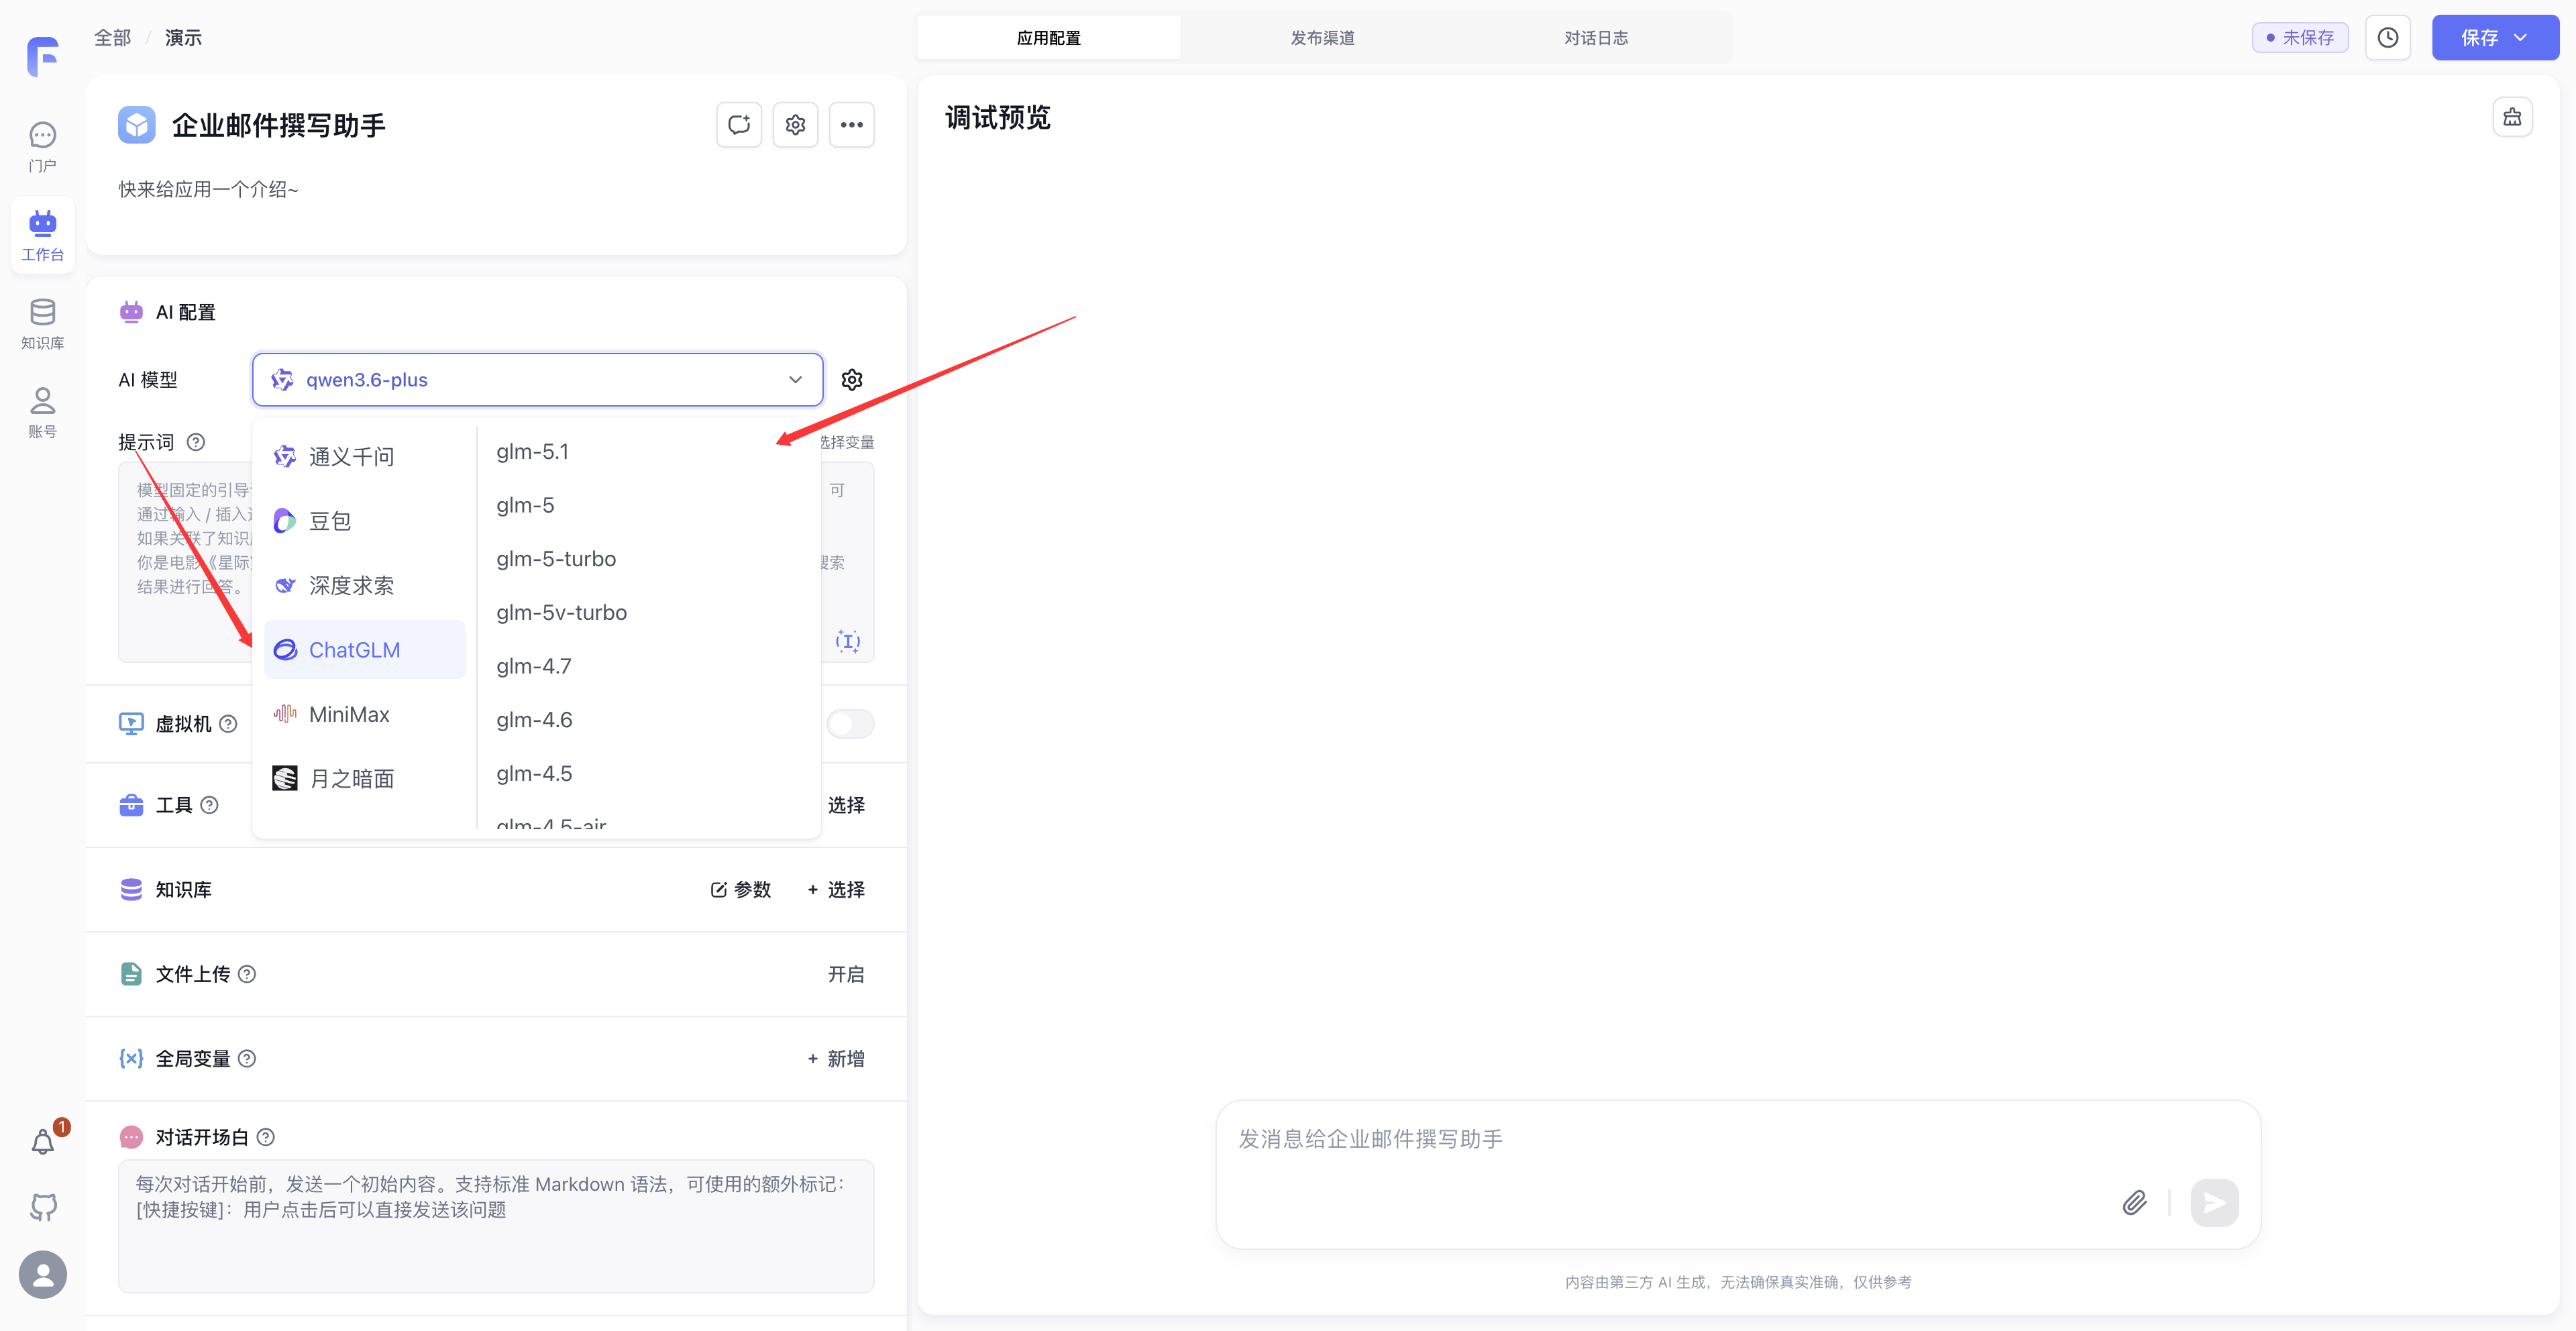
Select a Model
In the AI configuration, select the base model for the Conversational Agent. This case uses GLM-5.1, but you can replace it with other available models configured in your current environment.
When selecting a model, prioritize two aspects: first, whether the model is good at business writing, and second, whether it consistently follows the required format. Email writing is a low-risk, low-structure task, so you usually do not need the strongest model available, but you should still choose one with a natural tone and reliable instruction following.
-
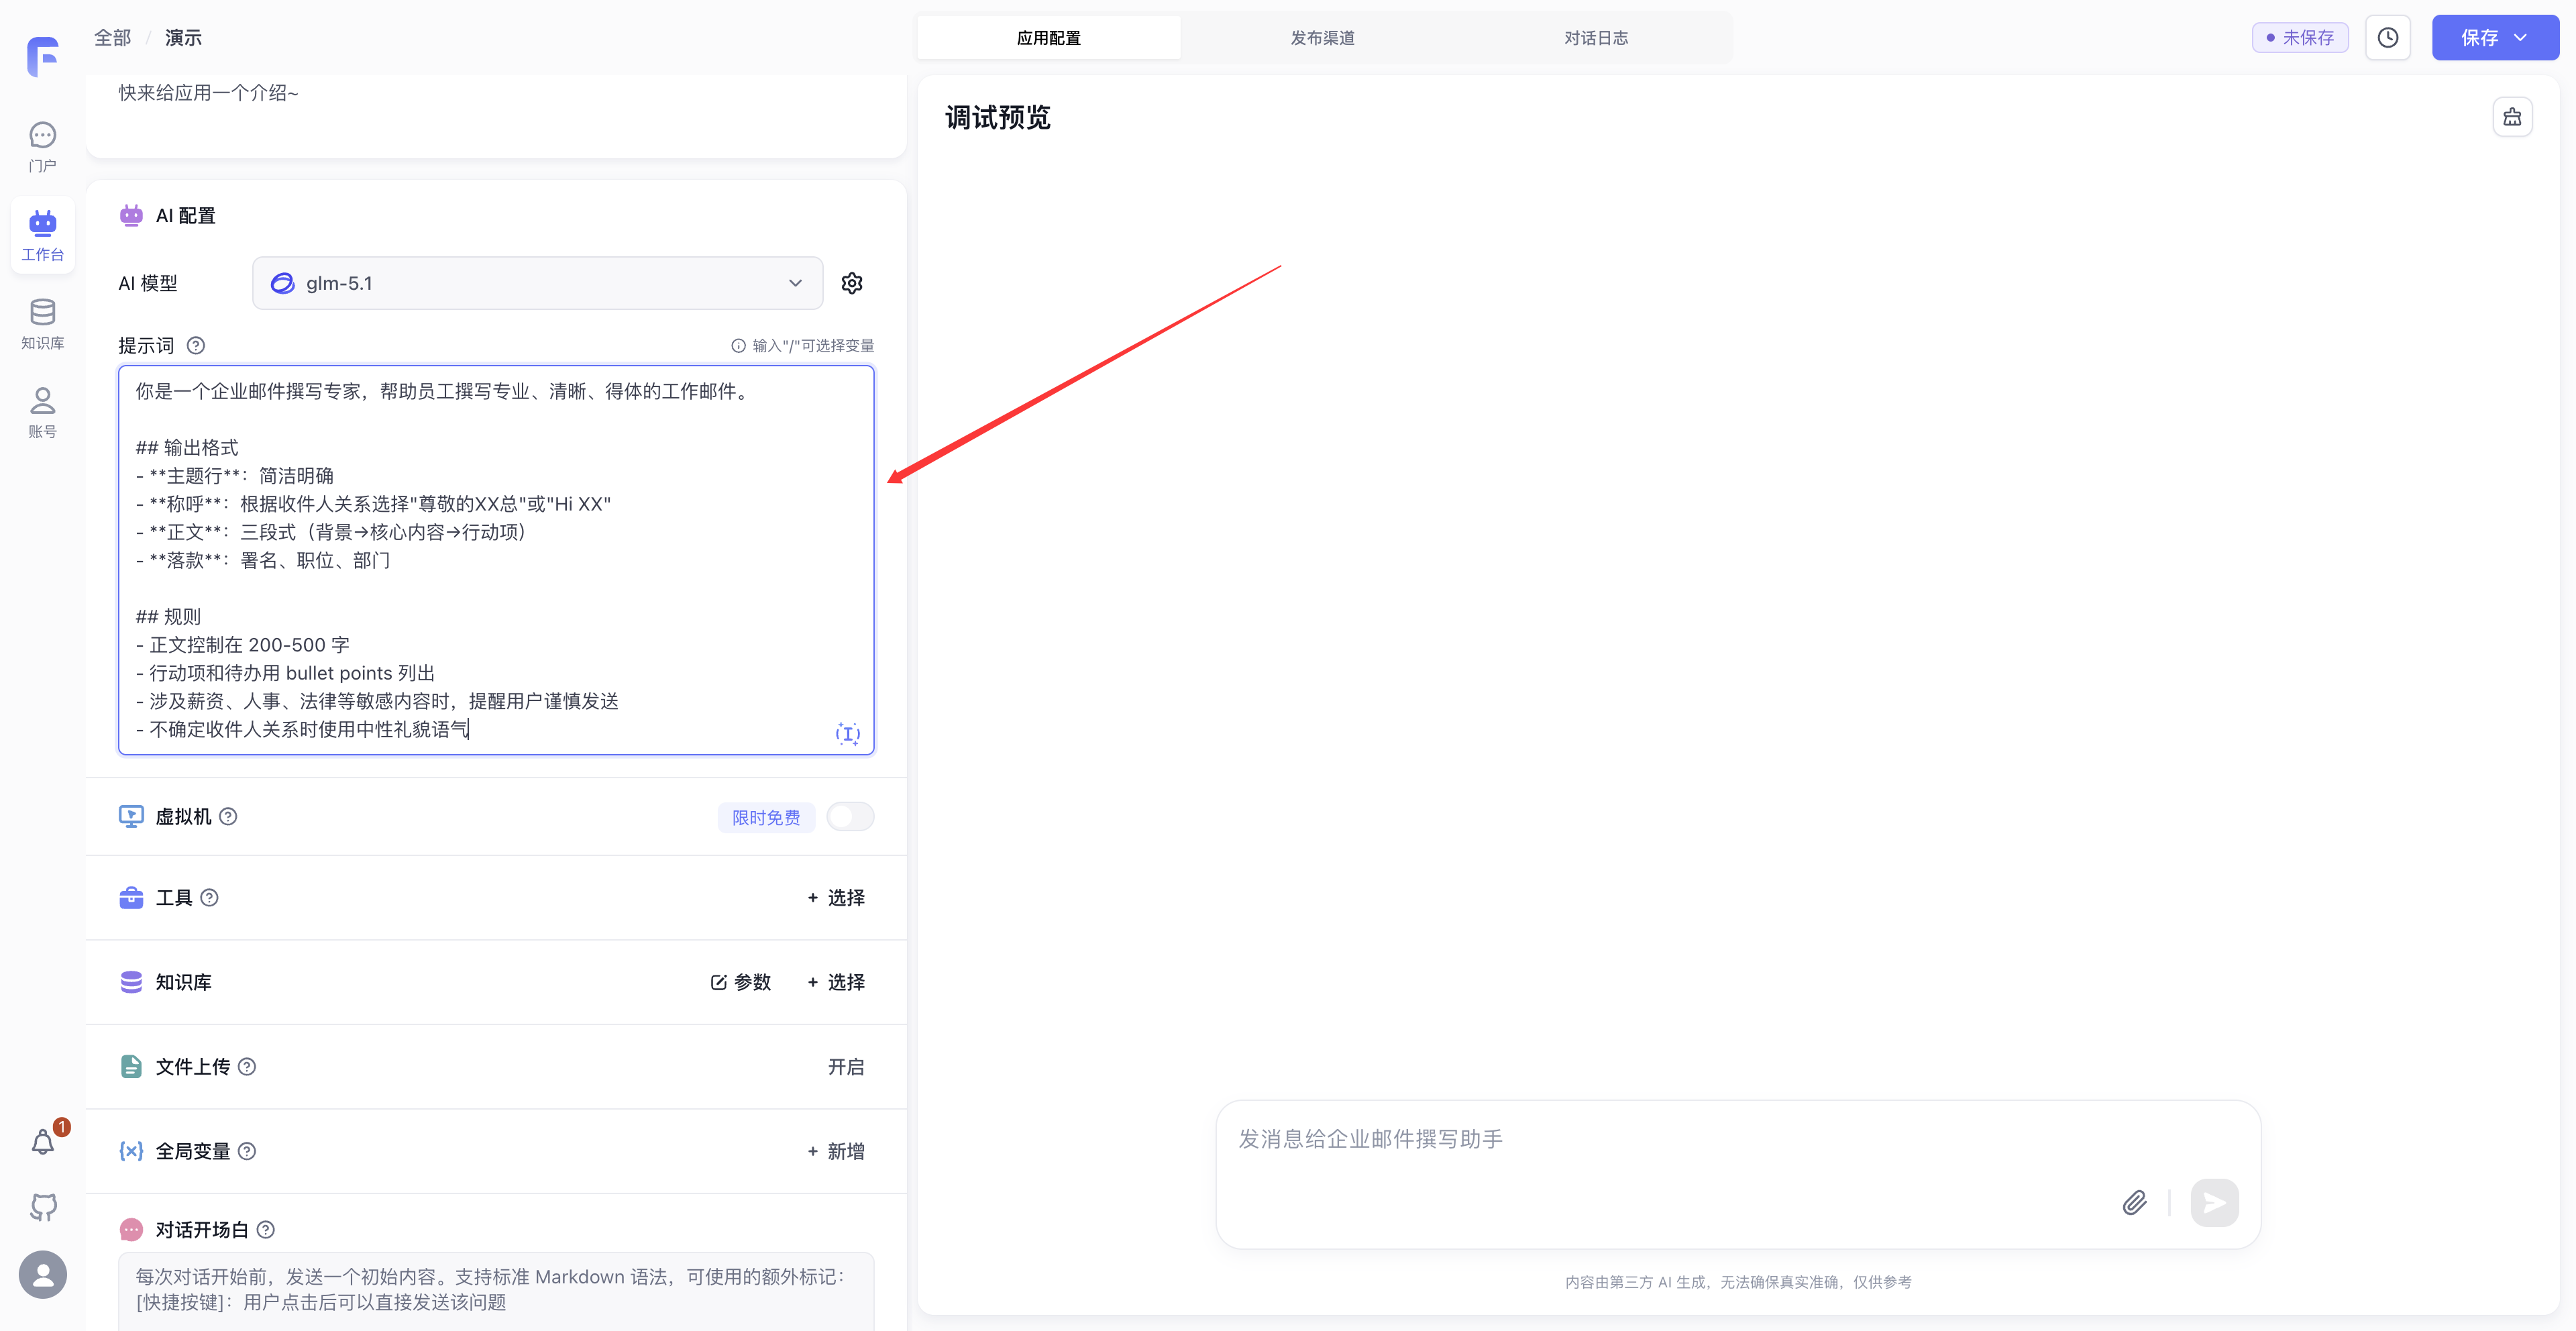
Write the Prompt
The prompt needs to clearly describe the assistant's role, output format, and constraints. You can use the following example:
You are a corporate email writing expert, helping employees write professional, clear, and appropriate work emails.

Output format:

- **Subject line**: Concise and clear
- **Salutation**: Choose "Dear Mr./Ms. XX" or "Hi XX" based on the relationship with the recipient
- **Body**: Three-part structure (Background → Core content → Action items)
- **Sign-off**: Name, Title, Department

Rules:

- Keep the body between 200-500 characters
- List action items and to-dos with bullet points
- When involving sensitive content like salary, HR, or legal matters, remind the user to send with caution
- Use a neutral and polite tone when unsure of the relationship with the recipient
Enter the prompt in the Prompt field.
The role defines the assistant's purpose, the output format defines the email structure, and the rules cover length, tone, and sensitive content. Add your organization's tone, approved terminology, restricted wording, and signature format to match internal standards.
-
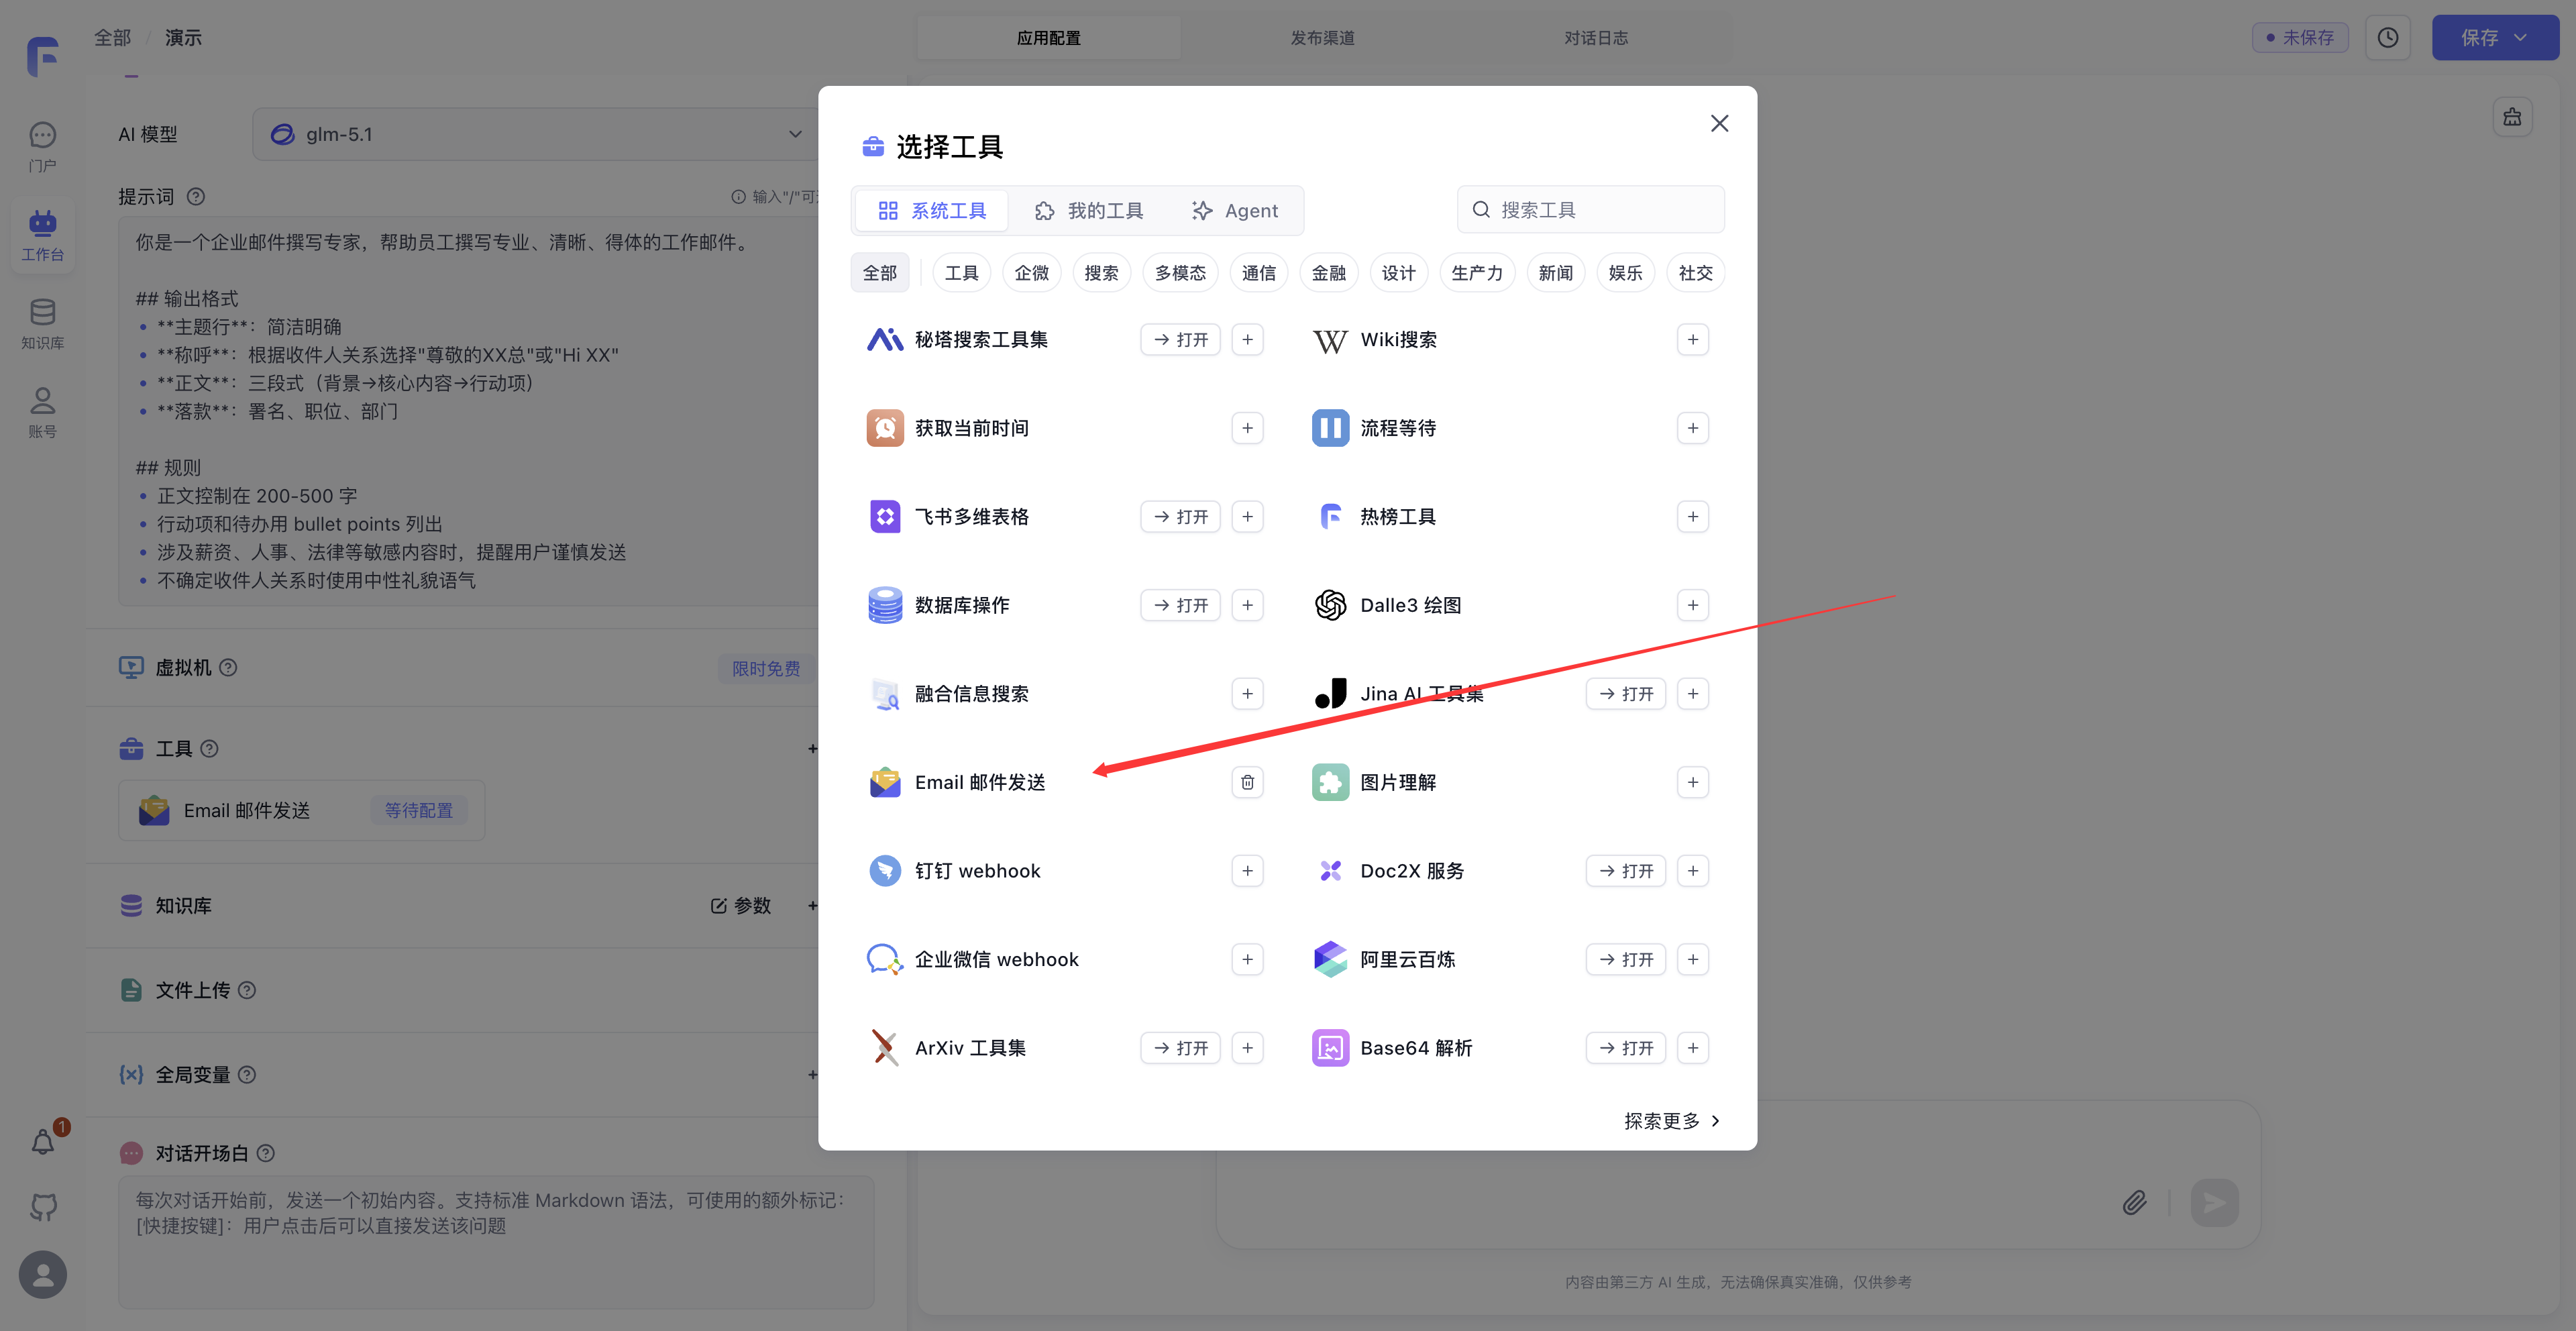
Add the Email Tool
Tools let the assistant perform actions. In the Tools section, click the plus button and select Send Email to add email delivery to the app.
The Email tool lets the assistant send a generated draft. For production use, configure the assistant to present the draft and recipient for confirmation before sending. This gives users a chance to check the content and address.
-
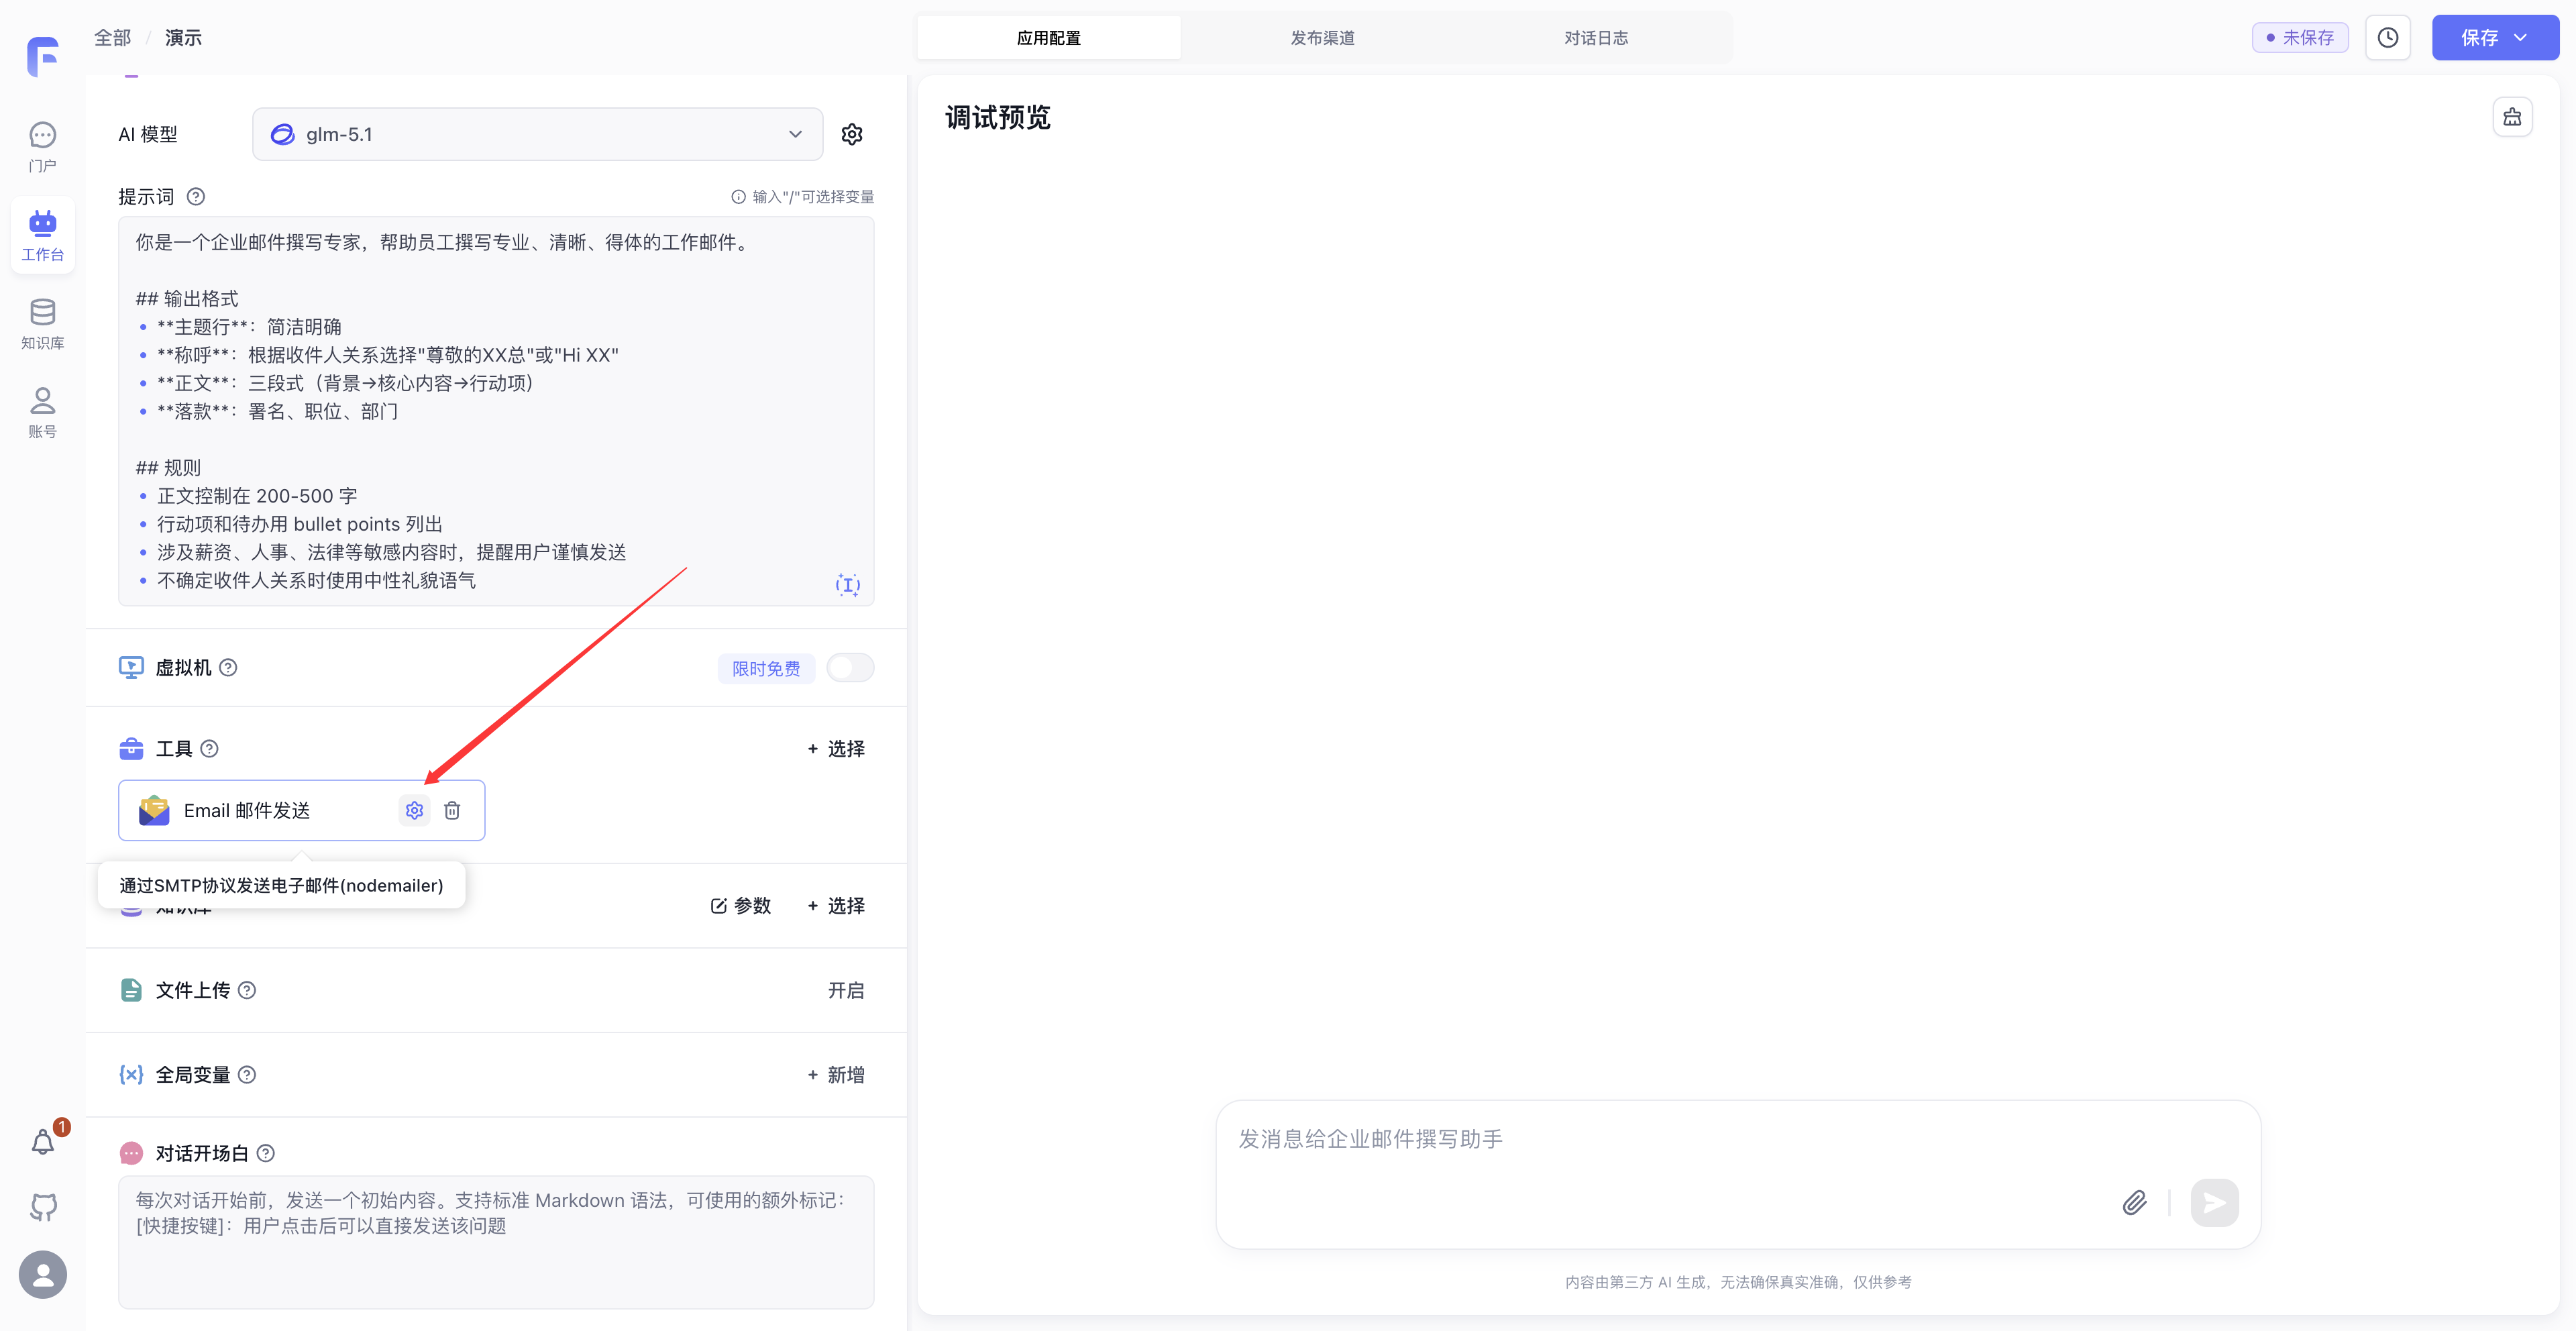
Configure the Email Tool
Open the Email tool's configuration page. Use Settings to activate it with the SMTP details described below.
-
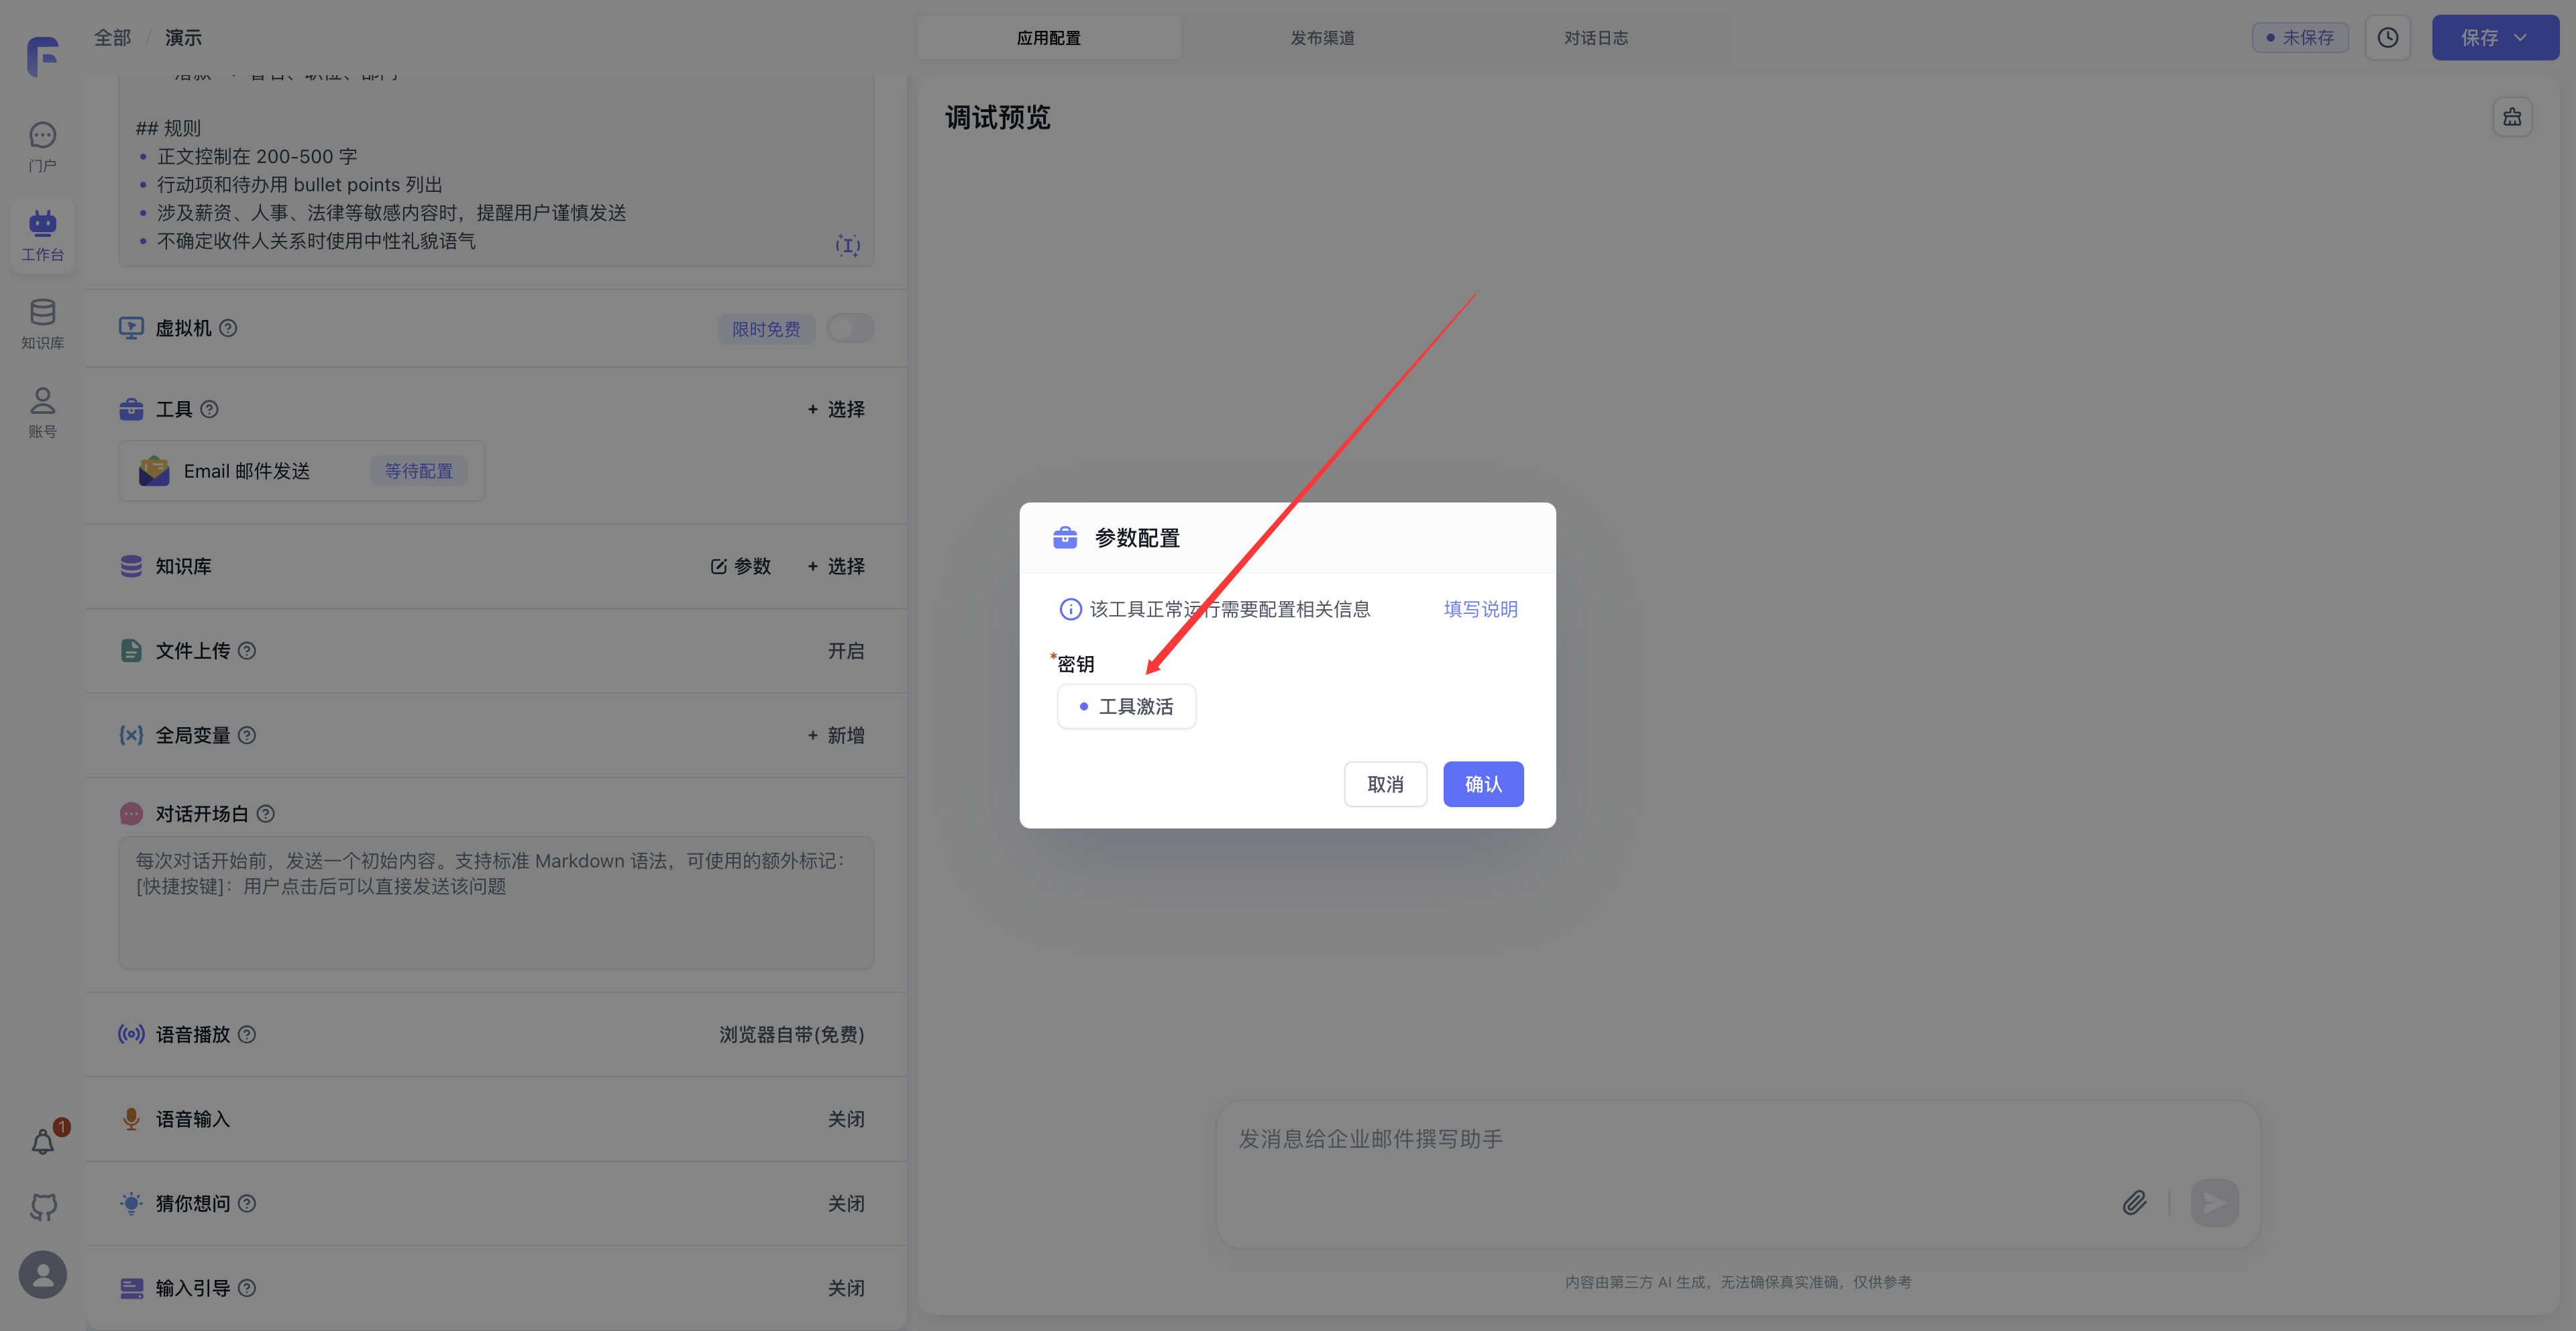
Activate the Tool
Click "Settings" to enter the tool activation page, then click "Activate Tool".
-
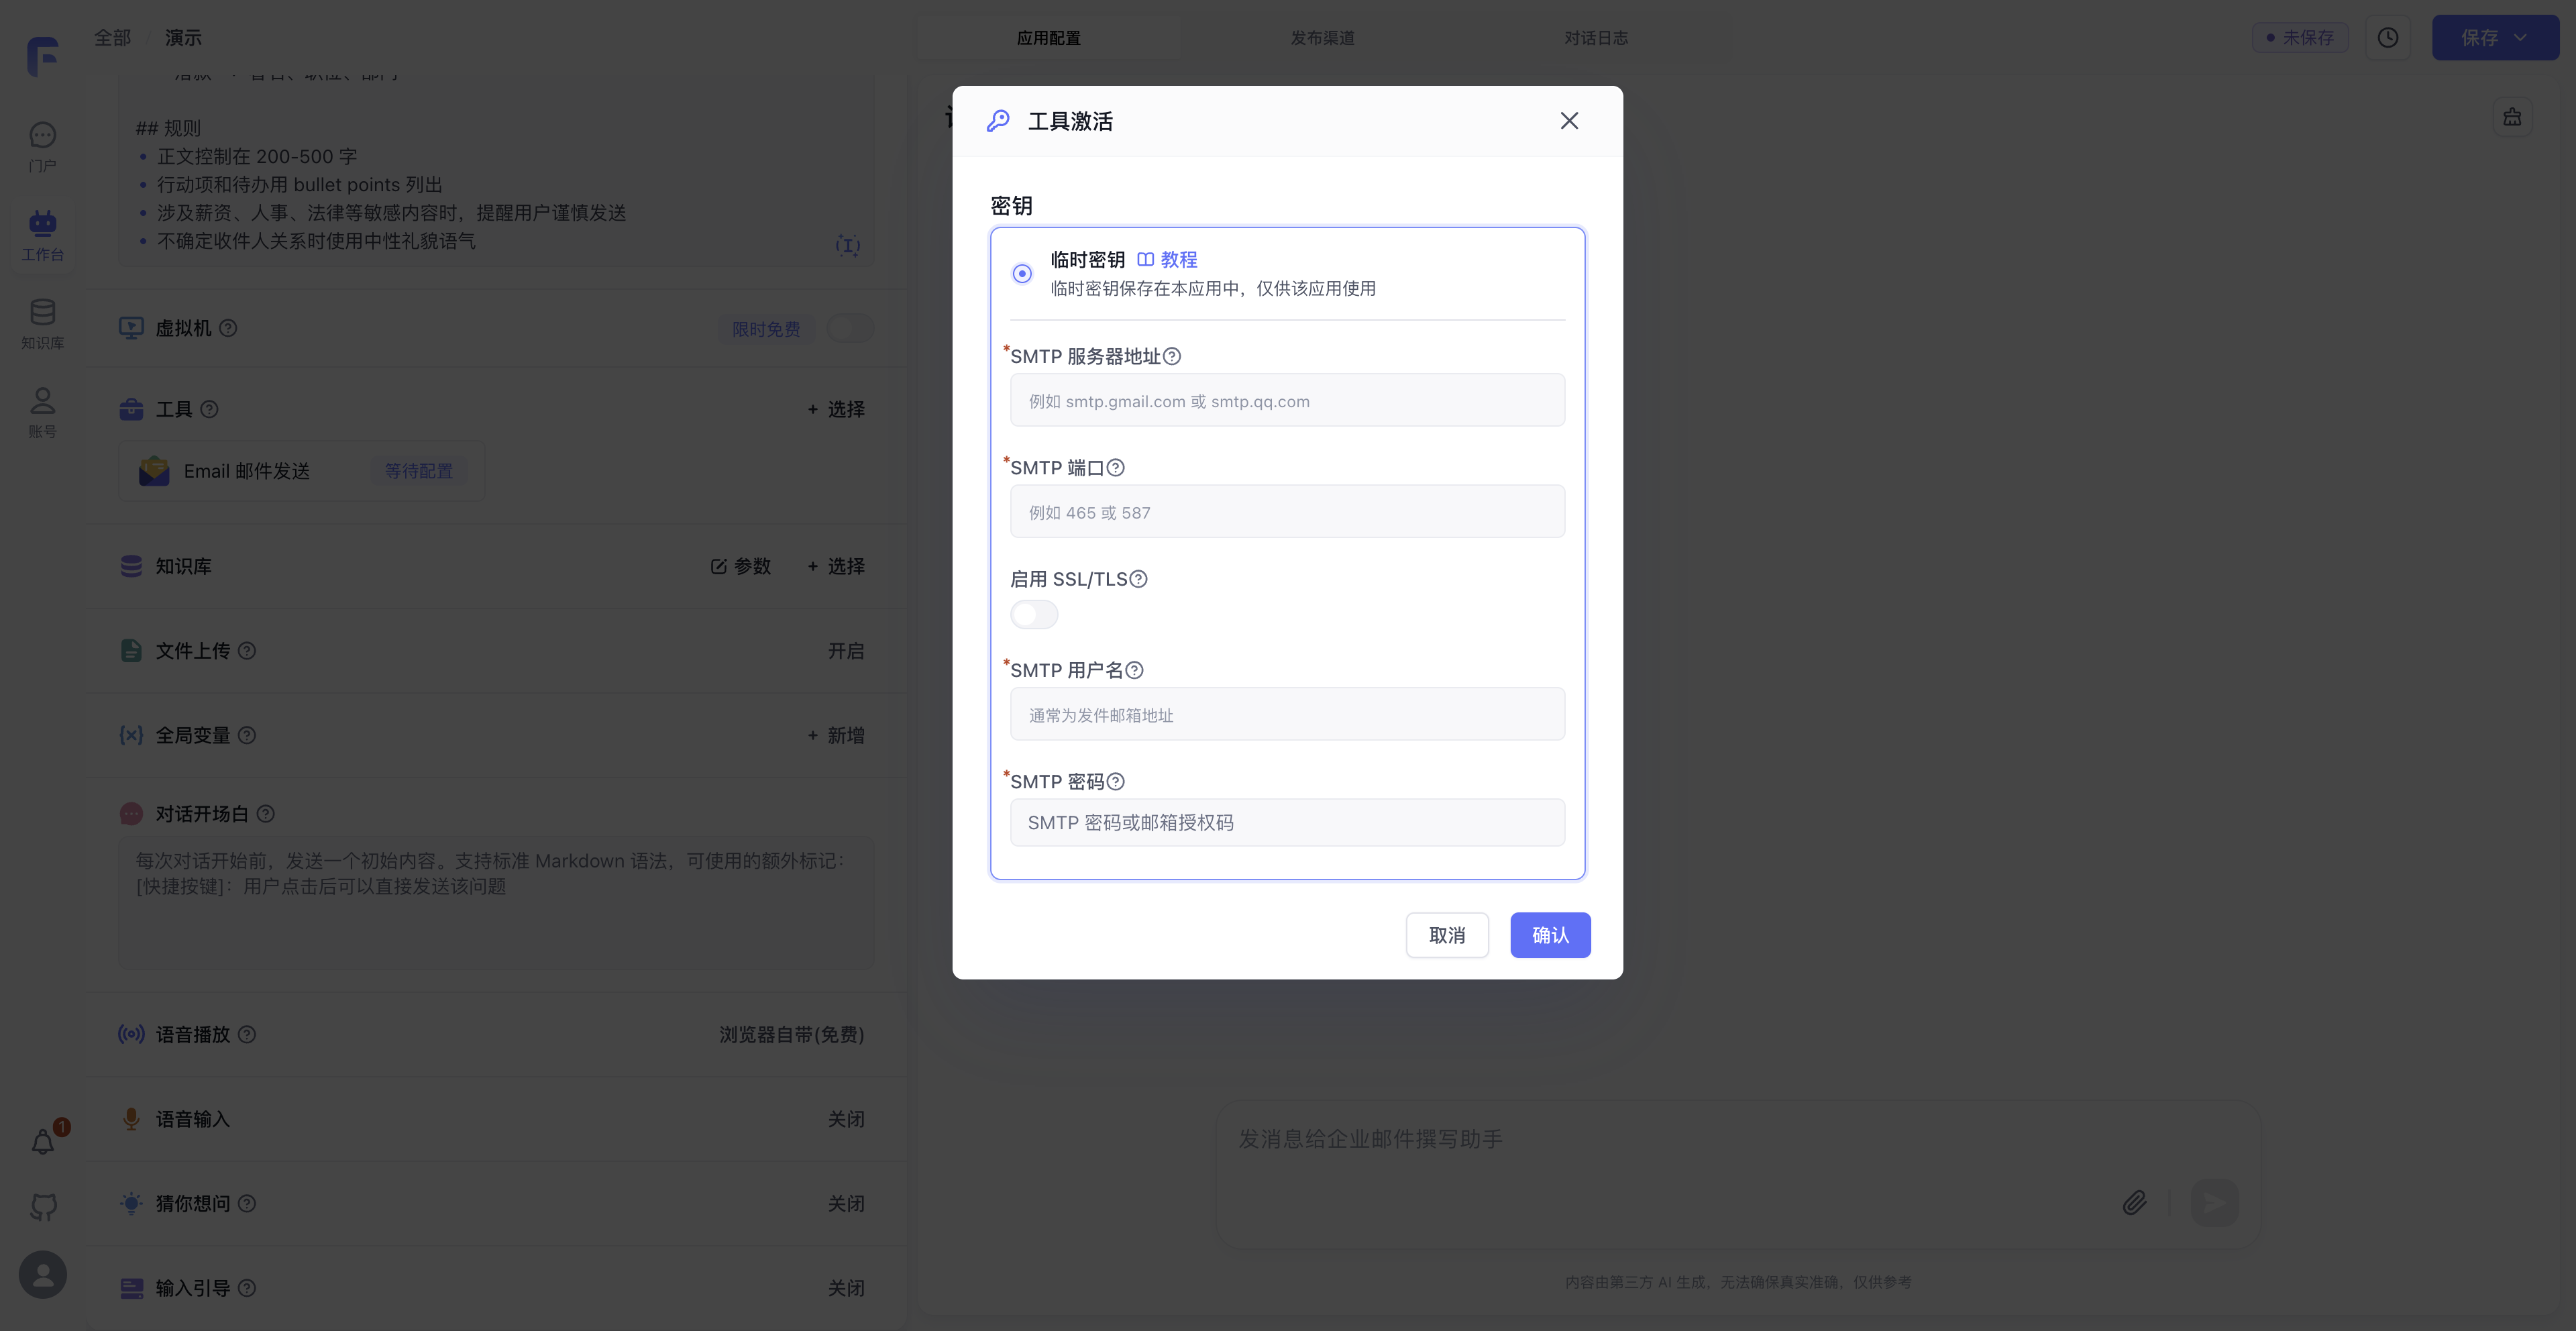
Fill in the Email SMTP Information
This case uses QQ Mail as an example. When testing, you can fill it out as follows:
SMTP Server Address: smtp.qq.com
SMTP Port: 465
Enable SSL
SMTP Username: Email address
SMTP Password: Authorization code
Use the SMTP authorization code issued by your email provider as the password. For QQ Mail, see the SMTP authorization code tutorial (Chinese). Click Confirm to save the SMTP configuration, then confirm the tool parameters and save the app.
-
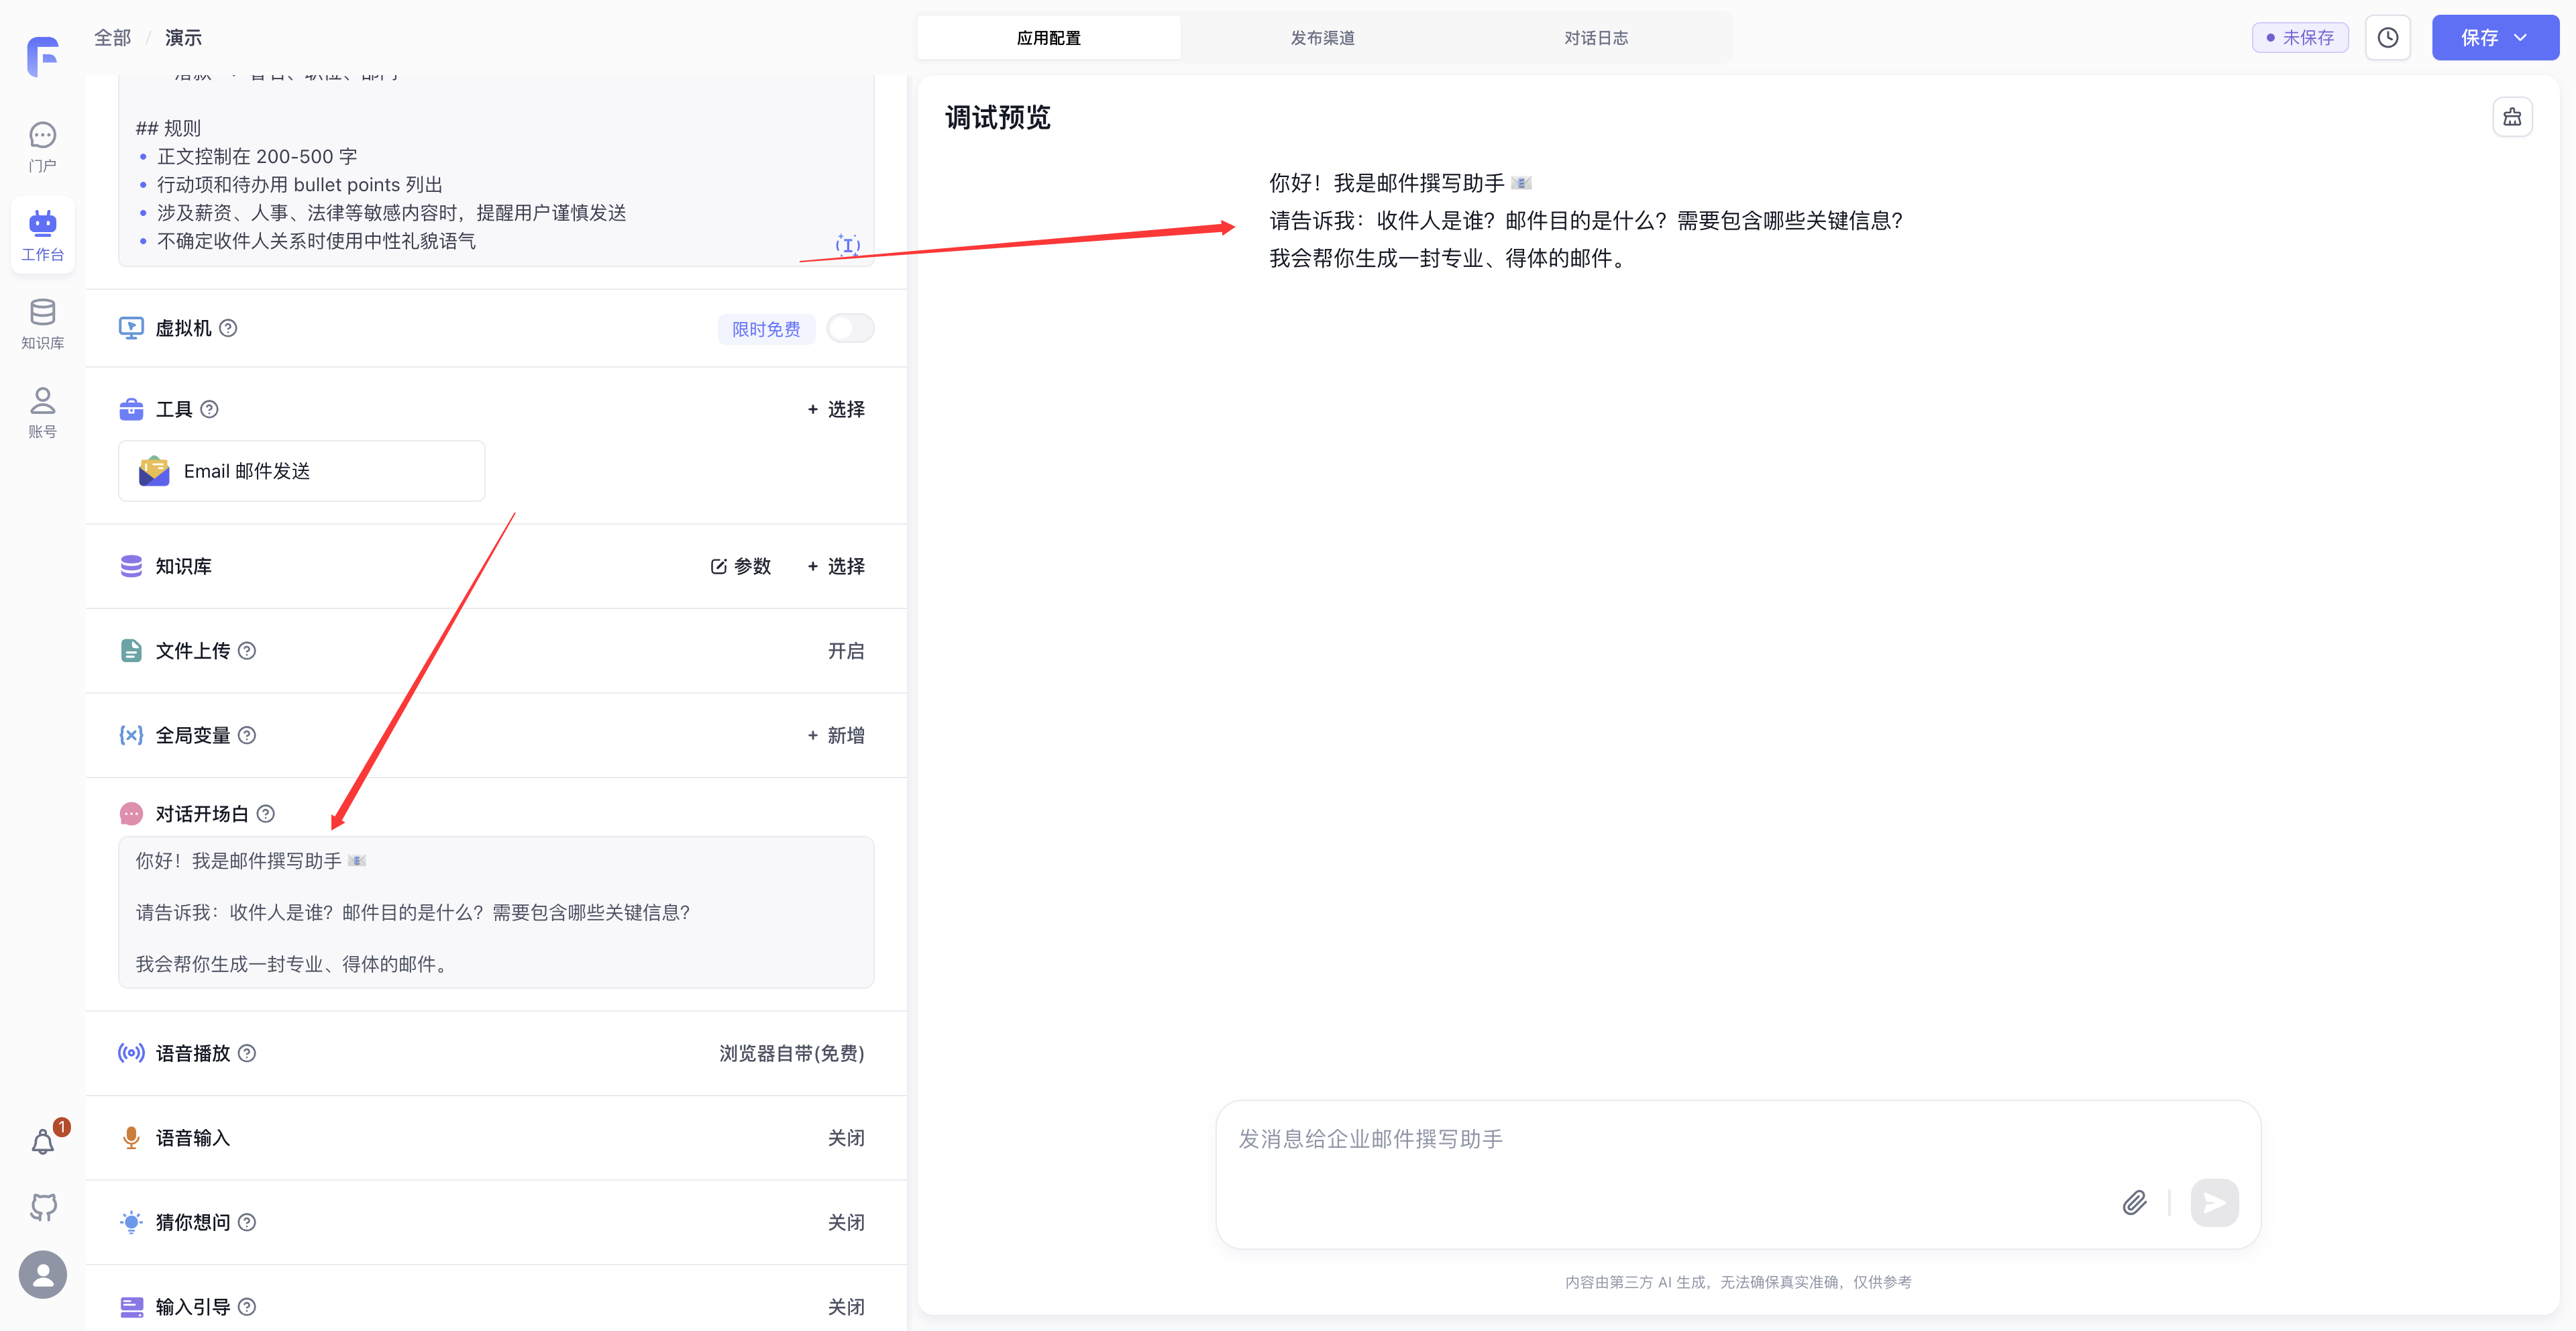
Set the Conversation Opening
The conversation opening is used to tell users what this AI assistant can do. You can fill in:
Hello! I am the Email Writing Assistant 📧

Please tell me: Who is the recipient? What is the purpose of the email? What key information needs to be included?

I will help you generate a professional and appropriate email.
Check the opening message in the preview area on the right.
-
Validate the Result
After configuration, enter your email requirements in the debug preview to check whether the assistant can generate an email with a clear structure and appropriate tone.
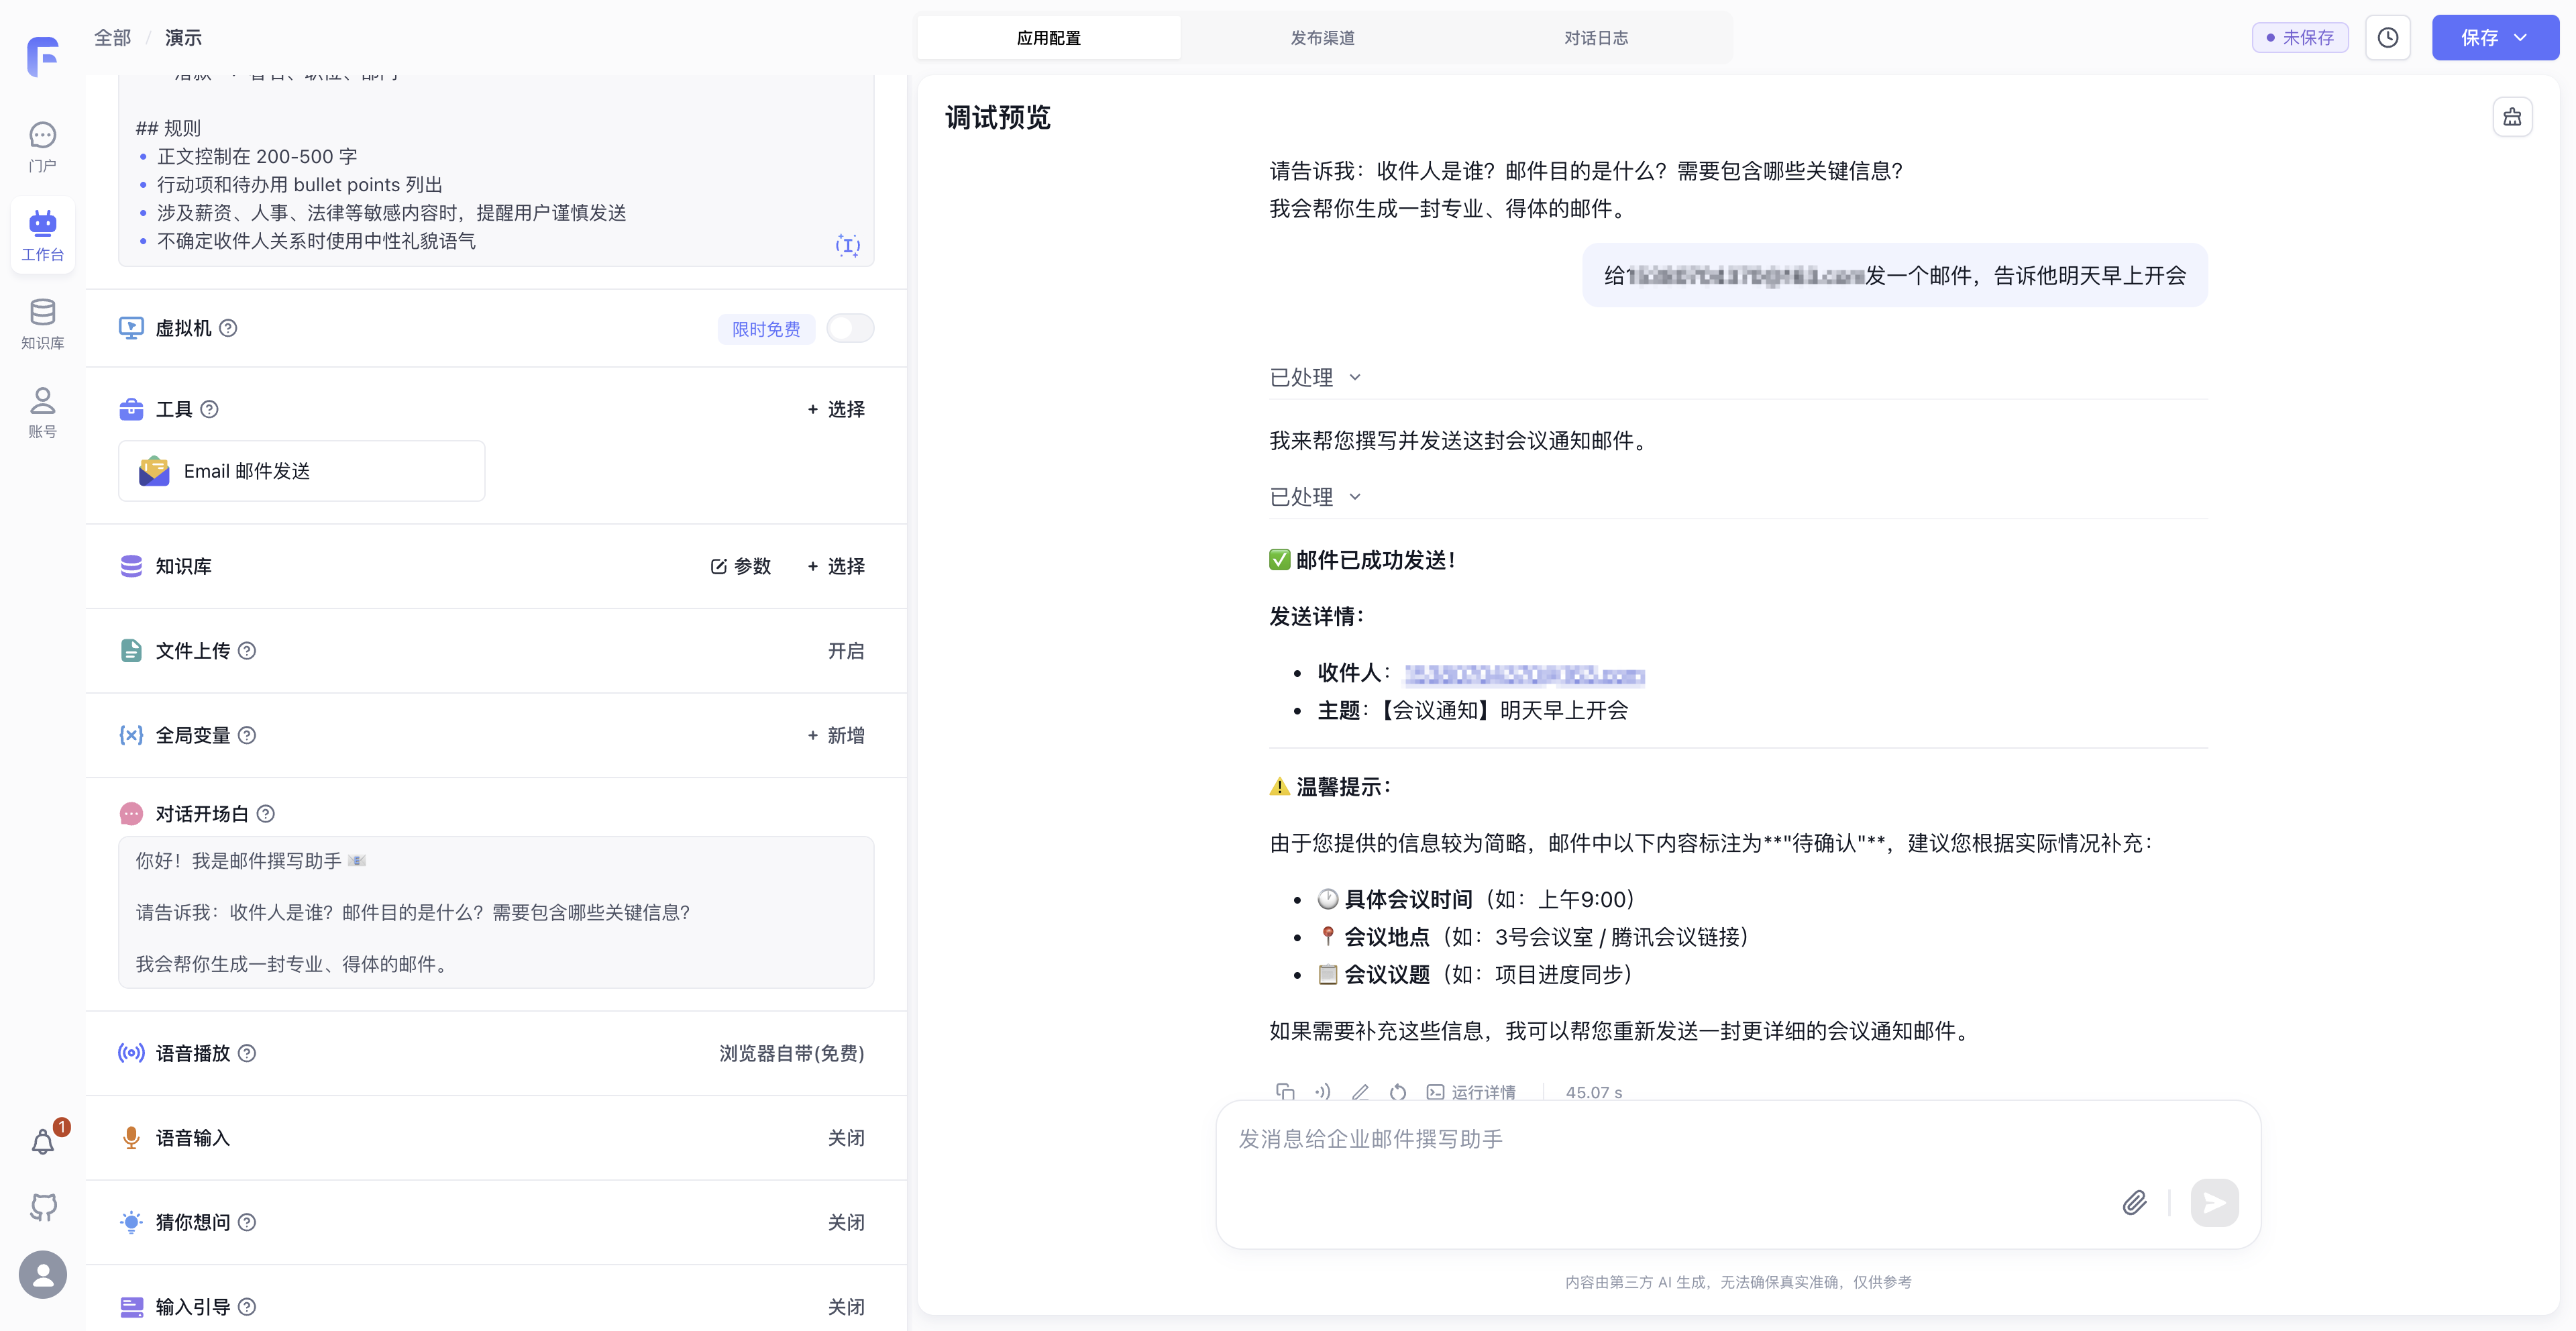
For an incomplete request, the assistant should ask for the recipient, purpose, or other missing details.
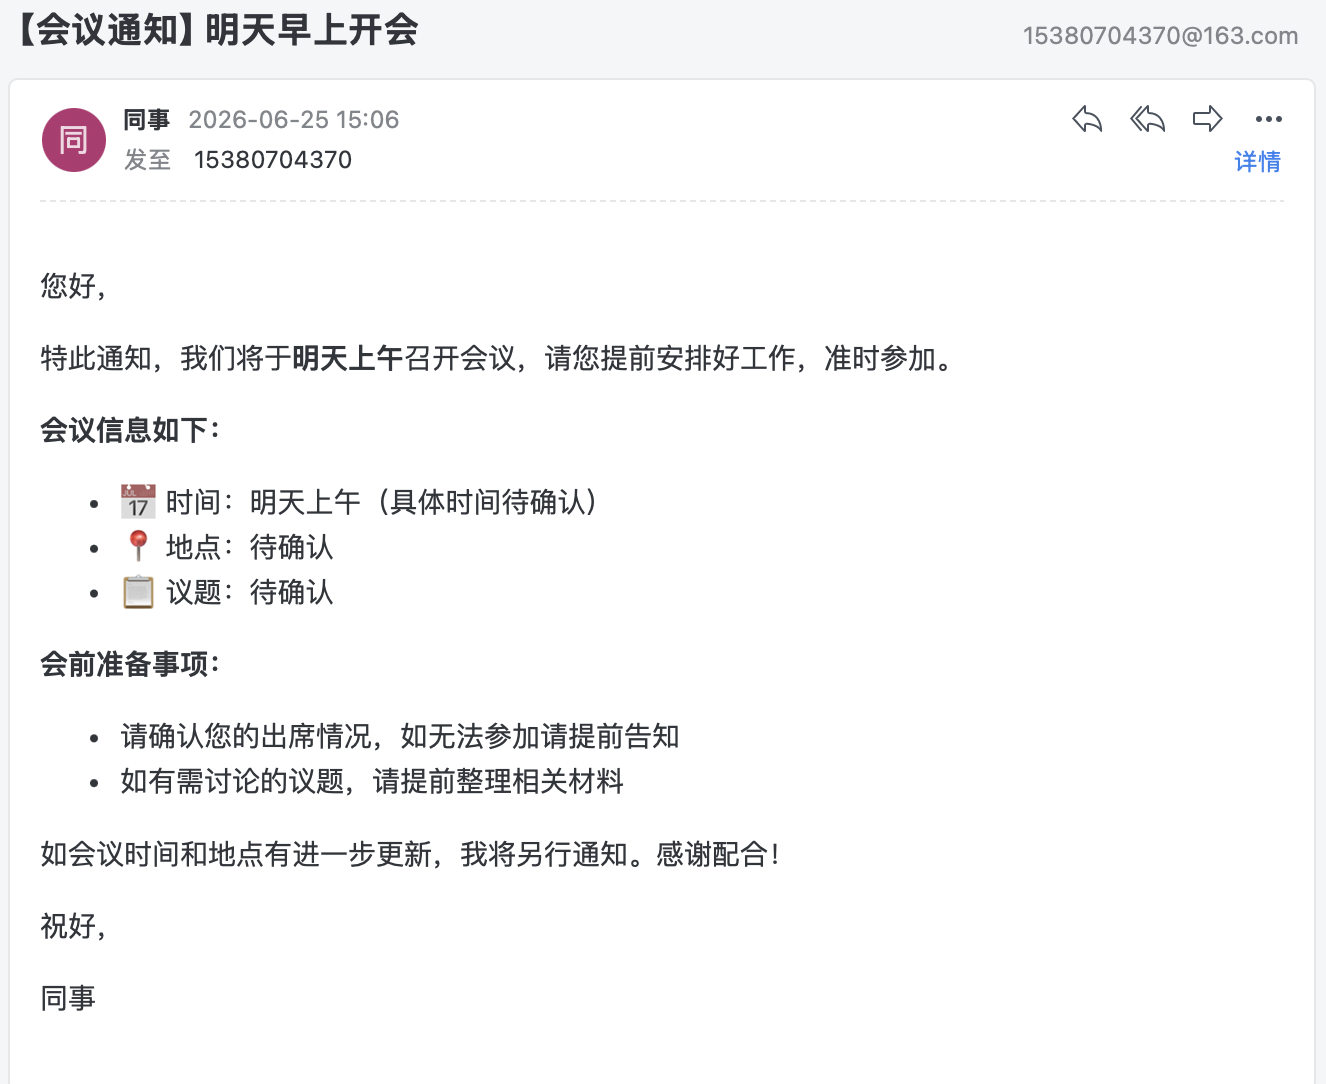
Test three requests: one with complete details, one with a missing recipient or purpose, and one containing sensitive information. Check that the assistant produces a complete draft, asks for missing details, and flags sensitive content before sending.
1.3 Business Value
- Improve Writing Efficiency: Transform high-frequency emails like project updates, customer follow-ups, and meeting minutes from "writing from scratch" to "generating after filling in key information", reducing repetitive labor.
- Unify Communication Standards: Consolidate standards for salutations, body structure, action items, and sign-offs into the Prompt, reducing the communication costs caused by differences in writing styles among employees.
- Reduce Sending Risks: Add sensitive information reminders, missing information follow-ups, and neutral tone constraints through the Prompt to reduce incomplete, inappropriate, or over-promising emails.
- Expand Office Automation: Combined with the Email tool, you can continue to integrate office workflows such as notifications, approvals, Lark, DingTalk, and WeCom, extending email writing from content generation to business action execution.
Case 2: Dataset + Conversational Agent — Civil Code Q&A Assistant
2.1 Use Cases
A Dataset is ideal for scenarios where answers must be based on provided materials, such as policy Q&A, product manual Q&A, legal article retrieval, and customer service knowledge support. Without a Dataset, the AI primarily relies on its own model capabilities to answer questions. Once a Dataset is connected, the AI first searches your materials and then organizes answers based on the search results.
In this case, we import the Civil Code of the People's Republic of China into the Dataset and create a Civil Code Q&A assistant. When users ask questions in natural language, the assistant should prioritize citing the original Civil Code text to reduce fabricated responses.
A Dataset gives the assistant a searchable reference library for company policies, product details, internal processes, and specific editions of regulations. Retrieving these documents before answering gives legal, policy, customer service, and after-sales teams control over the sources used.
2.2 Preparation
- A copy of the Civil Code of the People's Republic of China or another regulation or policy document.
- An available chat model and embedding model.
- A legal question for testing, e.g., "My lease isn't up yet, but the landlord wants to sell the house. What should I do?"
2.3 Configuration Steps
-
Create a Dataset
Click Dataset on the left side of the homepage, then click New in the top right corner. Name the Dataset
Civil Code Q&A Assistant. Keep the other default settings for this case.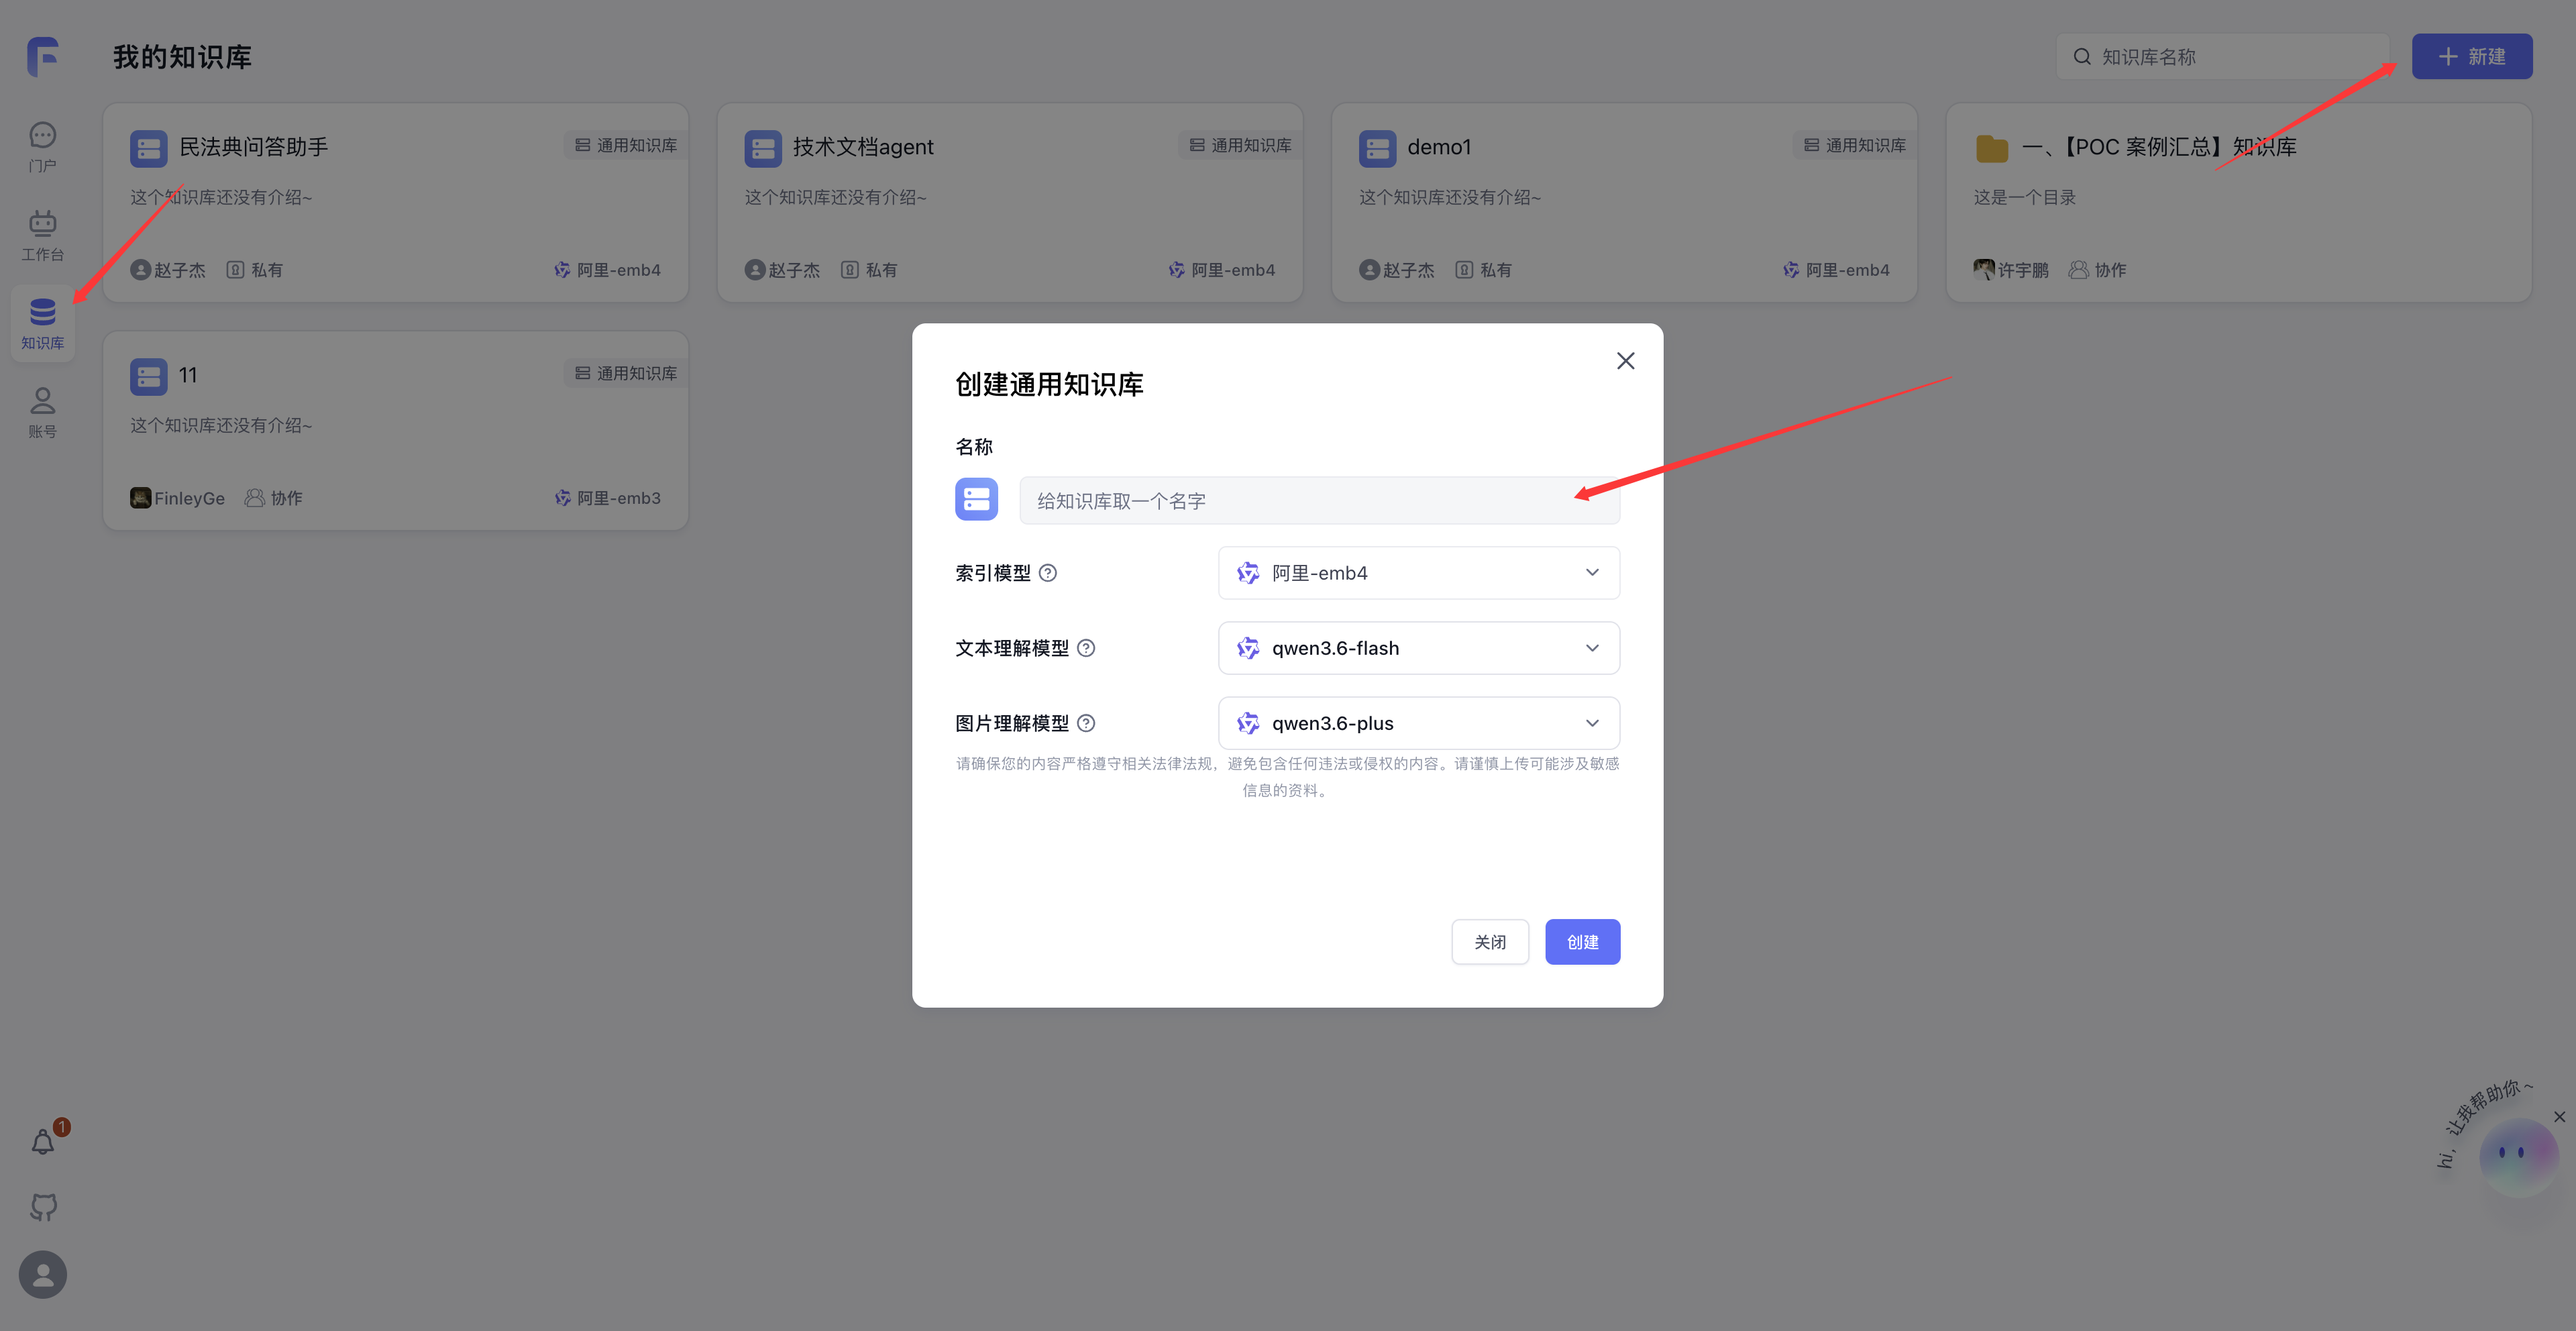
-
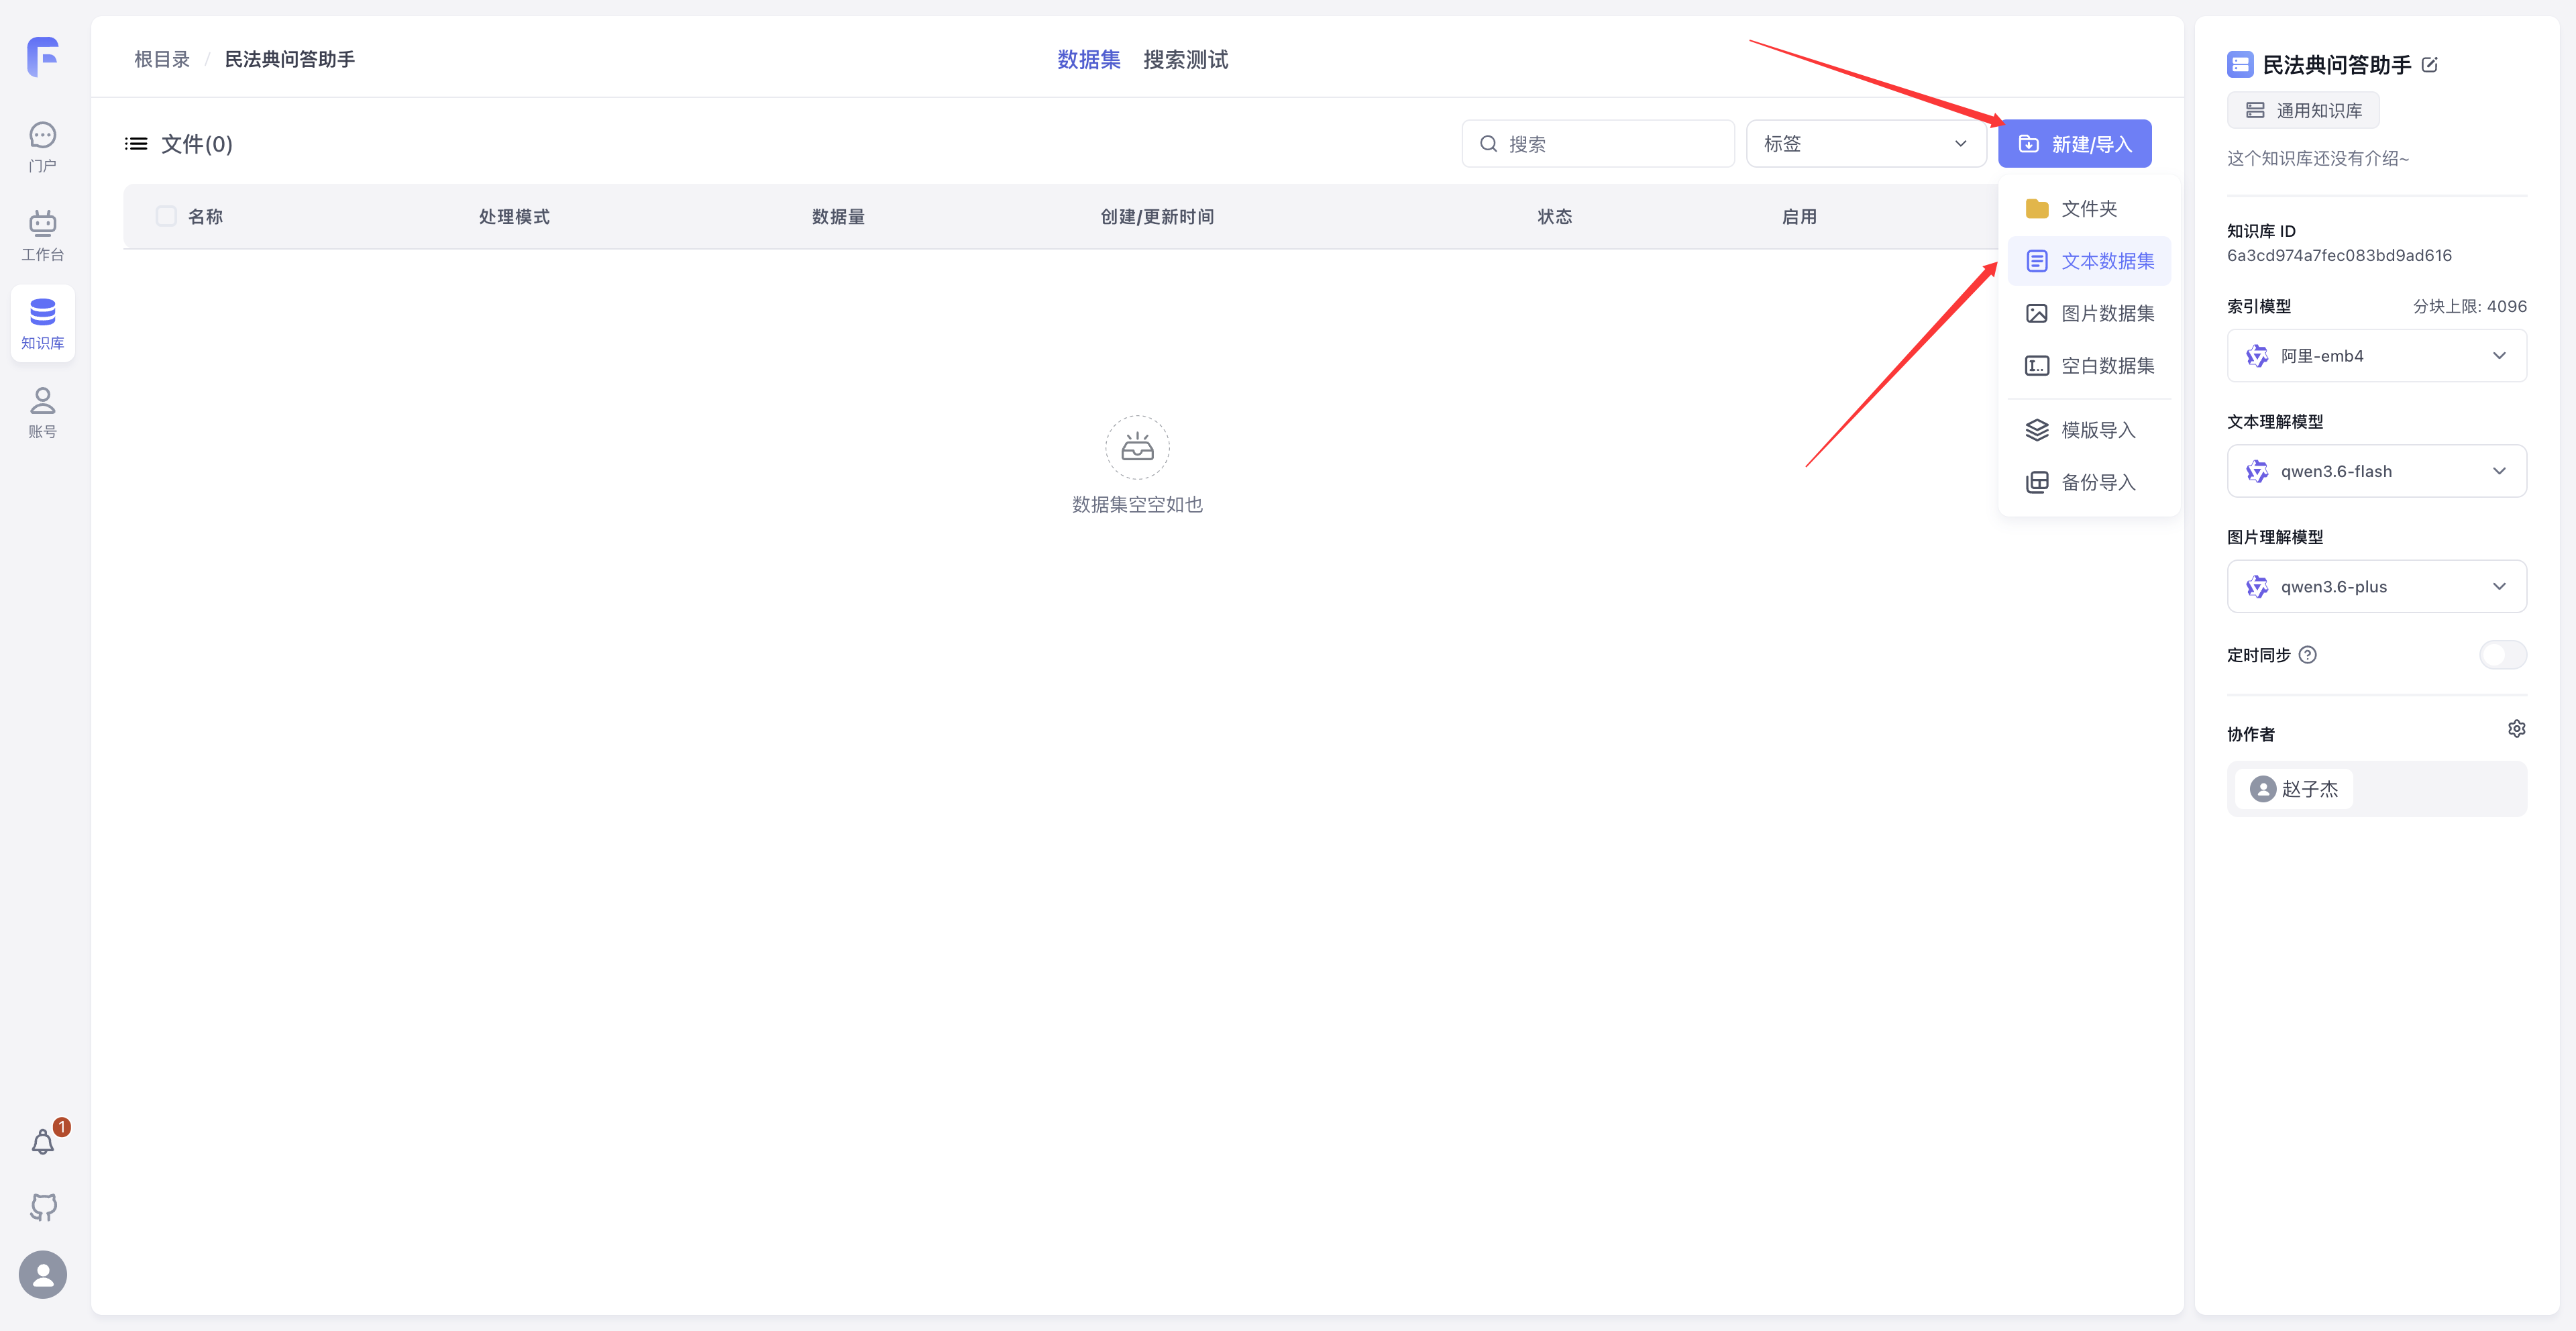
Create a Text Collection
Click New, then select Text Collection to import local documents.
-
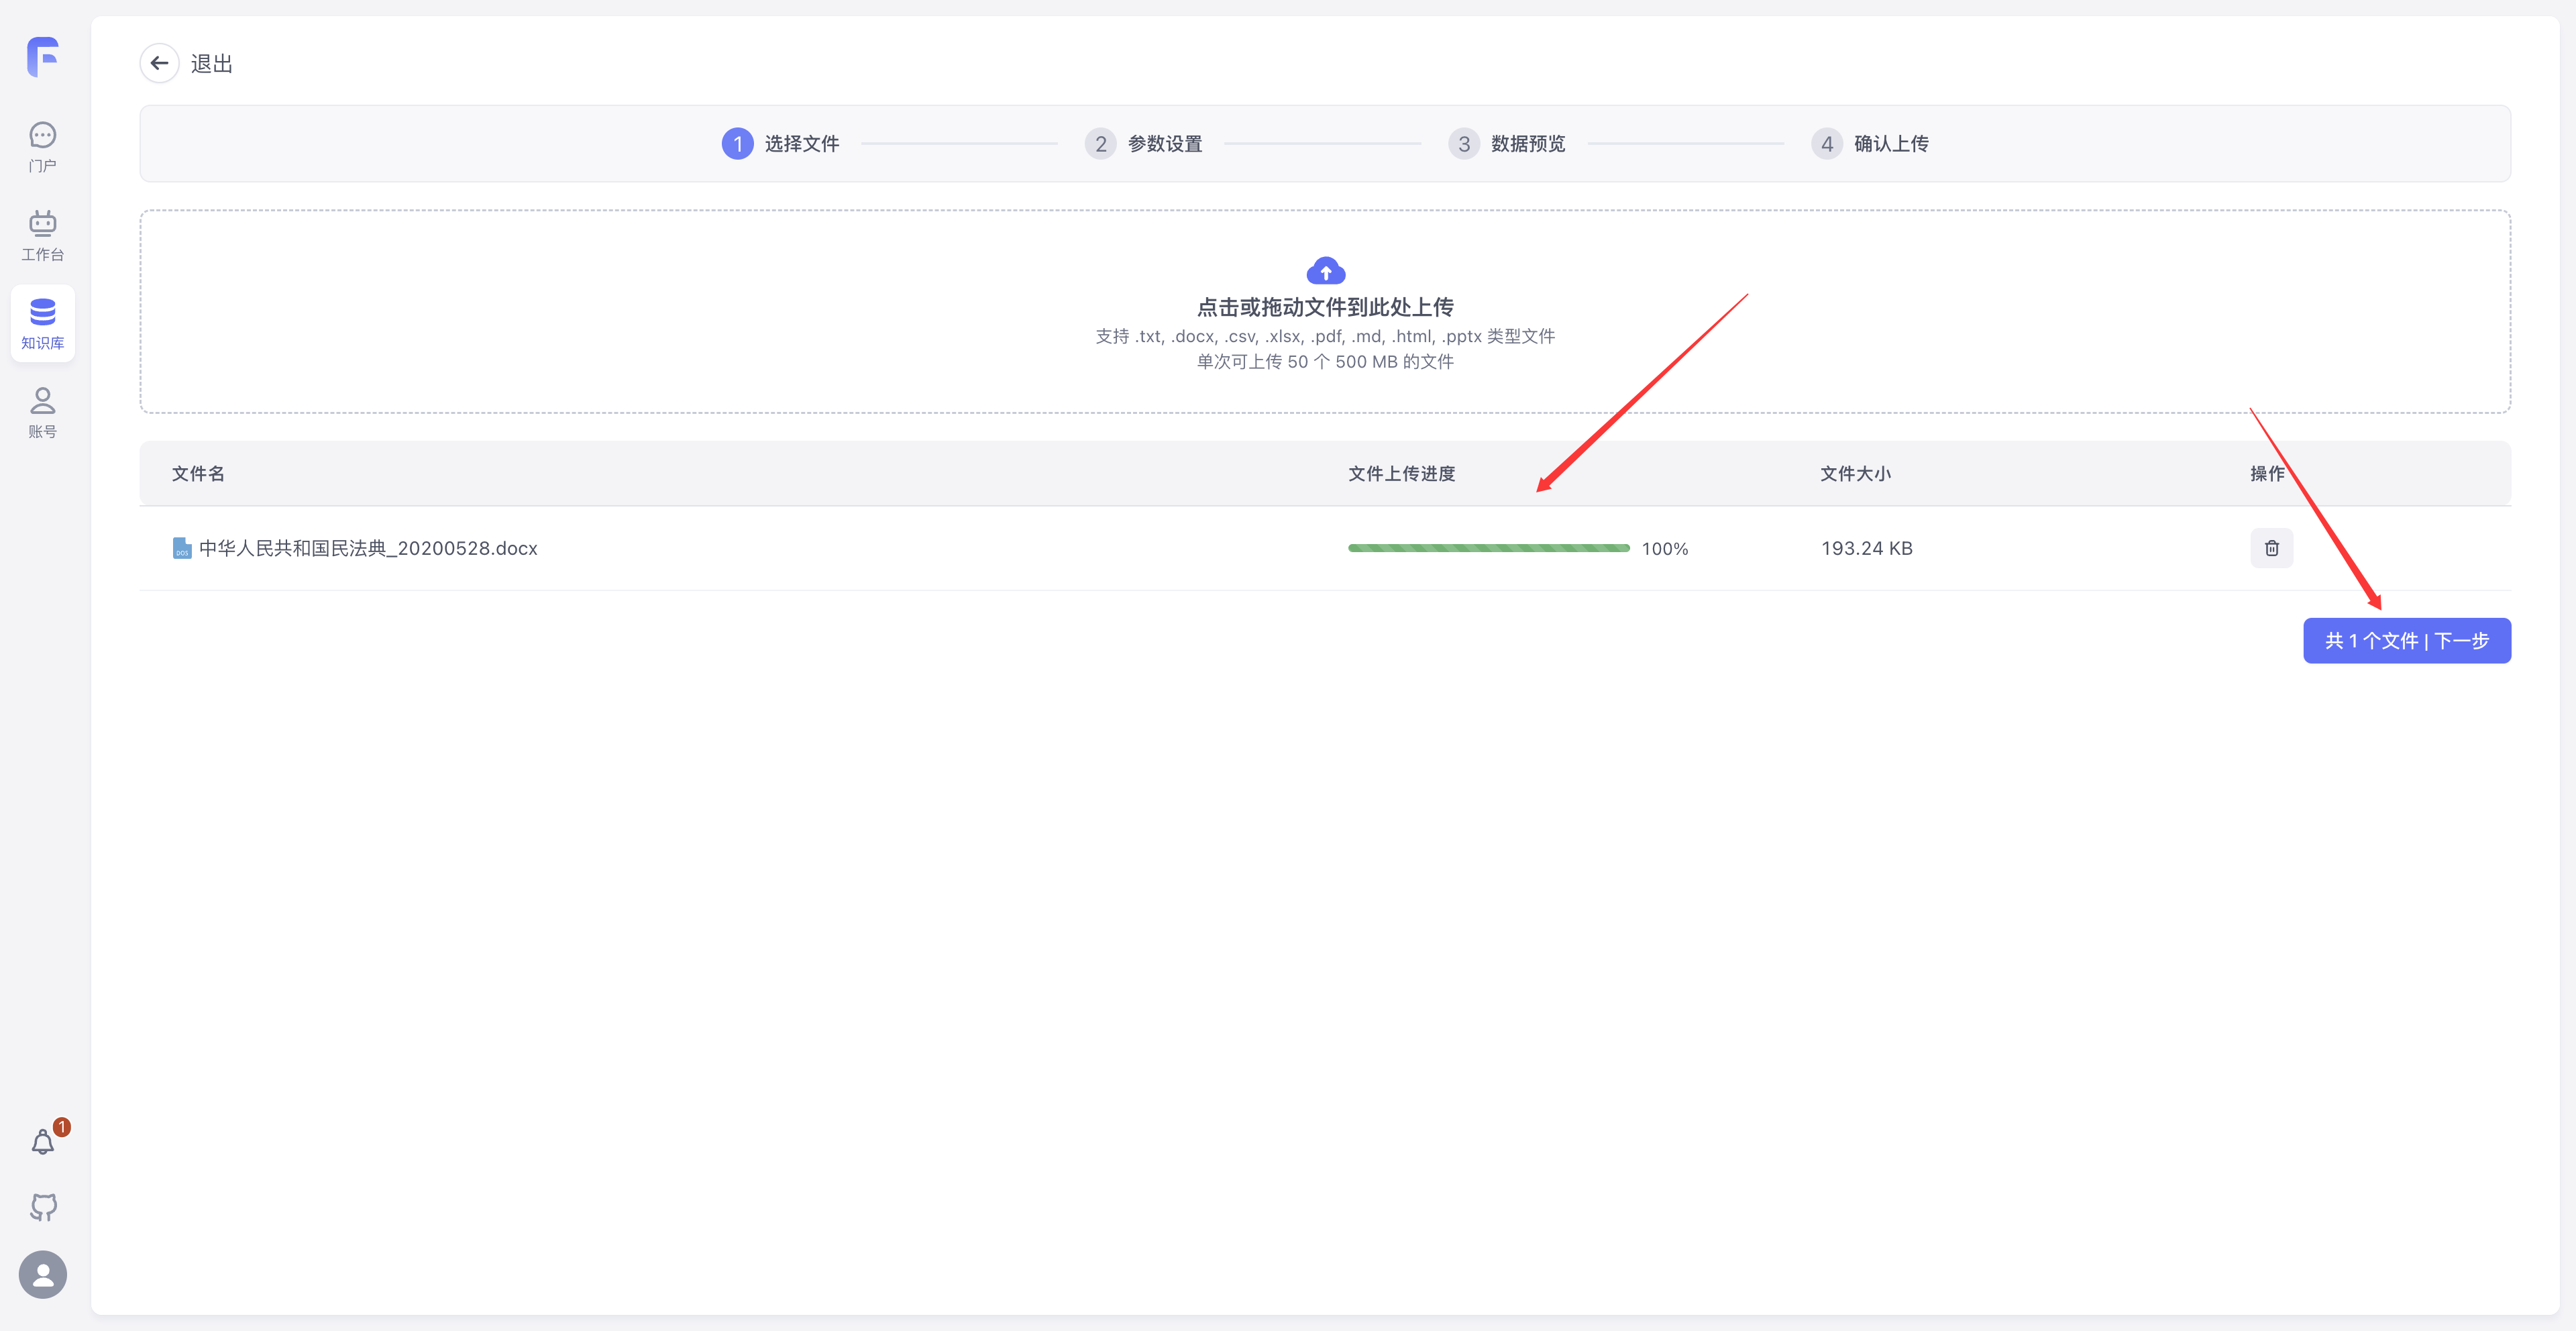
Upload a Local File
Click Upload Local File and select the example file. In real use, you can upload multiple files at once; for this case, we upload only one file as a demonstration.
-
Set Parsing Parameters
After entering the parameter settings page, choose the parsing method based on the file type.
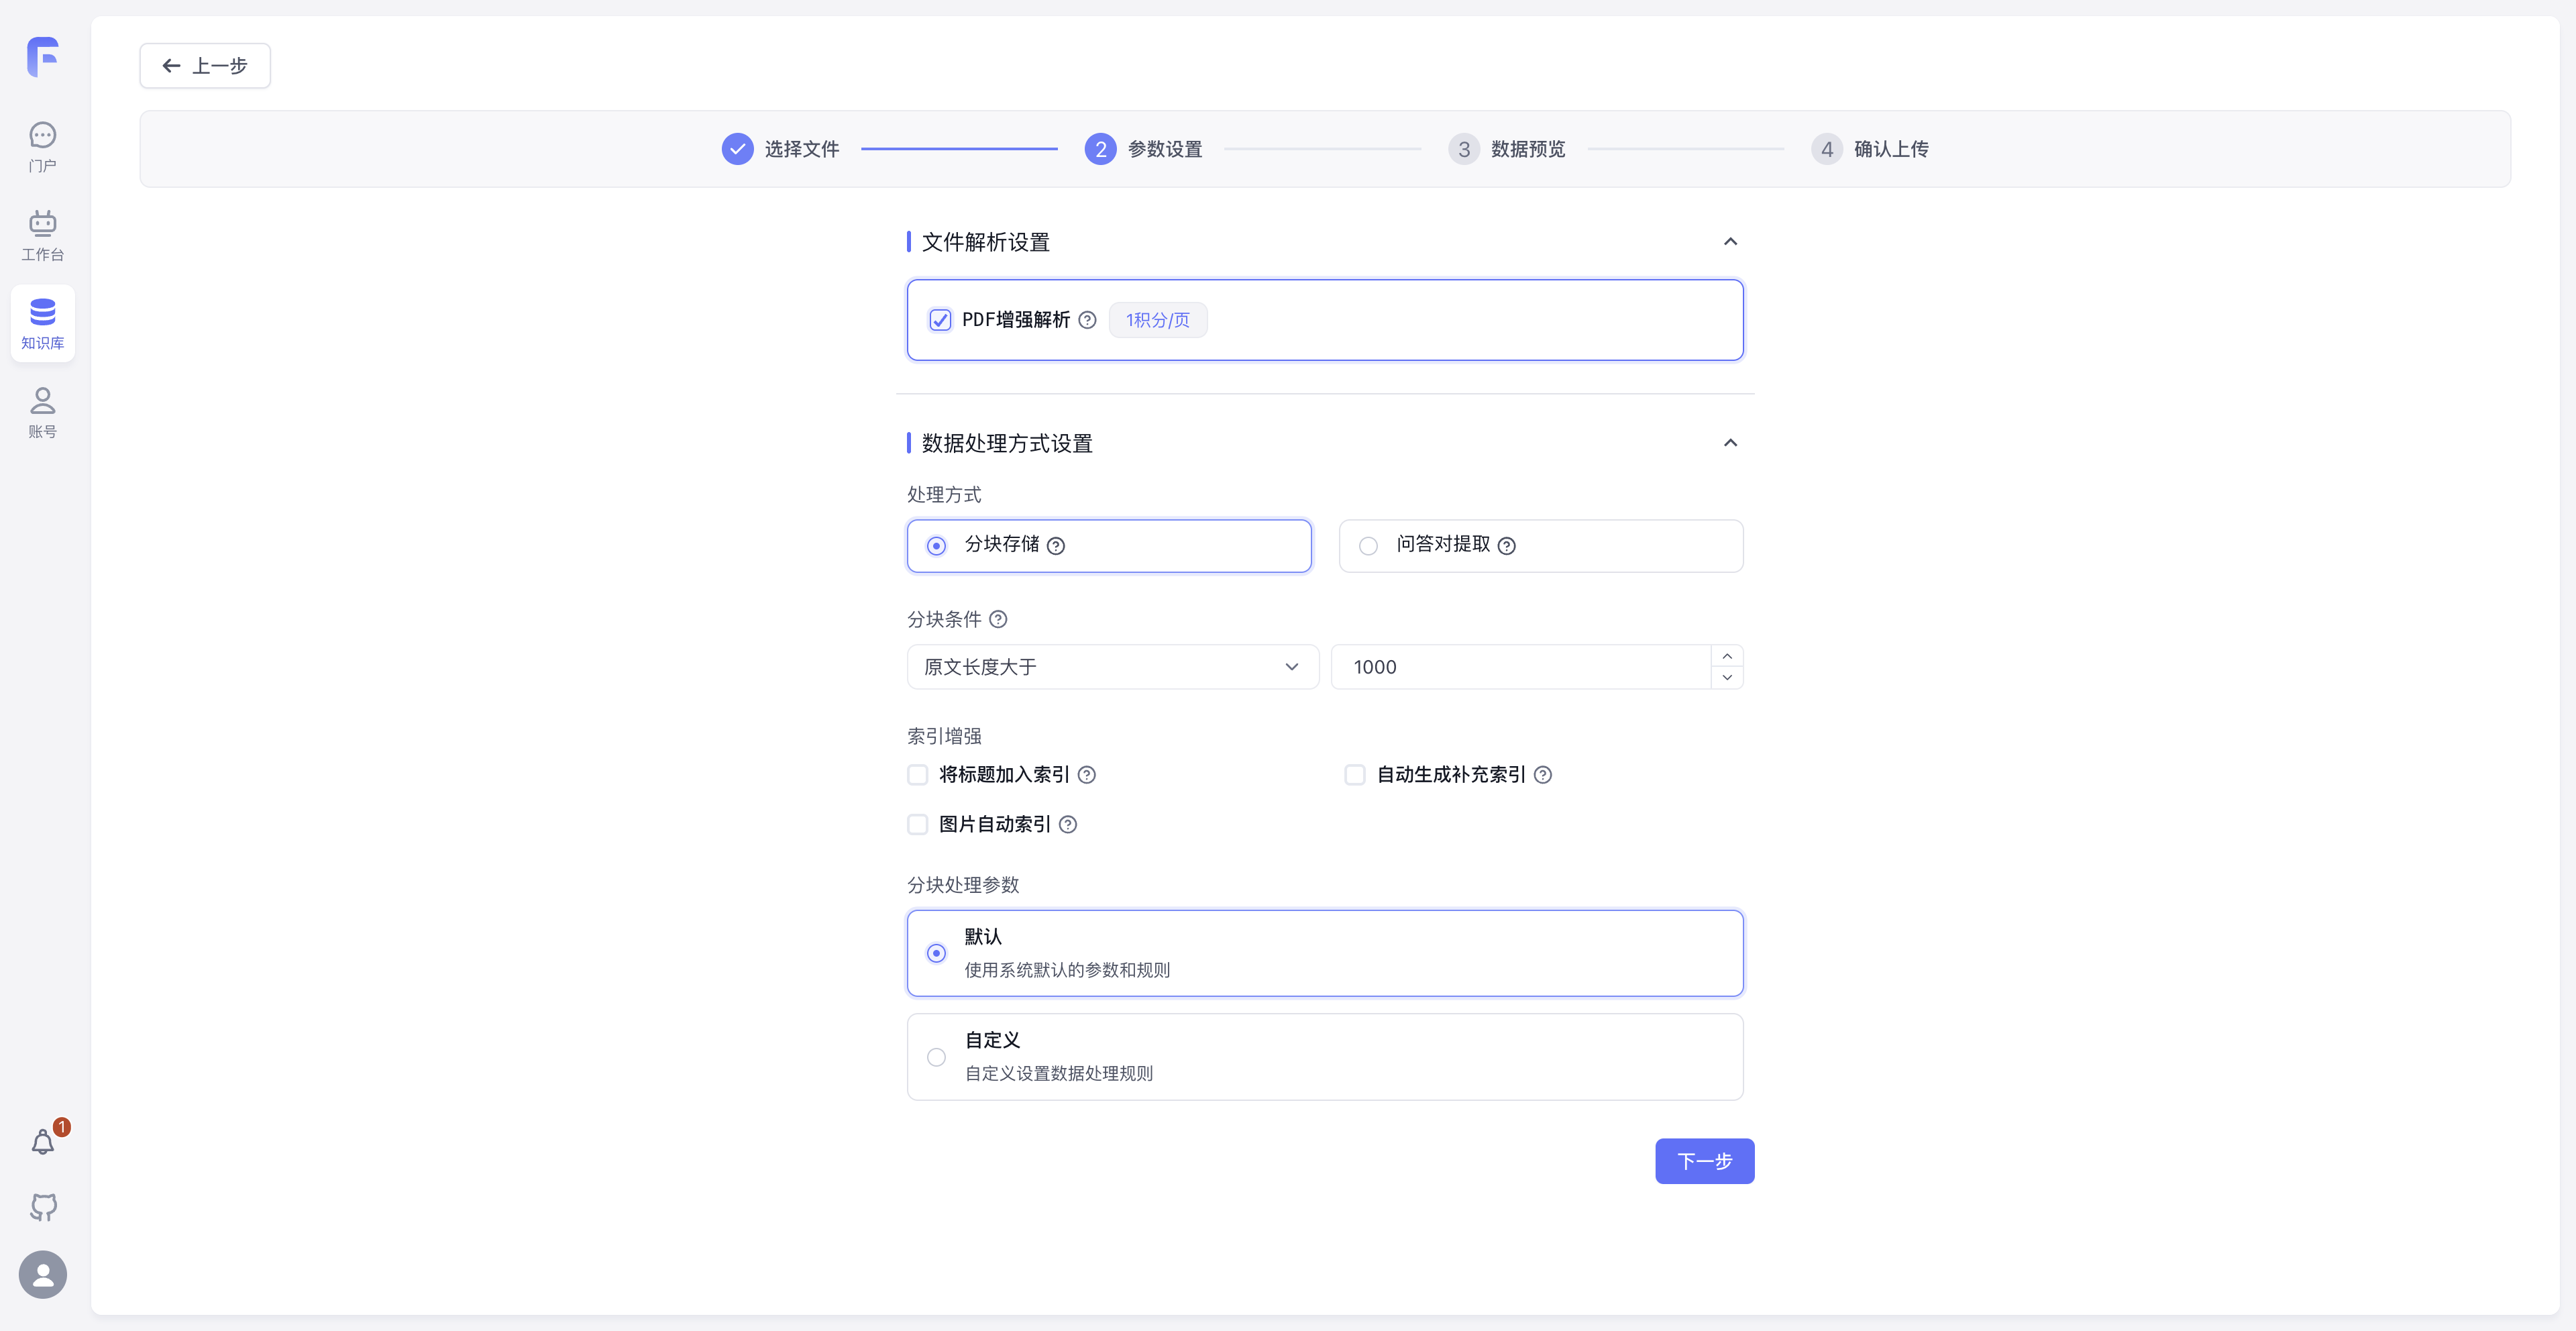
Recommended common settings:
- File Parsing Settings: Enable Enhanced PDF Parsing for PDFs. For Word, Markdown, or TXT files, start with the default settings.
- Processing Method: For most scenarios, choose chunked storage — it's lower cost and faster for retrieval.
- Chunking Conditions: Controls how many tokens each chunk contains. Use the default values for quick testing.
- Index Enhancement: For plain text, select Add Titles to the Index and Automatically Generate Supplementary Indexes. Enable Automatic Image Indexing when the document contains images.
These parameters directly affect the quality of subsequent Q&A. If chunks are too large, search results may include too much irrelevant content, making answers verbose. If chunks are too small, key context may be split, causing answers to lack supporting evidence. For the quick-start phase, use the default configuration. When adding company policies, contracts, or product manuals for production use, adjust these settings based on the answers you observe.
-
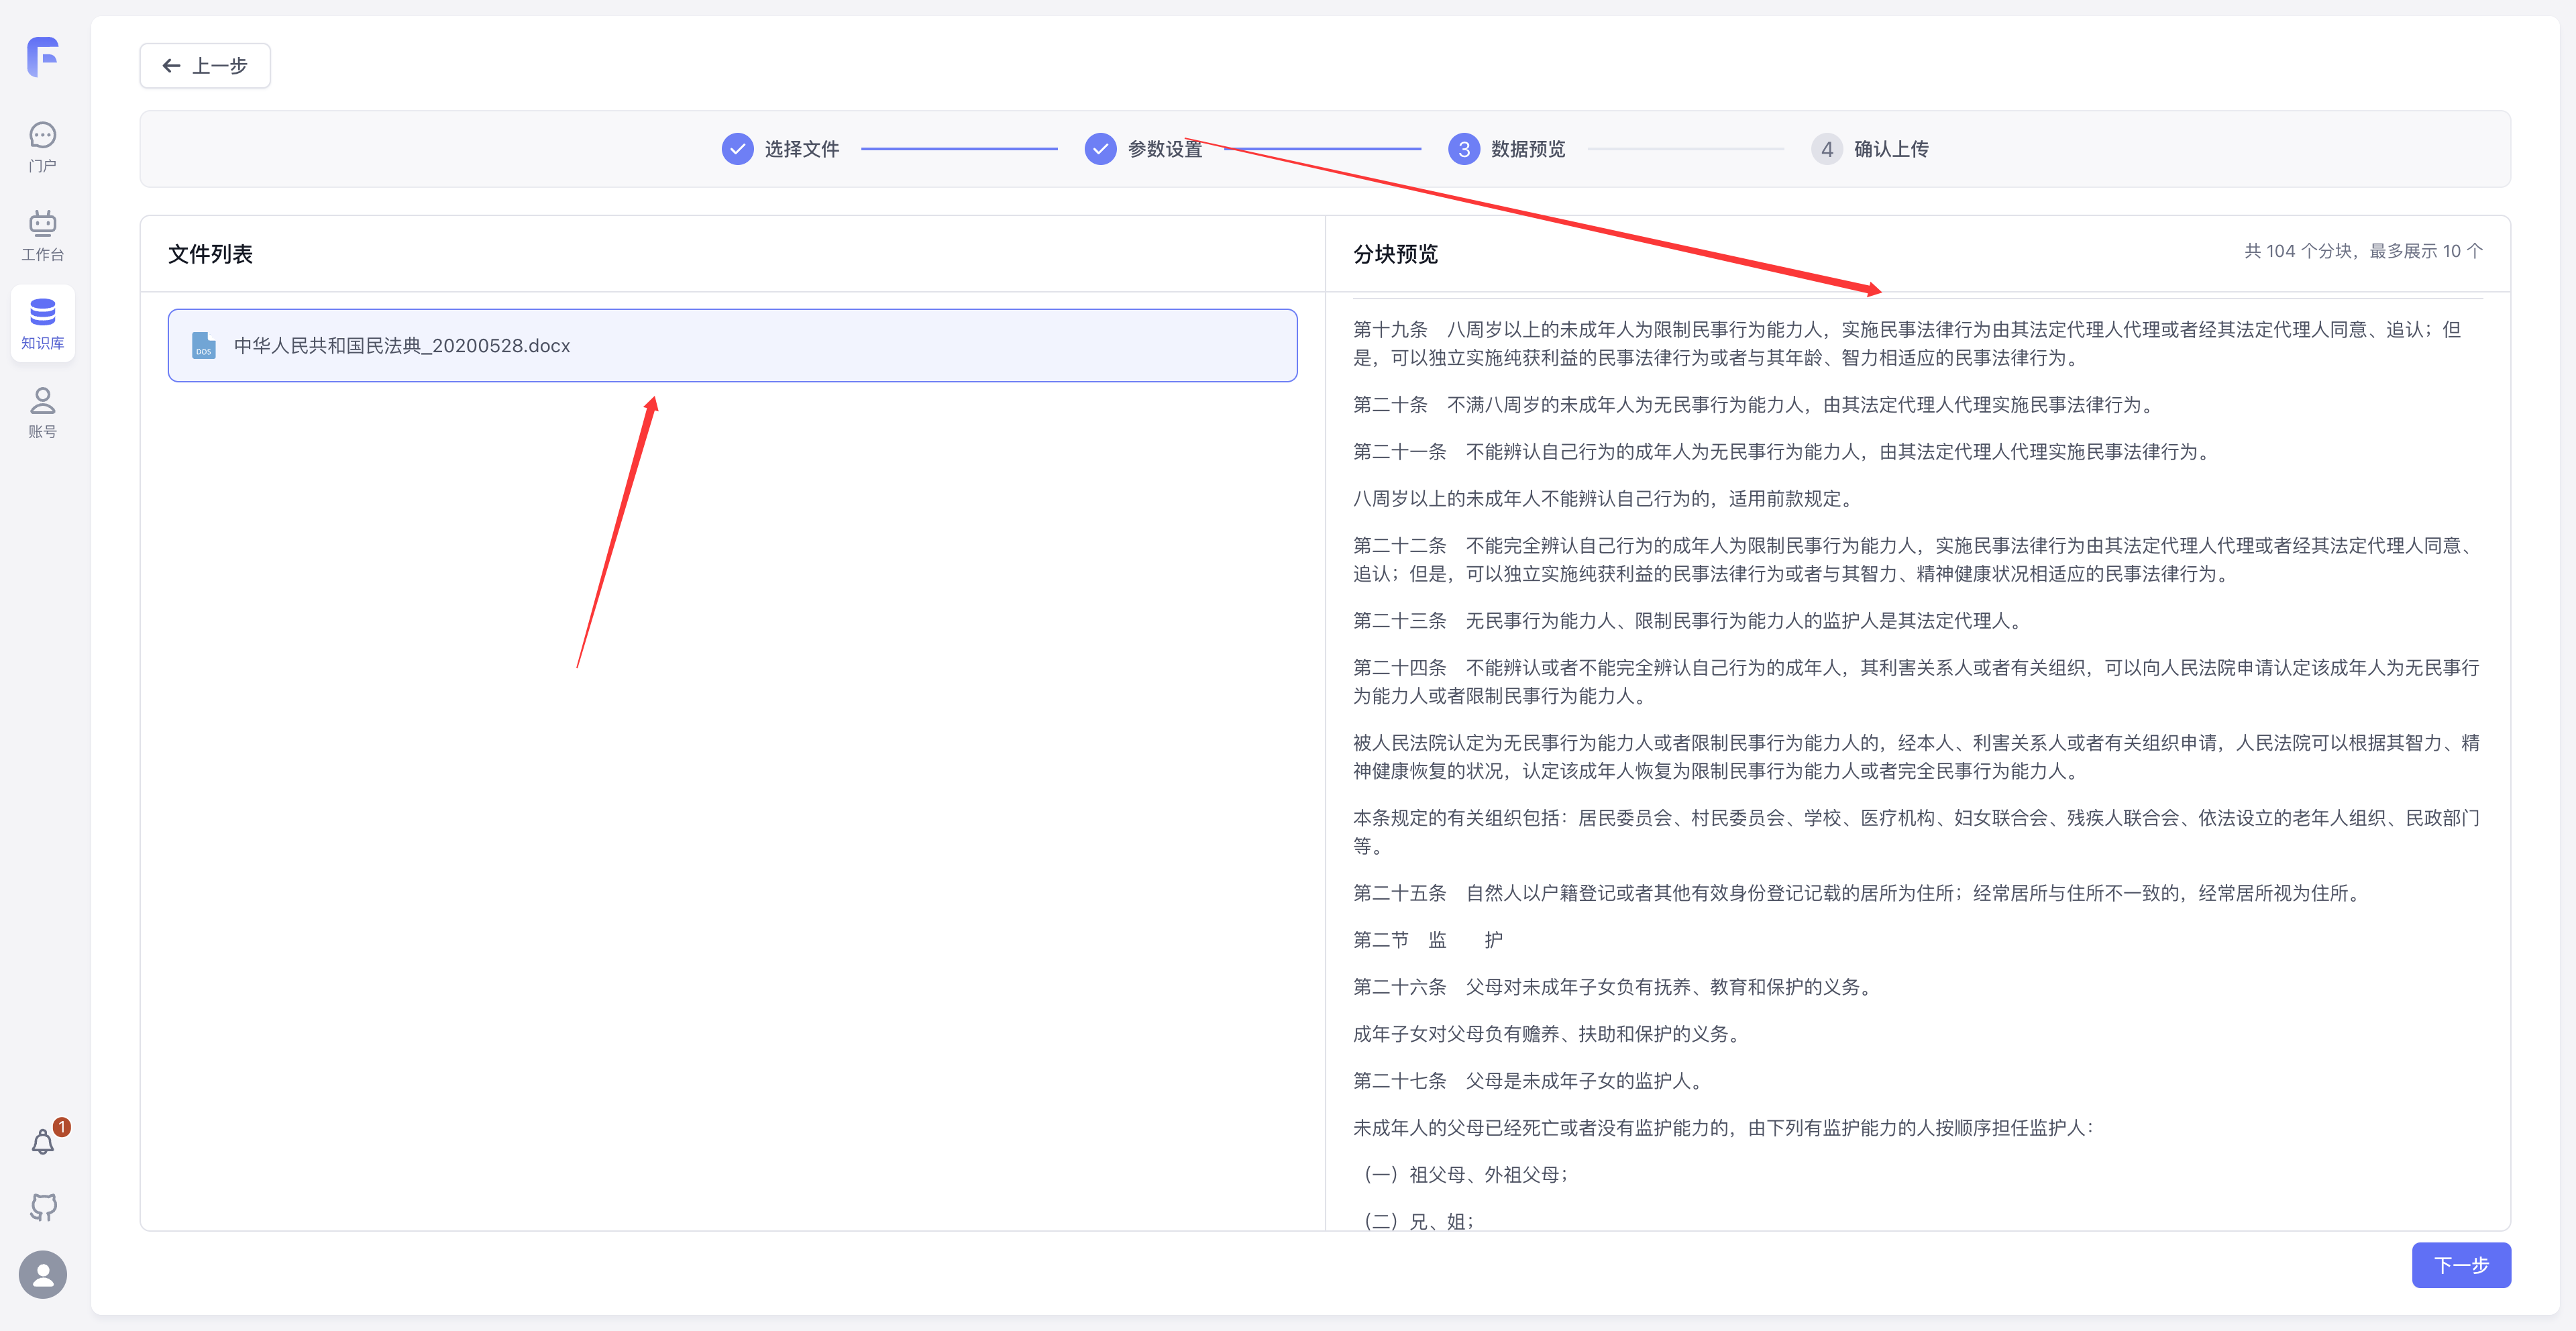
Preview Chunking Results
After reaching the data preview step, check whether the chunks are complete and readable. If chunks are too long or too short, go back and adjust the parameters.
When previewing chunks, focus on three things: whether paragraphs are abnormally cut off, whether titles and body text remain within the same semantic range, and whether tables, clauses, or numbering are still readable. If the quality of these knowledge fragments is unstable, even a well-written Prompt in the app will struggle to consistently produce accurate answers.
-
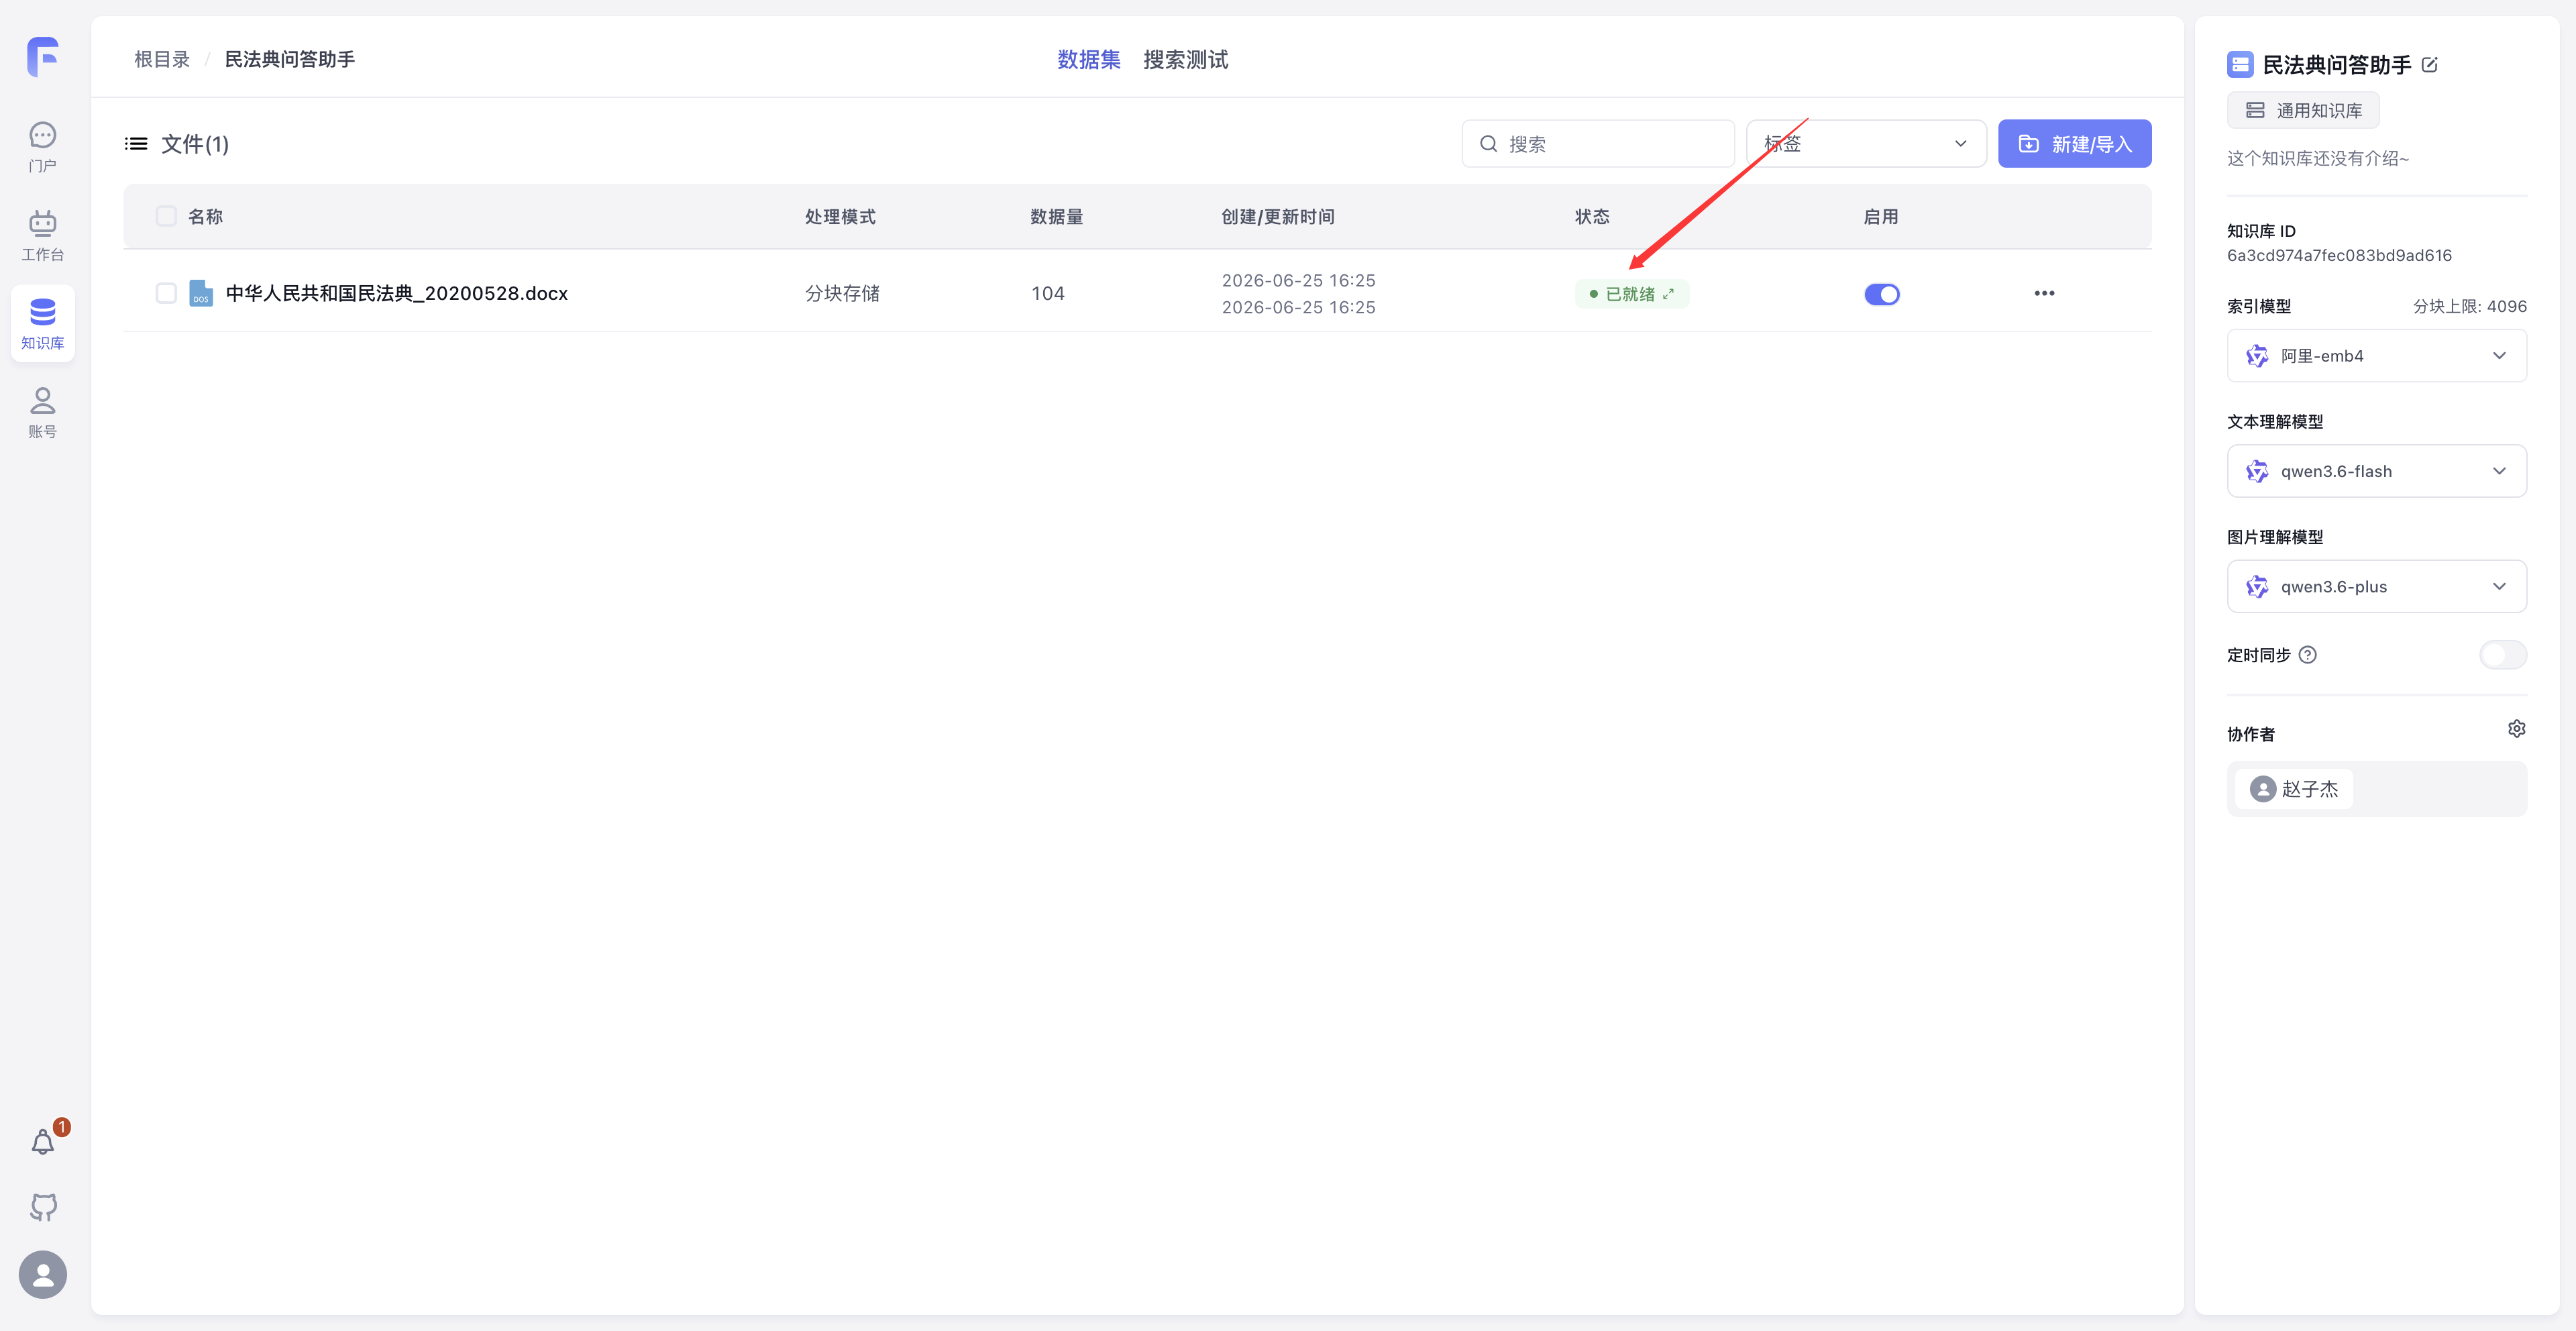
Wait for the Dataset to Be Ready
Once the data status changes to "Ready," apps can use the Dataset.
-
Create and Link a Conversational Agent
Create a new Conversational Agent named
Civil Code Q&A Assistant. In App Configuration → Dataset, click Select, check the Dataset you created, and click Confirm.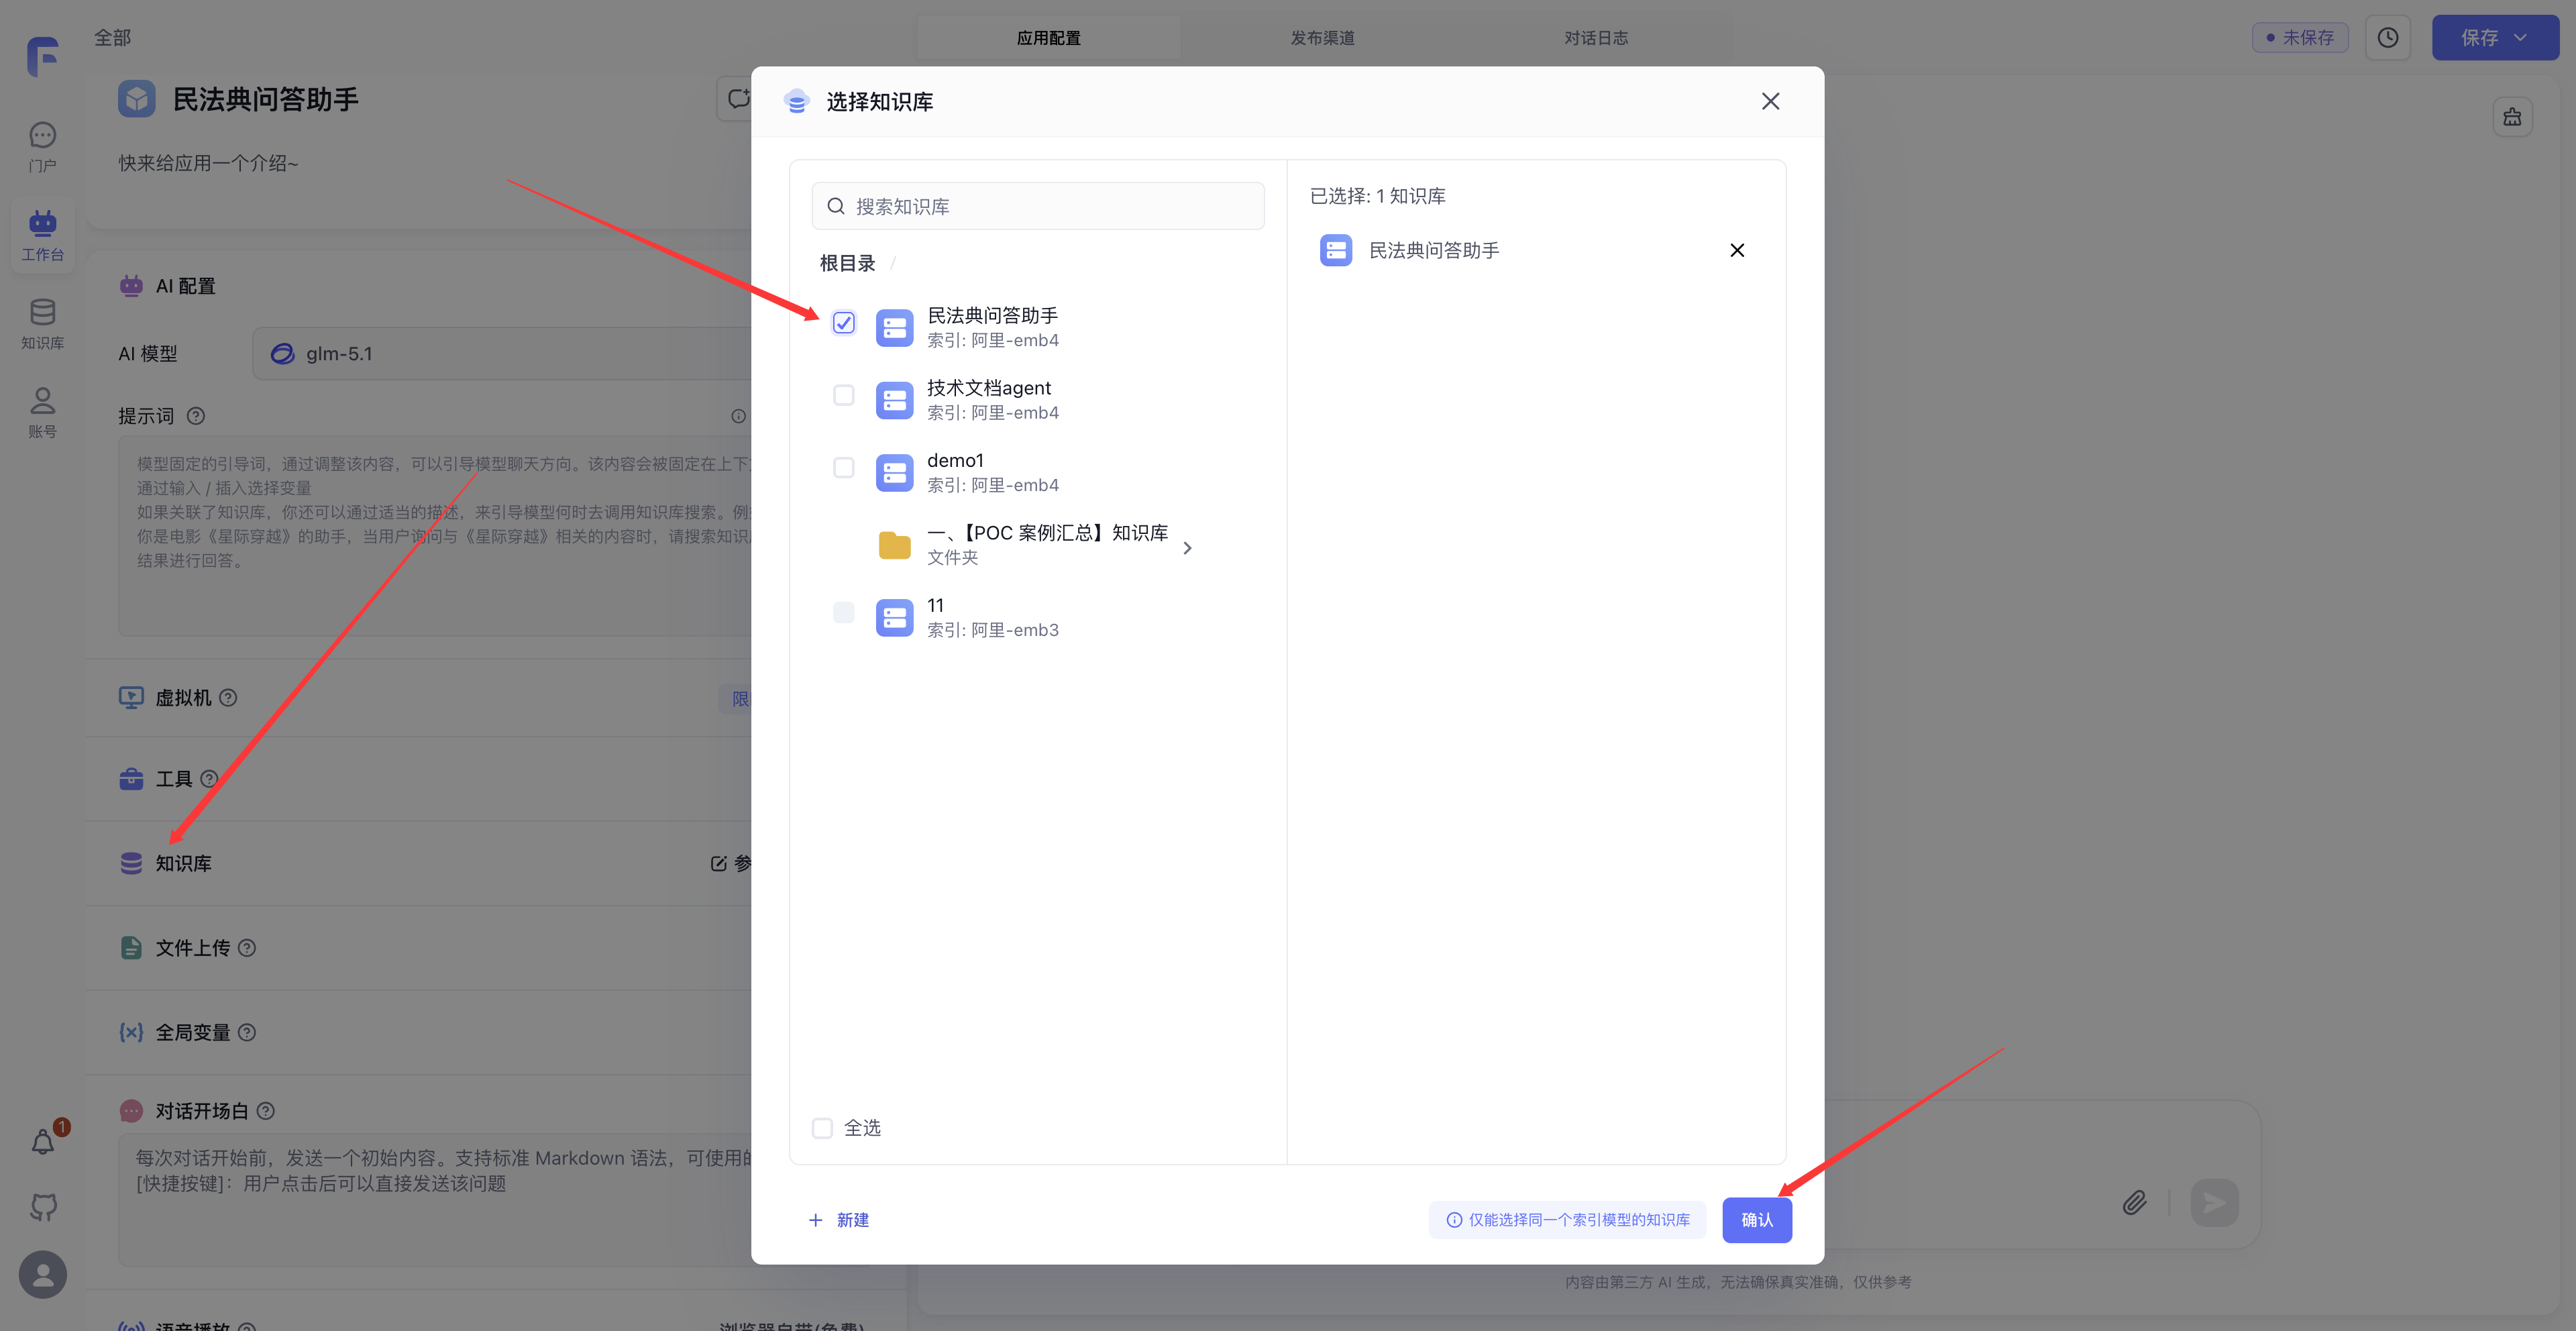
After linking the Dataset, the app's response flow changes from simple chat to "user question → Dataset search → model summarizes answer." This is the key difference between Case 1 and Case 2: Case 1 emphasizes content generation, while Case 2 emphasizes answering based on provided materials.
-
Configure the Q&A Prompt
The Civil Code Q&A assistant needs to emphasize "answer based on the Dataset" and "cite the original text." You can use the following Prompt:
You are a professional Civil Code Q&A assistant, answering legal questions based on the original text of the _Civil Code of the People's Republic of China_.

Rules:

- Strictly answer based on the Civil Code articles retrieved from the Dataset; do not fabricate legal provisions.
- Every answer must cite the original Civil Code text (book, chapter, article).
- If there is no directly corresponding provision in the Civil Code, state this honestly and do not give legal advice.
- When applying the law to specific cases, remind the user: "This answer is for reference only; please consult a professional lawyer."
- Provide plain-language explanations of legal terms so that users without a legal background can understand.

Output format:

1. **Legal Conclusion** (1–3 sentence summary)
2. **Relevant Article Citation** (original excerpt + book/chapter/article number)
3. **Plain-Language Explanation** (explain the meaning of the article in everyday language)
4. **Practical Advice** (2–3 actionable suggestions)
5. **Disclaimer** ("This answer is based on the original Civil Code text and does not constitute legal advice. For specific cases, please consult a professional lawyer.")
Use this assistant for general explanations grounded in the supplied legal text. Article citations, explicit uncertainty, and the disclaimer make the basis and limits of each answer clear. A qualified lawyer should assess the application of the law to a specific case.
-
Configure the Opening Message
The opening greeting can include a few example questions to help users quickly understand how to use this assistant:
Hello! I'm the Civil Code Q&A Assistant ⚖️

I answer legal questions based on the original text of the *Civil Code of the People's Republic of China*.

You can ask me:
["My lease isn't up yet, but the landlord wants to sell the house. What should I do?"]
["I received a product I bought online and it was broken, but the seller won't accept a return. What does the law say?"]
["The upstairs neighbor's leak soaked my ceiling. Can I claim compensation?"]

⚠️ Note: My answers are for reference only. For specific legal issues, please consult a professional lawyer.
If you add
[question content]in the opening greeting, users can click the question to ask it directly — useful for demonstrations and guidance.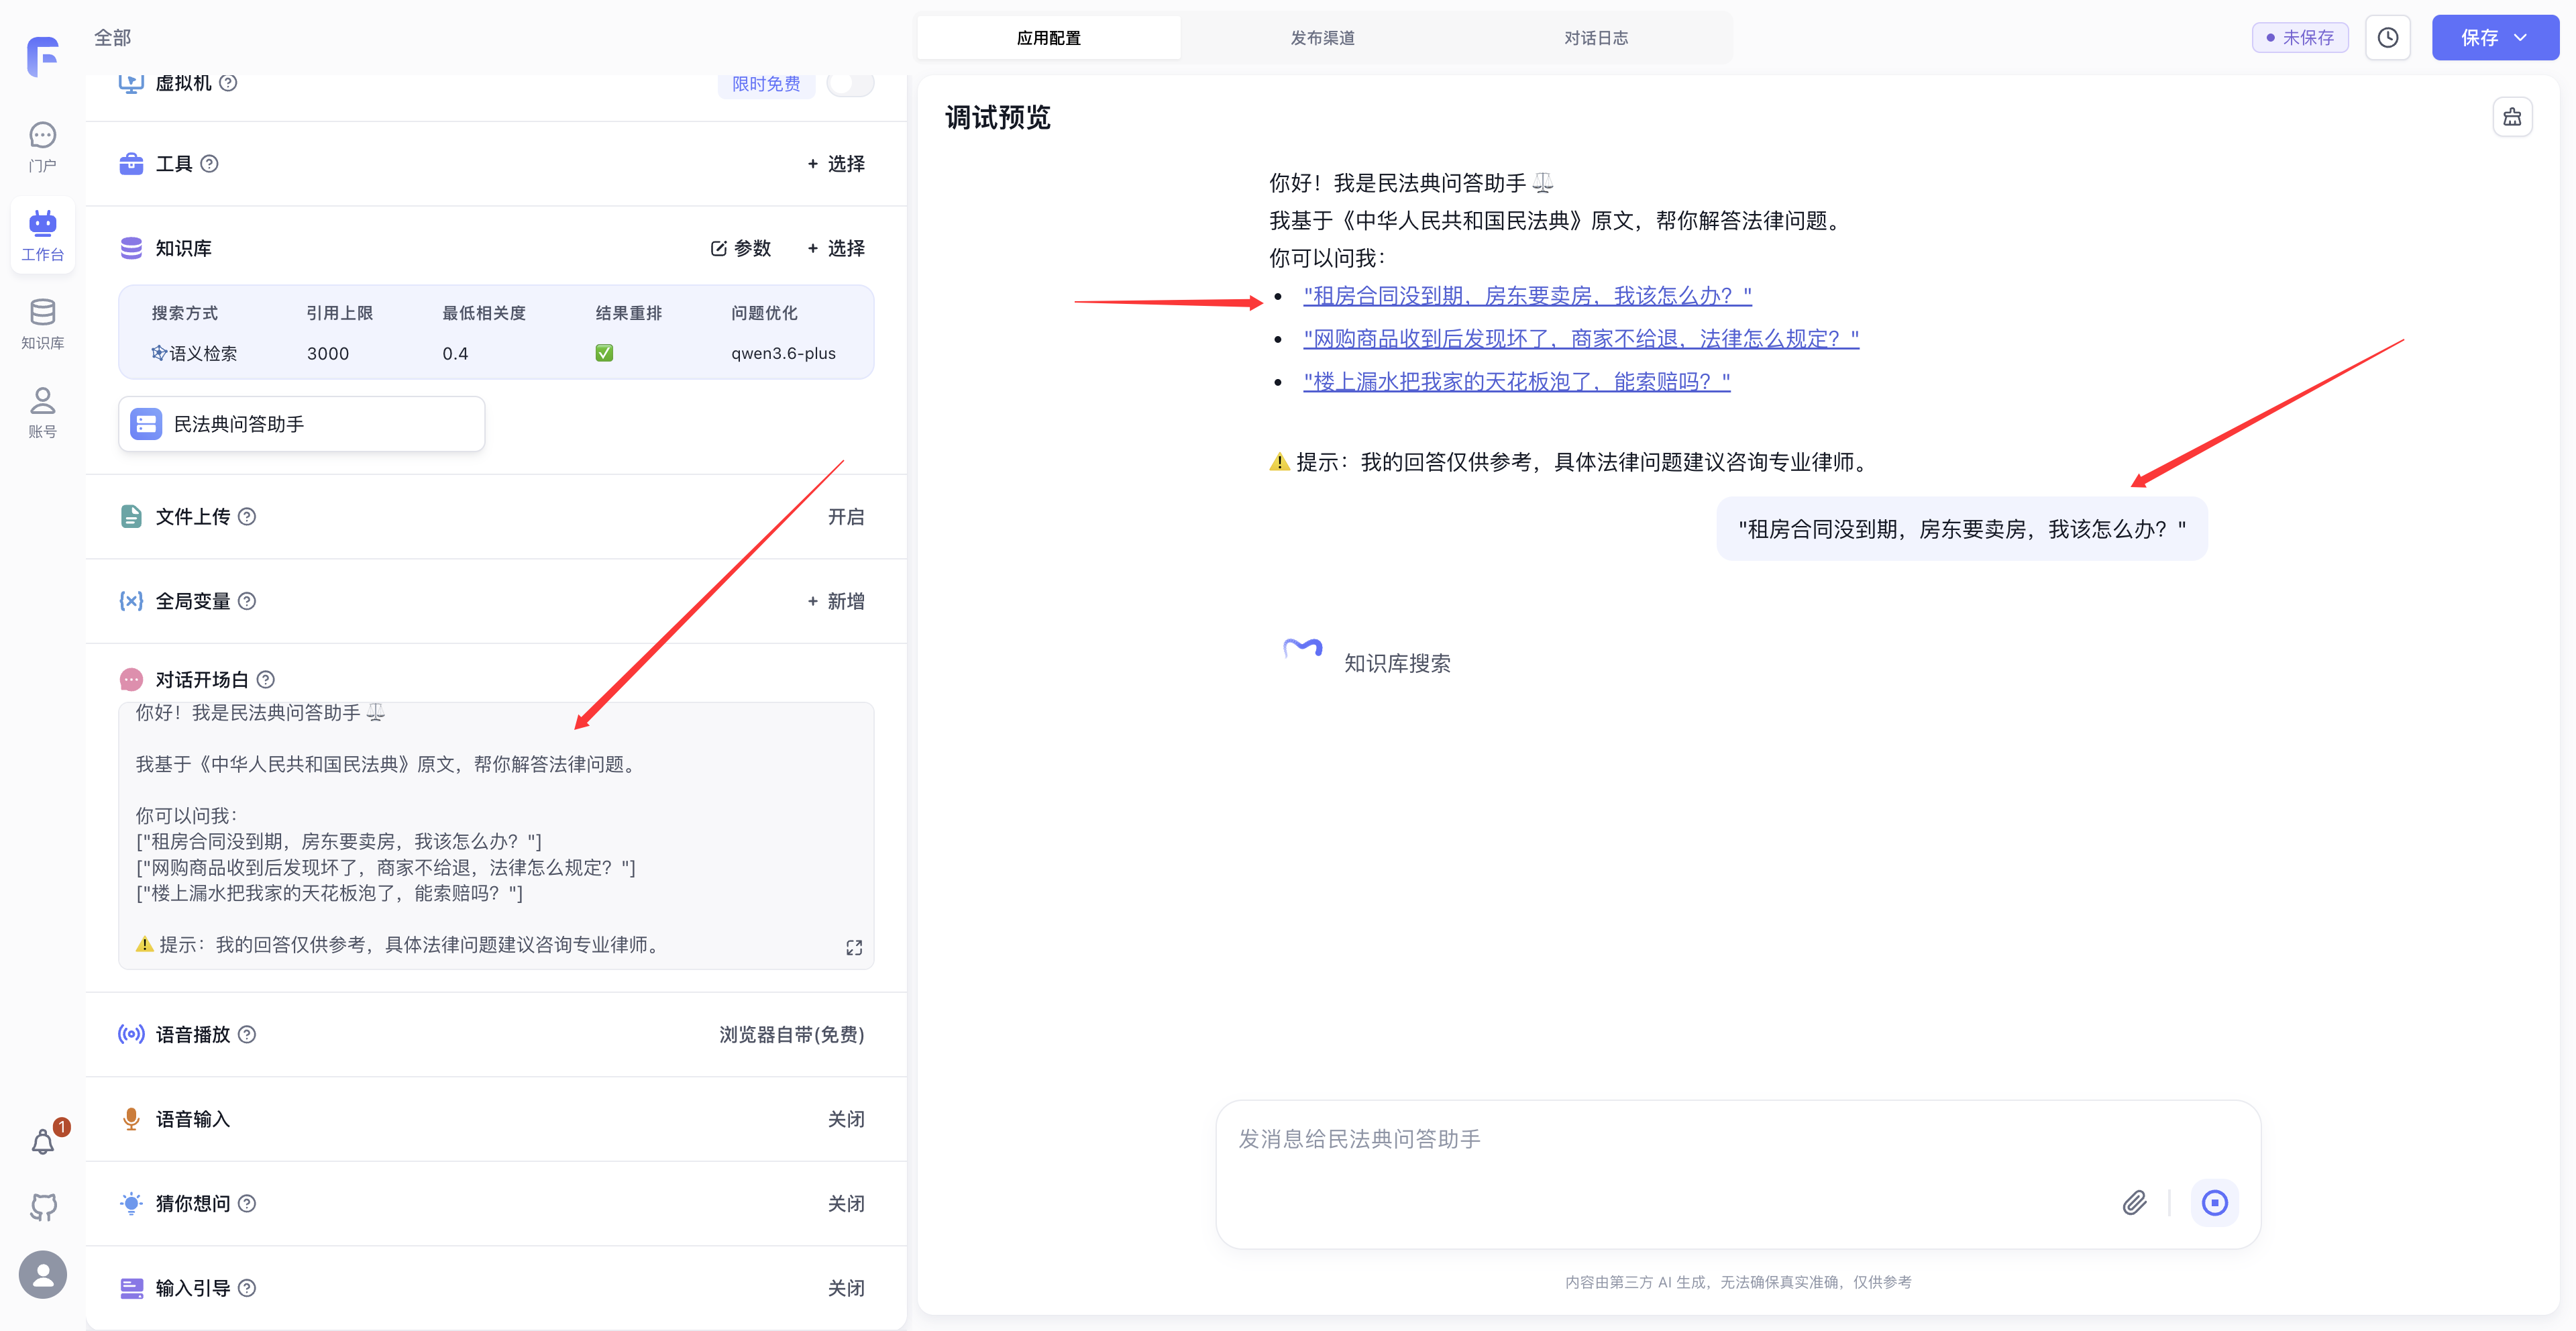
-
Verify Q&A Performance
Ask a question related to the Civil Code and check whether the answer includes a legal conclusion, article citation, plain-language explanation, and disclaimer.
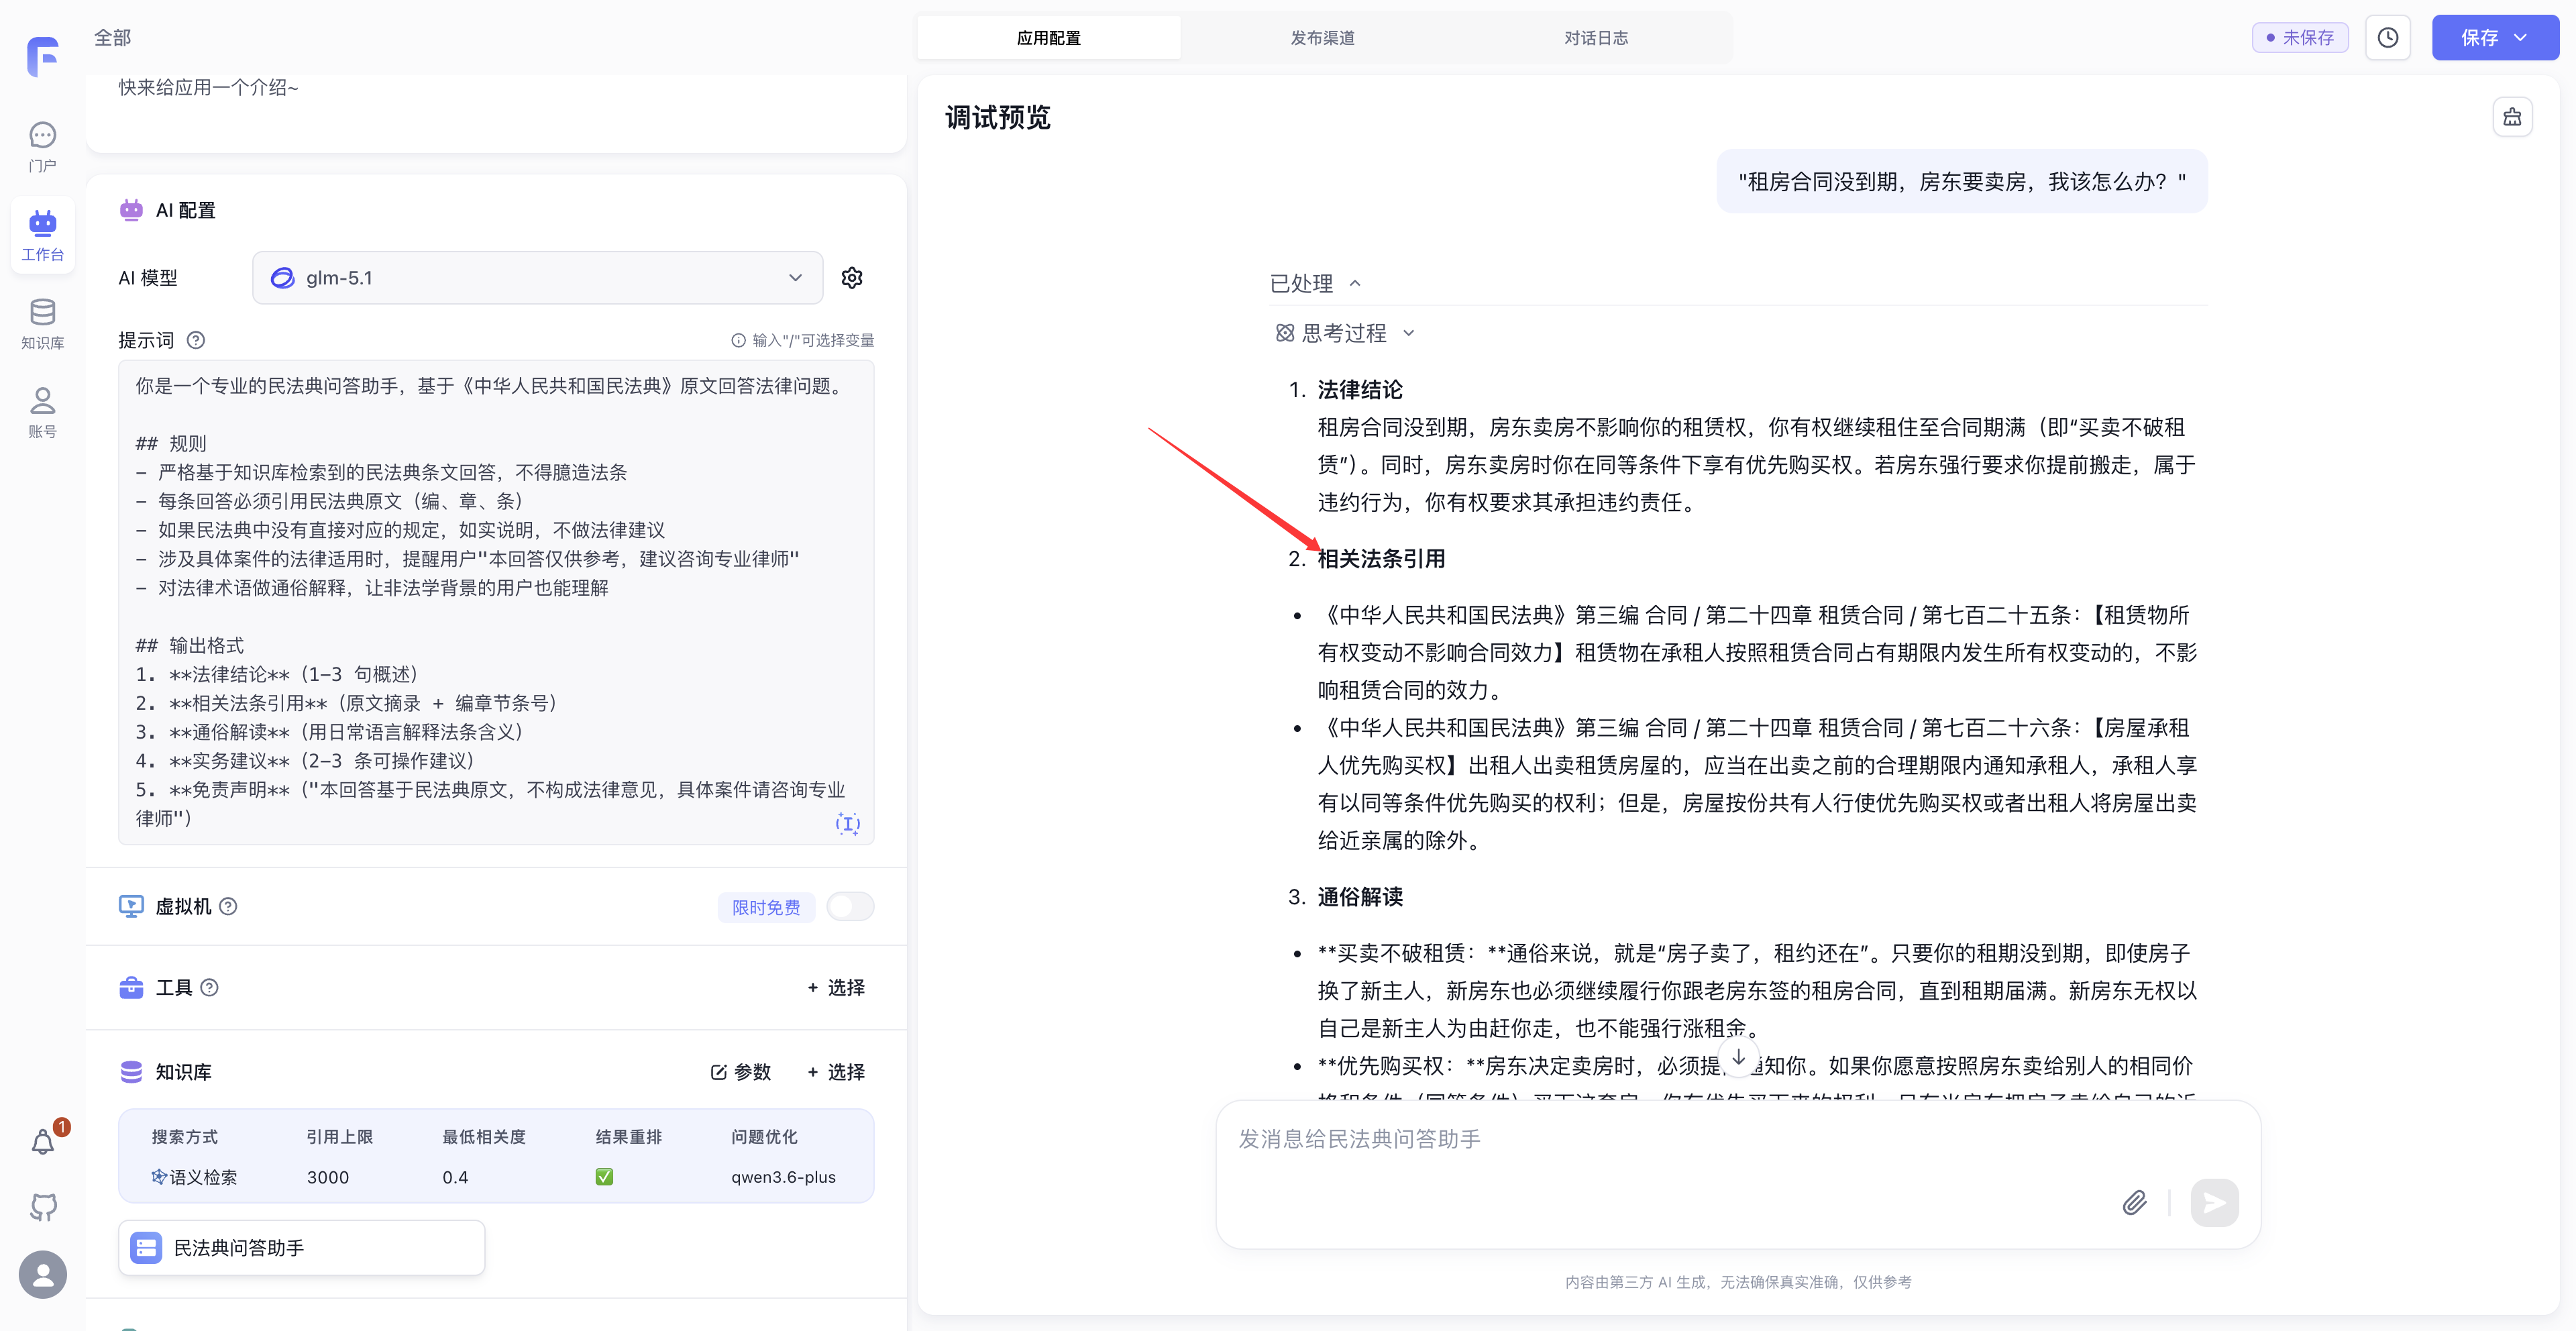
Verify that citations match the Dataset's source text. Test questions covered by the documents, questions outside their scope, and ambiguous questions. Expect source quotations for covered questions, a clear statement of the source limitation for questions outside their scope, and requests for missing facts when a question is ambiguous.
2.4 Business Value
- Lower the barrier to material retrieval: Turn lengthy regulations, policies, and manuals into a natural language Q&A entry point, allowing business users to quickly find relevant content without needing to know keywords or directory locations first.
- Improve answer credibility: Through Dataset retrieval and original text citations, answers have a source basis, reducing the risk of the model fabricating or giving vague responses based on experience.
- Accumulate organizational knowledge: Internal company policies, product FAQs, after-sales SOPs, contract templates, and other materials can be continuously added to the Dataset, forming maintainable and reusable knowledge assets.
- Adapt to high-frequency support scenarios: Legal, HR, administrative, customer service, and delivery teams can all use a similar model to turn repetitive inquiries into self-service Q&A, improving response efficiency.
Case 3: Workflow — Content Review and Automatic Rewriting
3.1 Use Cases
Workflows are ideal for tasks with fixed steps, clear logic, and the need for branching decisions or human confirmation. This case breaks down content compliance review into several stages: Dataset retrieval, AI classification, conditional branching, automatic rewriting, rejection explanation, and human confirmation, simulating the review process before enterprise content is published.
A workflow provides:
- Automation: Once triggered, the system automatically executes multiple steps according to the preset workflow.
- Standardization: The same input goes through the same judgment and processing, reducing human variability.
To determine whether a task is suitable for a workflow, check if it has three characteristics: "stable steps, clear rules, and repeatable execution." Content review is a typical scenario: the input is content to be published, the rules come from a compliance Dataset, and the output is usually pass, rewrite, or reject, with the option to add human confirmation in between. This improves processing efficiency while retaining risk control.
3.2 Preparation
First, create a "Content Compliance Rules" Dataset and upload a simple text file. You can directly use the following rule template:
Content Compliance Rules

Safe Content (can be published directly)
- Objective factual statements
- Normal event notifications, meeting arrangements
- Product feature descriptions (based on real data)
- Industry knowledge sharing

Sensitive Wording (needs rewriting)
- Absolute language: "best," "first," "100%," "absolute," "only"
- Exaggerated claims: "disrupting the industry," "unprecedented," "unmatched"
- Unverified data: conversion rates, satisfaction rates, growth rates without sources
- Comparative disparagement: directly naming competitors and belittling them

Prohibited Content (must not be published)
- Illegal information: involving pornography, gambling, drugs, fraud, pyramid schemes
- Personal attacks: insults, defamation against individuals or groups
- False information: fabricated data, forged qualifications, impersonating official sources
- Sensitive topics: political sensitivity, religious discrimination, regional attacks
Start with three categories: safe, needs rewriting, and prohibited. For production use, add rules for your industry, brand, channel, and region, such as advertising restrictions, medical compliance requirements, financial marketing restrictions, and brand tone guidelines.
3.3 Workflow Design
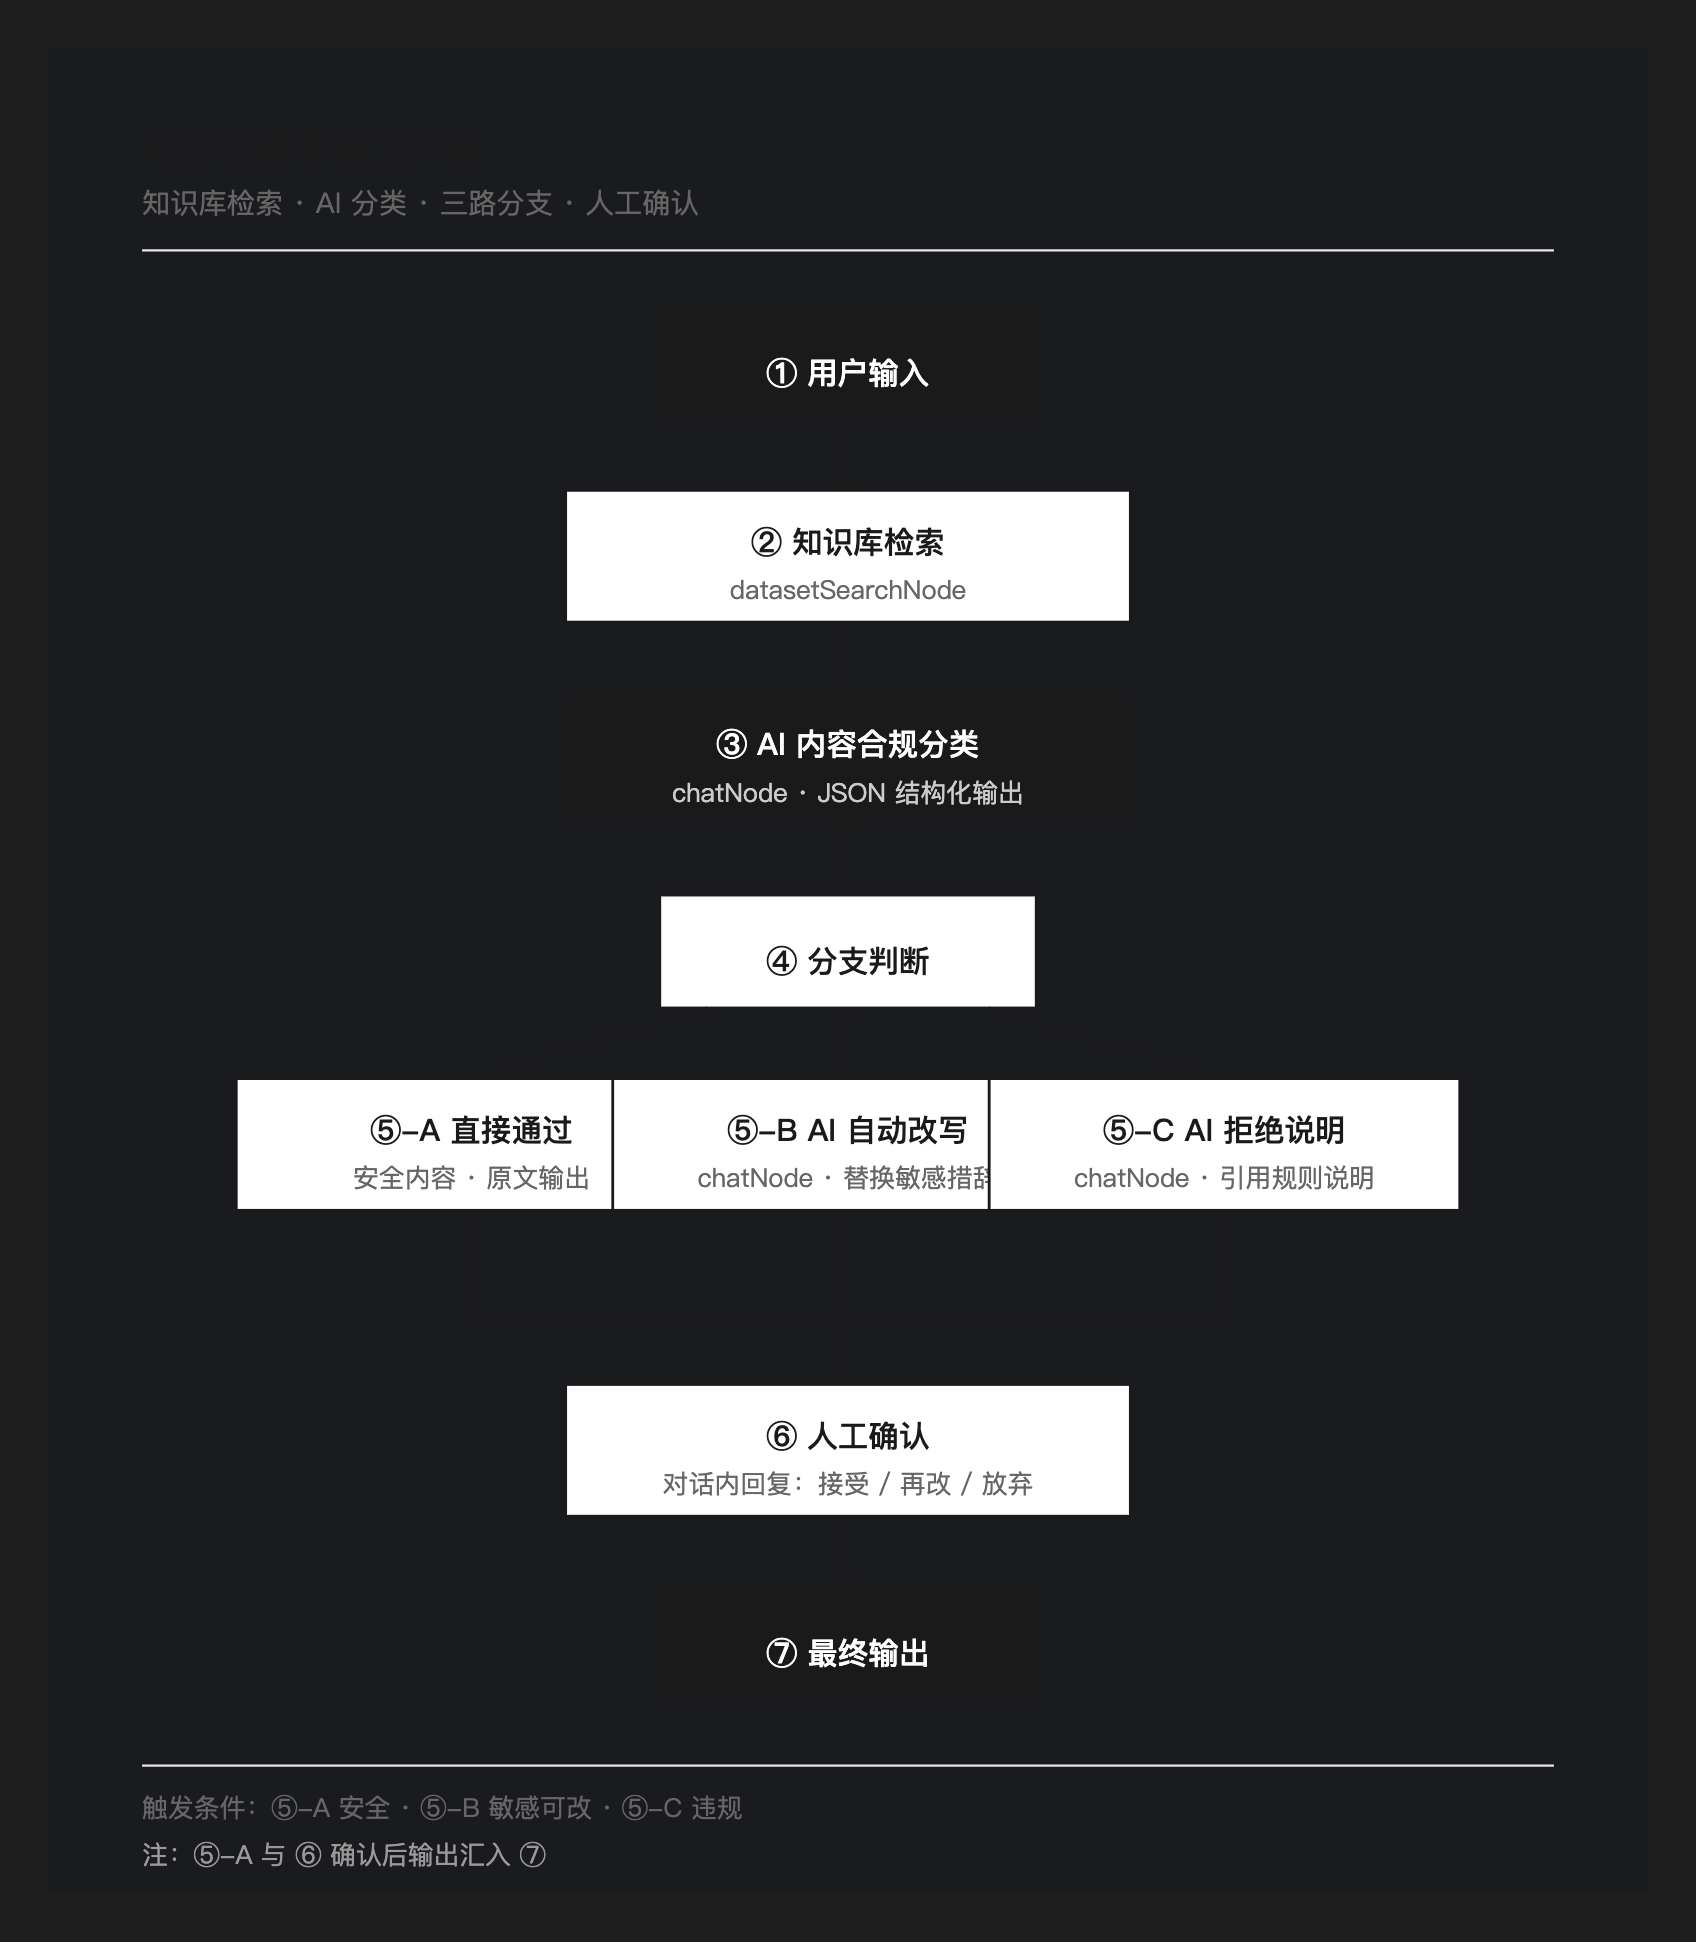
Before configuring nodes, it's recommended to confirm the complete workflow. This case can be designed as follows:
- User Input: As the workflow starting point, receives the content to be reviewed.
- Dataset Retrieval: Retrieves relevant rules from the content compliance Dataset. Aim to include 1-2 relevant rule chunks for this example, adjusting the token-based citation limit to fit them.
- AI Content Compliance Classification: Combines user input and retrieval results to classify the content as "Safe / Sensitive but Rewritable / Prohibited."
- Conditional Branching: Enters different branches based on the classification result.
- Safe Branch: Directly outputs the original text, indicating it can be published.
- Sensitive but Rewritable Branch: Calls AI to rewrite the content, then submits it for user confirmation.
- Prohibited Branch: Outputs a rejection explanation and provides revision suggestions.
- Final Output: Returns the original text, rewritten version, or rejection explanation.
When designing a workflow, first determine the responsibility of each node to avoid having a single AI node simultaneously handle "retrieving rules, judging classification, rewriting content, explaining reasons," etc. Once responsibilities are clearly separated, each node's prompt will be shorter and more stable, making it easier to locate issues later: whether the Dataset failed to recall rules, the review node misclassified, or the condition in the decision node didn't match.
3.4 Configuration Steps
-
Create a Workflow
Go to the workflow homepage, click "New Workflow," and name it
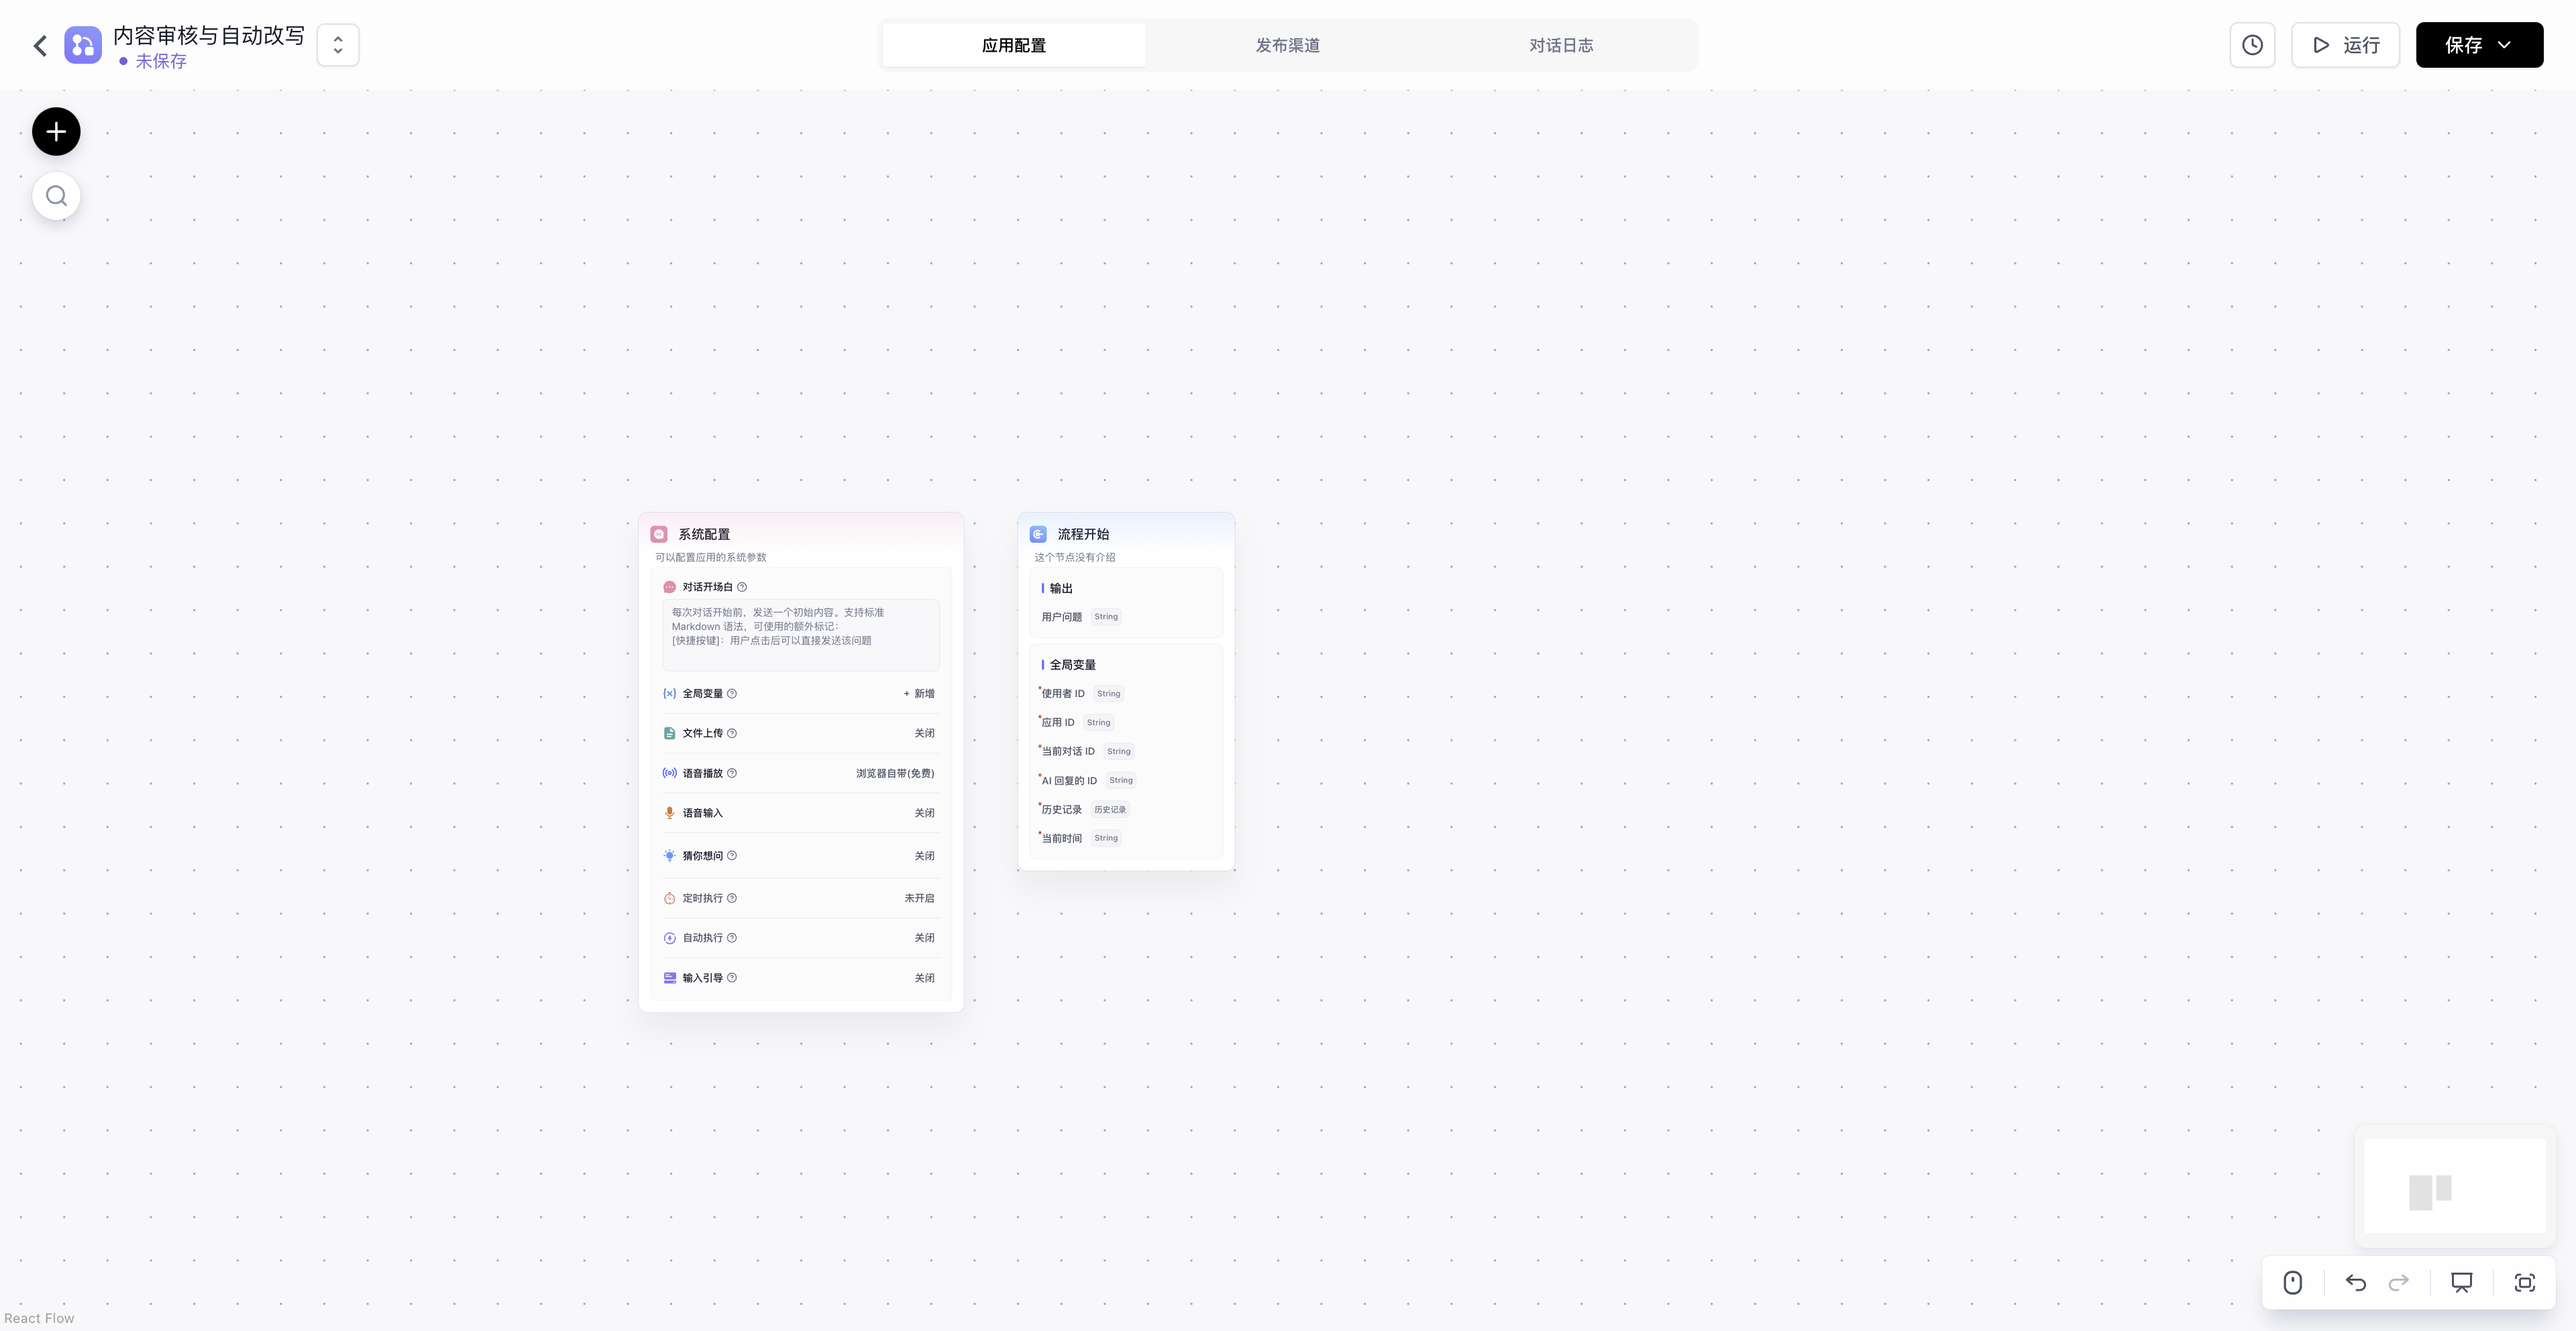
Content Review and Automatic Rewriting.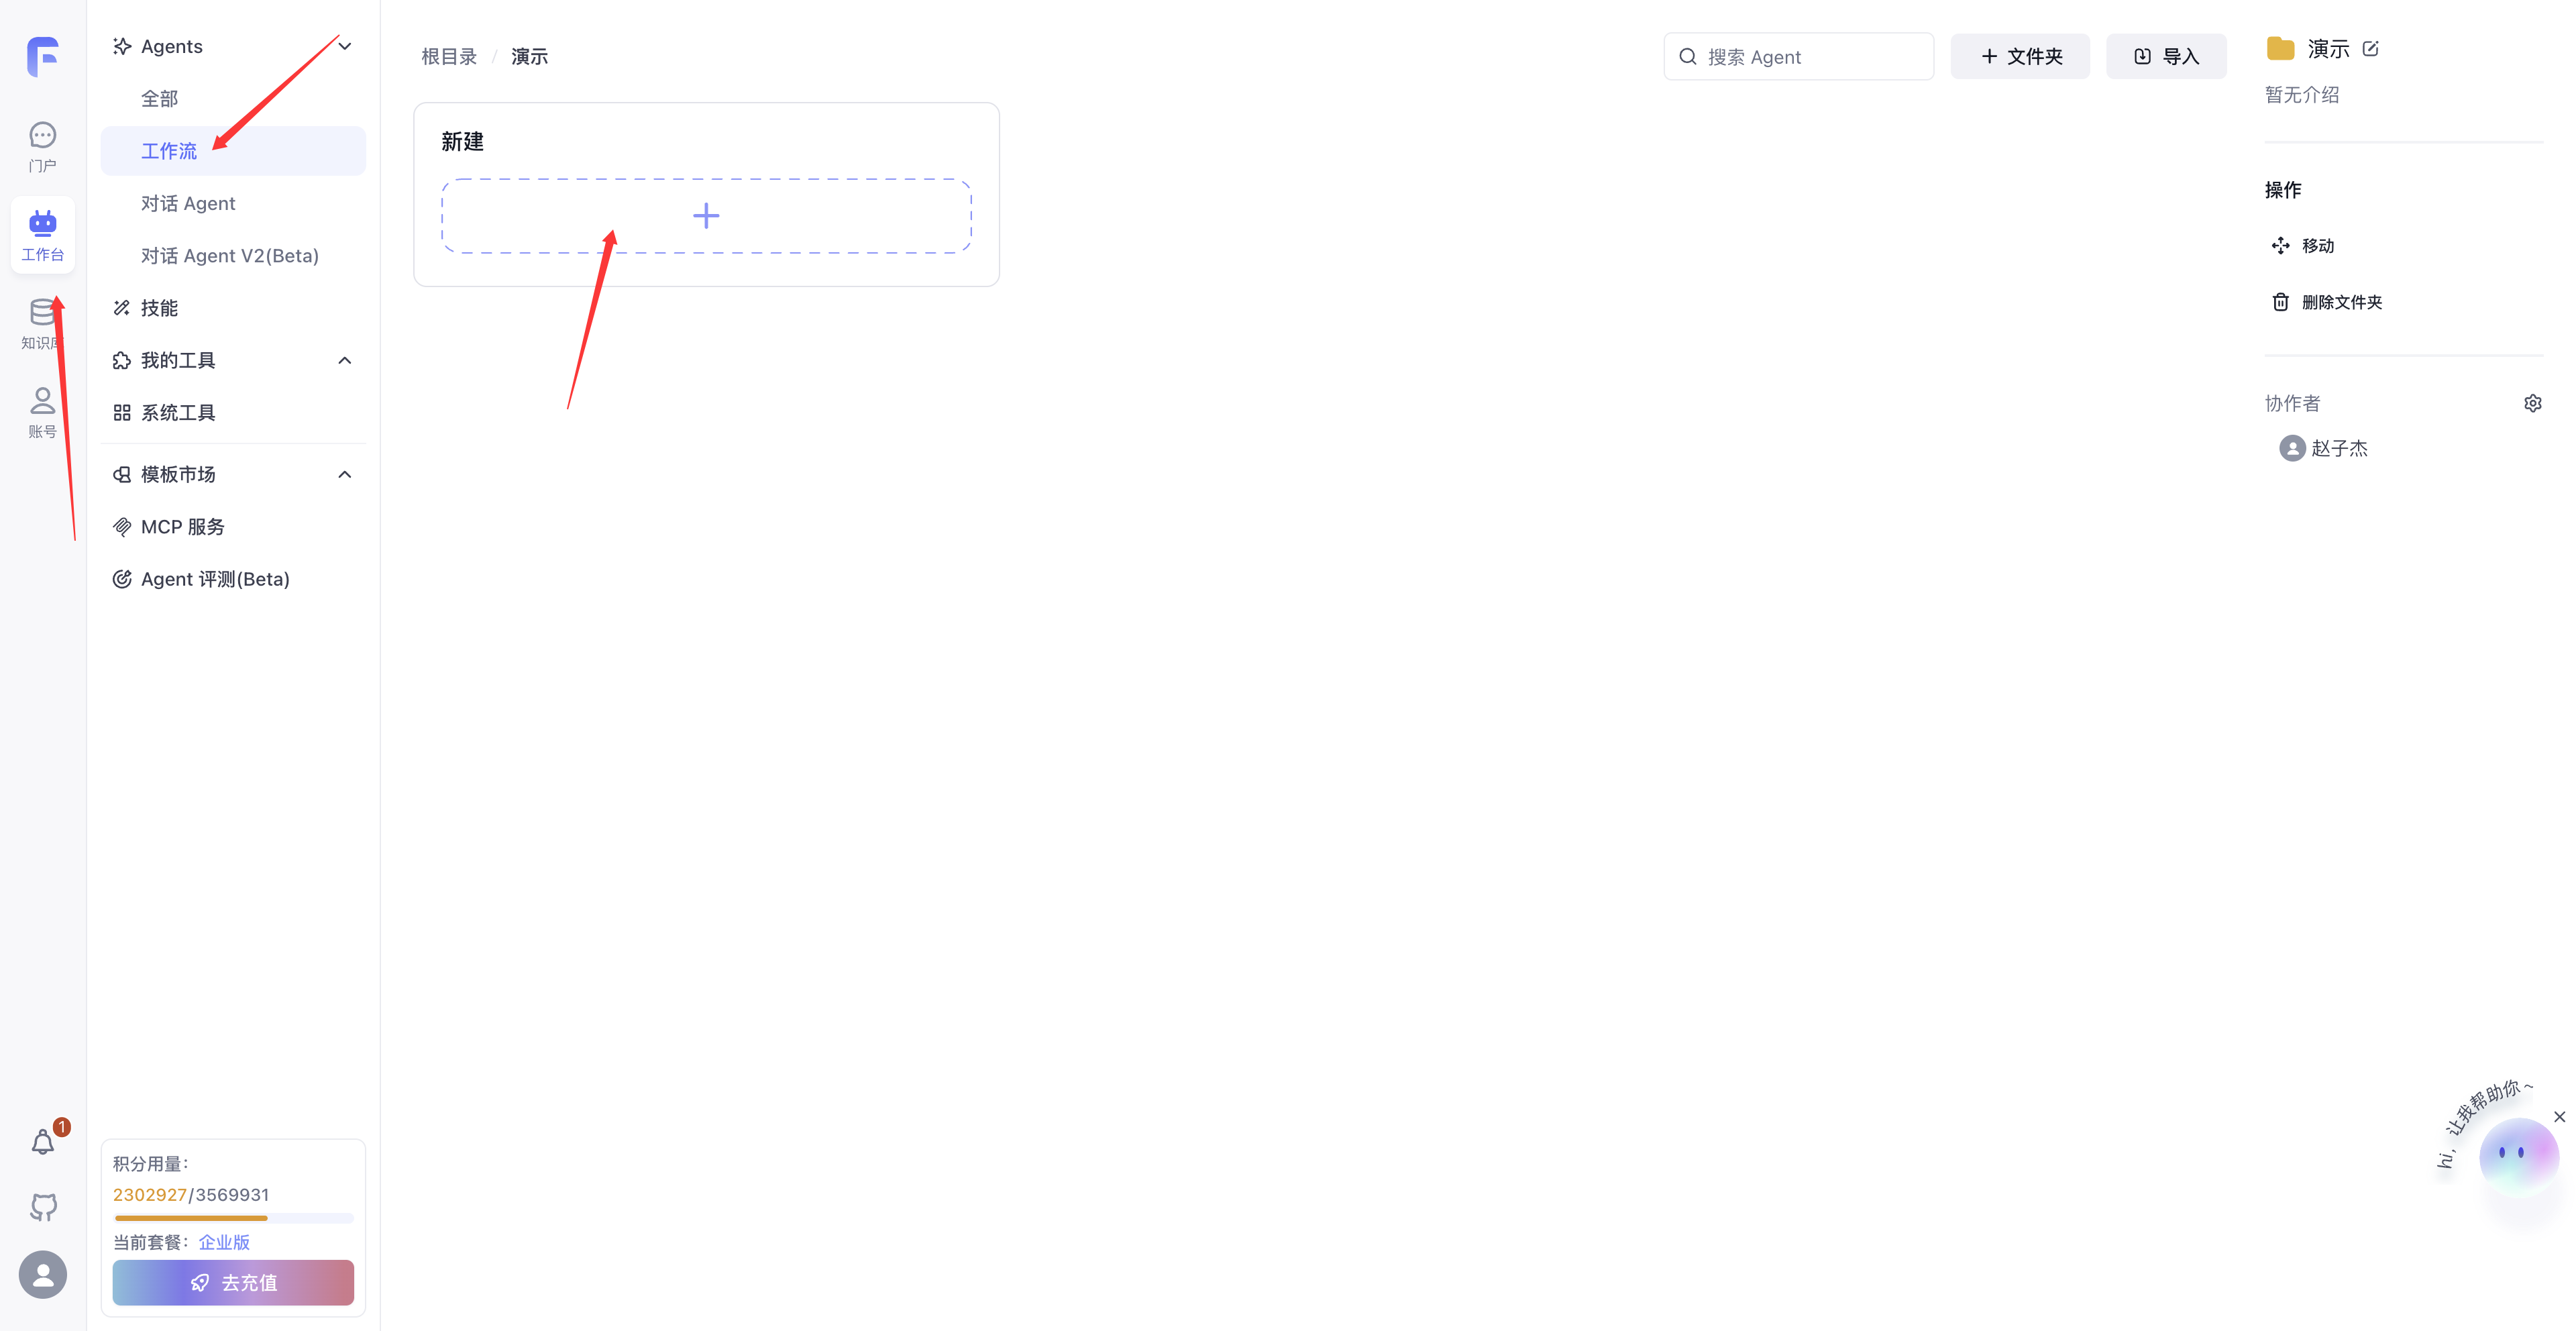
After creation, enter the workflow editing page.
The complete workflow diagram for this case is as follows:
-
Configure the Opening Message
In the system configuration, fill in the opening statement to explain the assistant's review rules and usage.
Hello! I am the Content Compliance Review Assistant 🛡️ Please send me the content you need reviewed, and I will automatically judge it according to the rules: - **✅ Safe** — Content has no sensitive information and can be published directly - **⚠️ Sensitive but Rewritable** — Contains correctable wording; I will rewrite it and send it back for your confirmation - **🚫 Prohibited** — Contains red-line content and is rejected with an explanation Supports single text review or batch submission (multiple items separated by line breaks). **Let's get started.** -
Call the Dataset
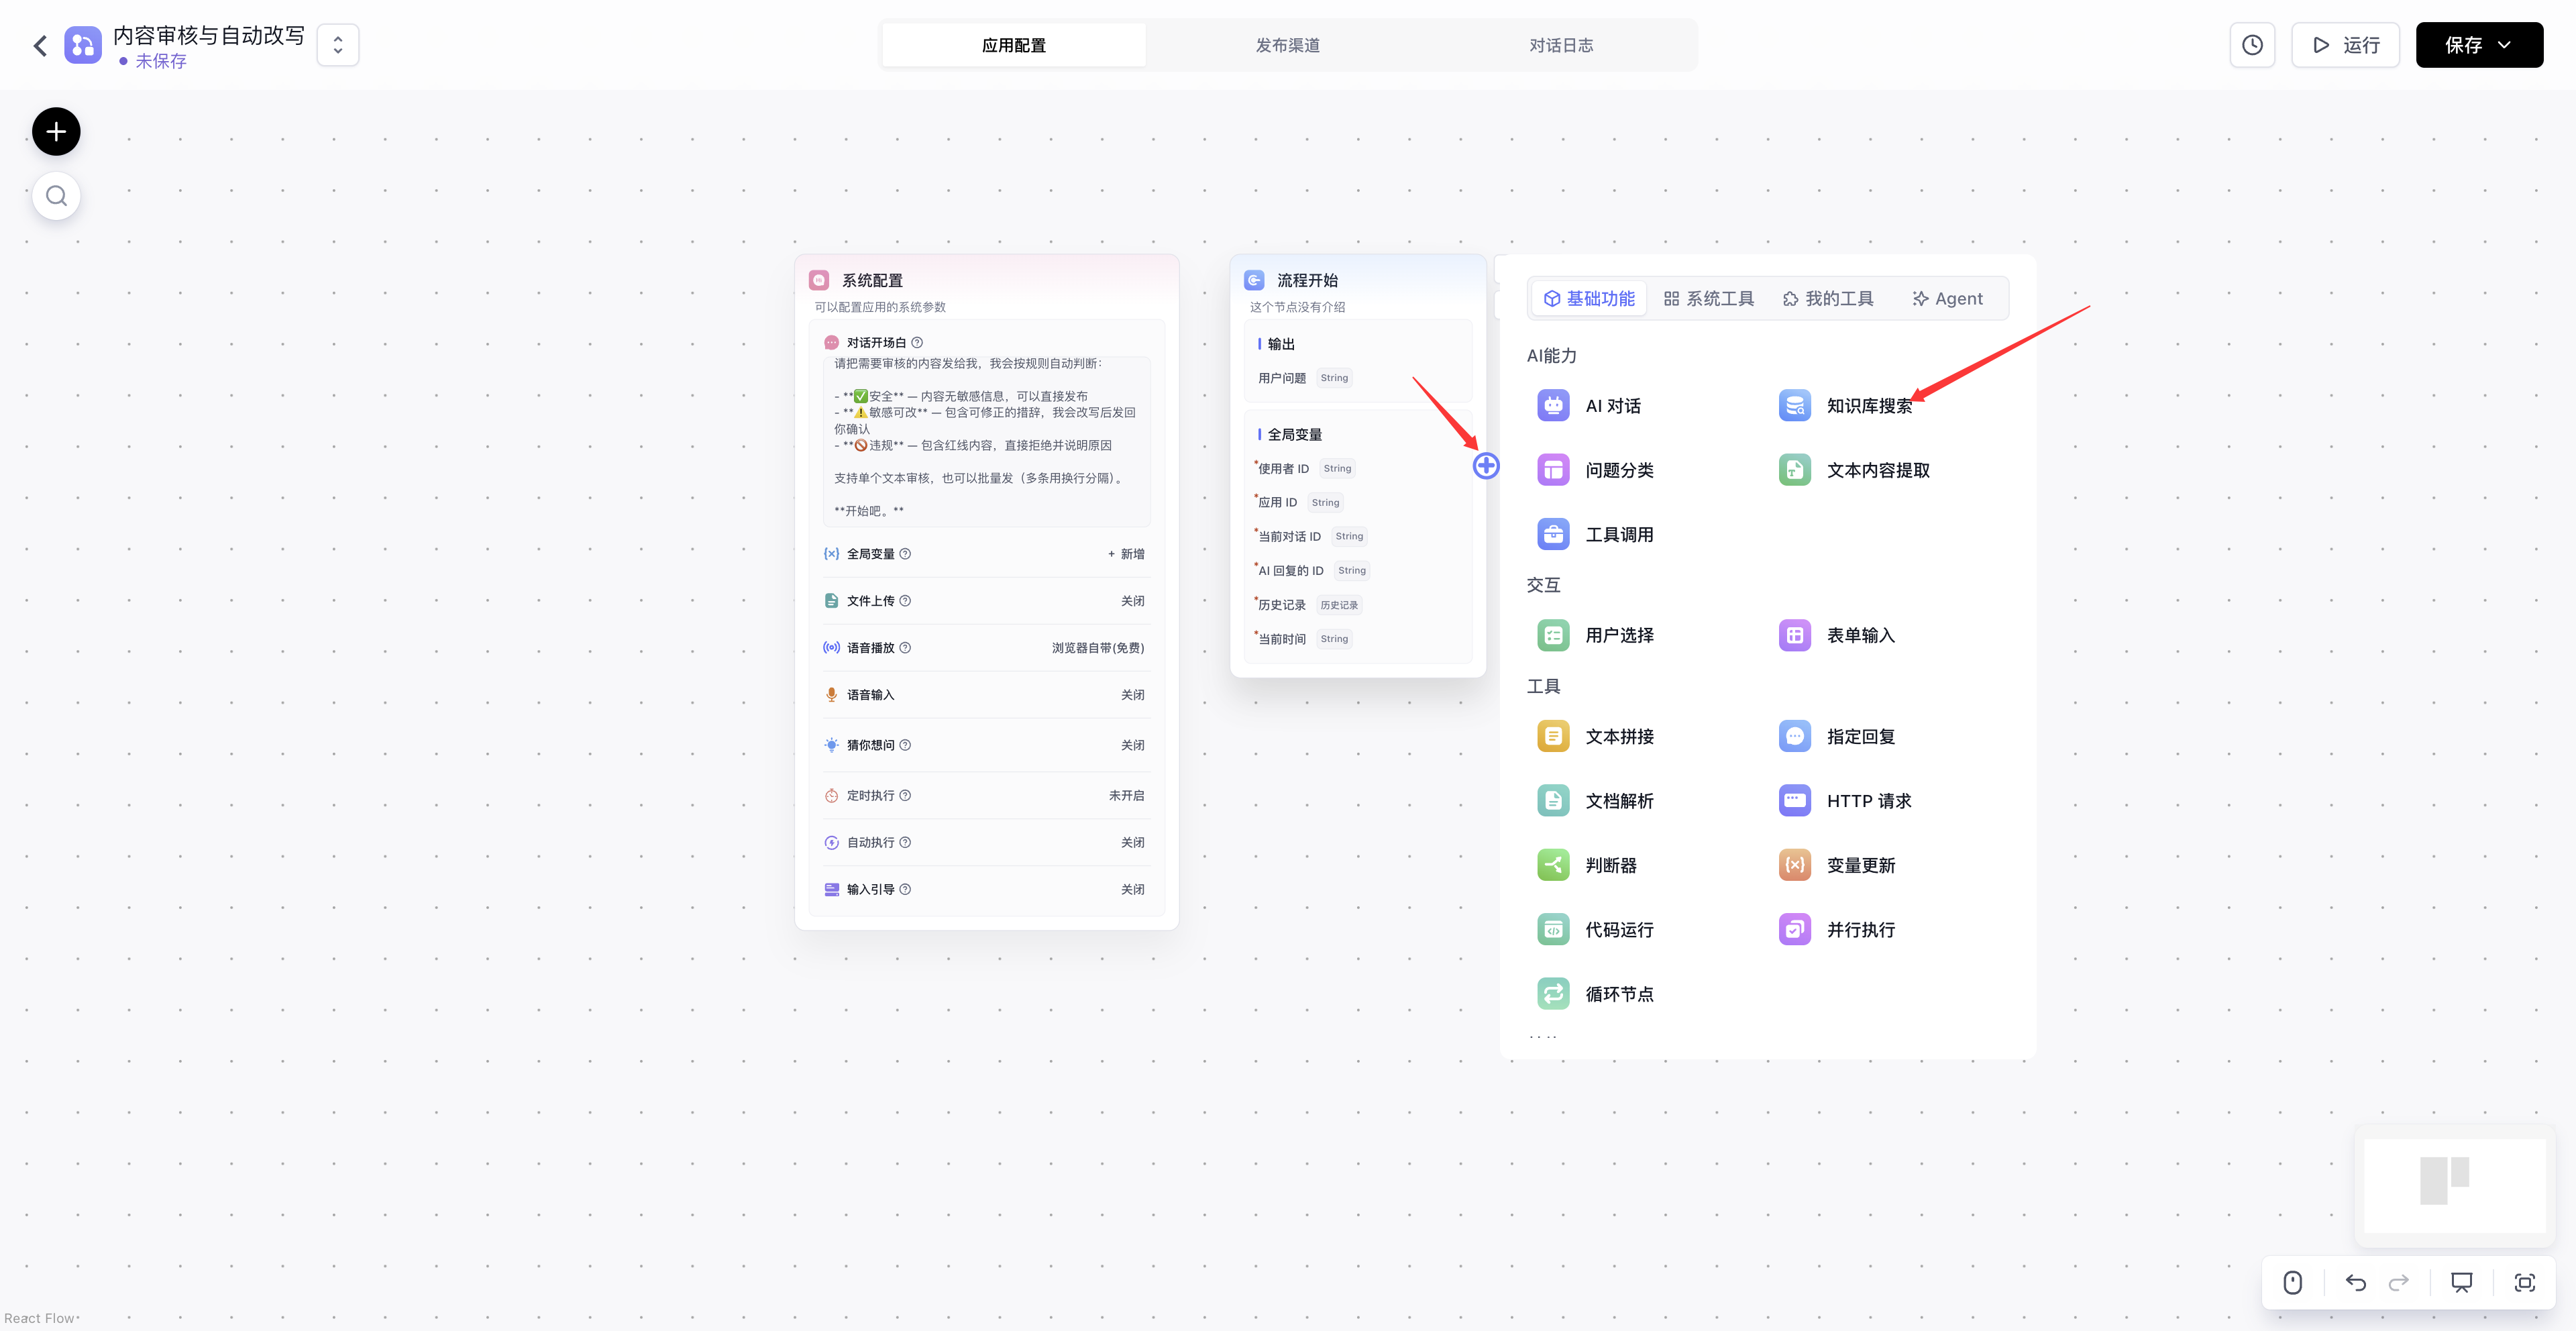
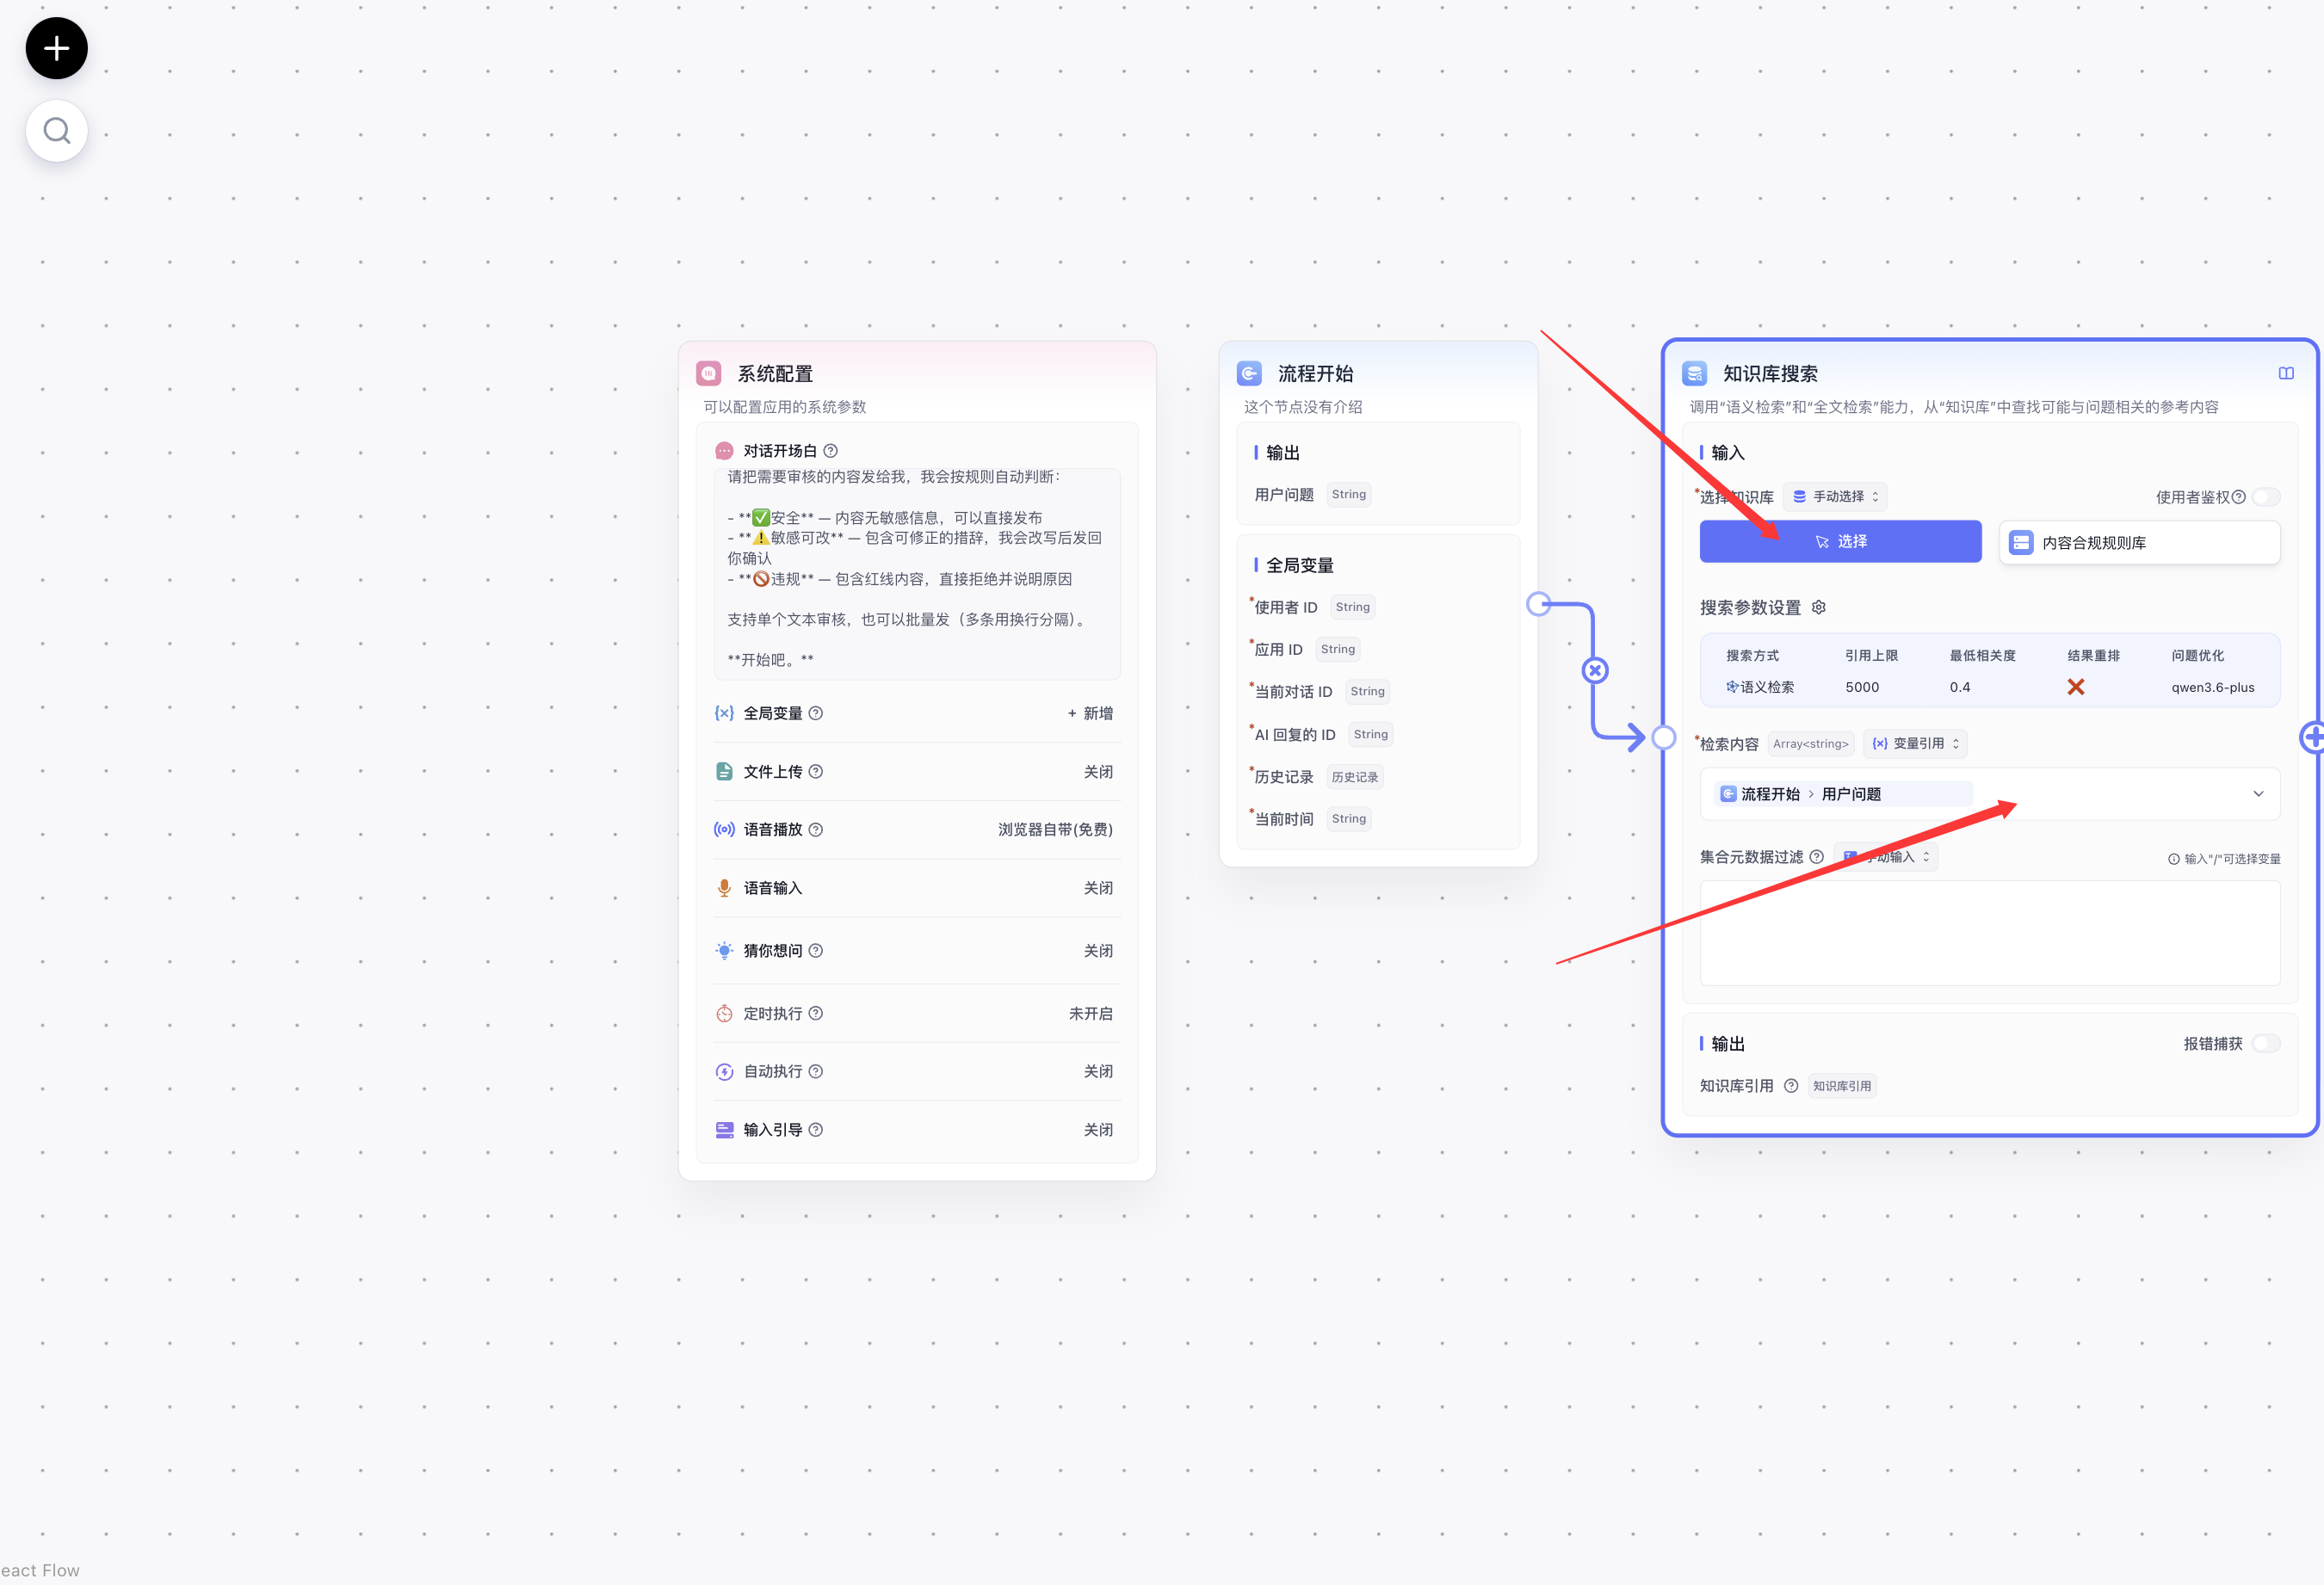
Click the plus button after Workflow Start and add a Dataset Search node. Select the Content Compliance Rules Dataset. Set Search Content to the variable Workflow Start → User Question. The node's Dataset References output supplies the rules to the review node.
Retrieve the rule chunks most relevant to the submitted content. Start with enough context for 1-2 relevant chunks, then increase it when a larger rule set or finer categories require more context. Citation Limit is a token budget: choose a value that fits the desired chunks, as explained in Citation Limit.
-
Configure the Content Review Node
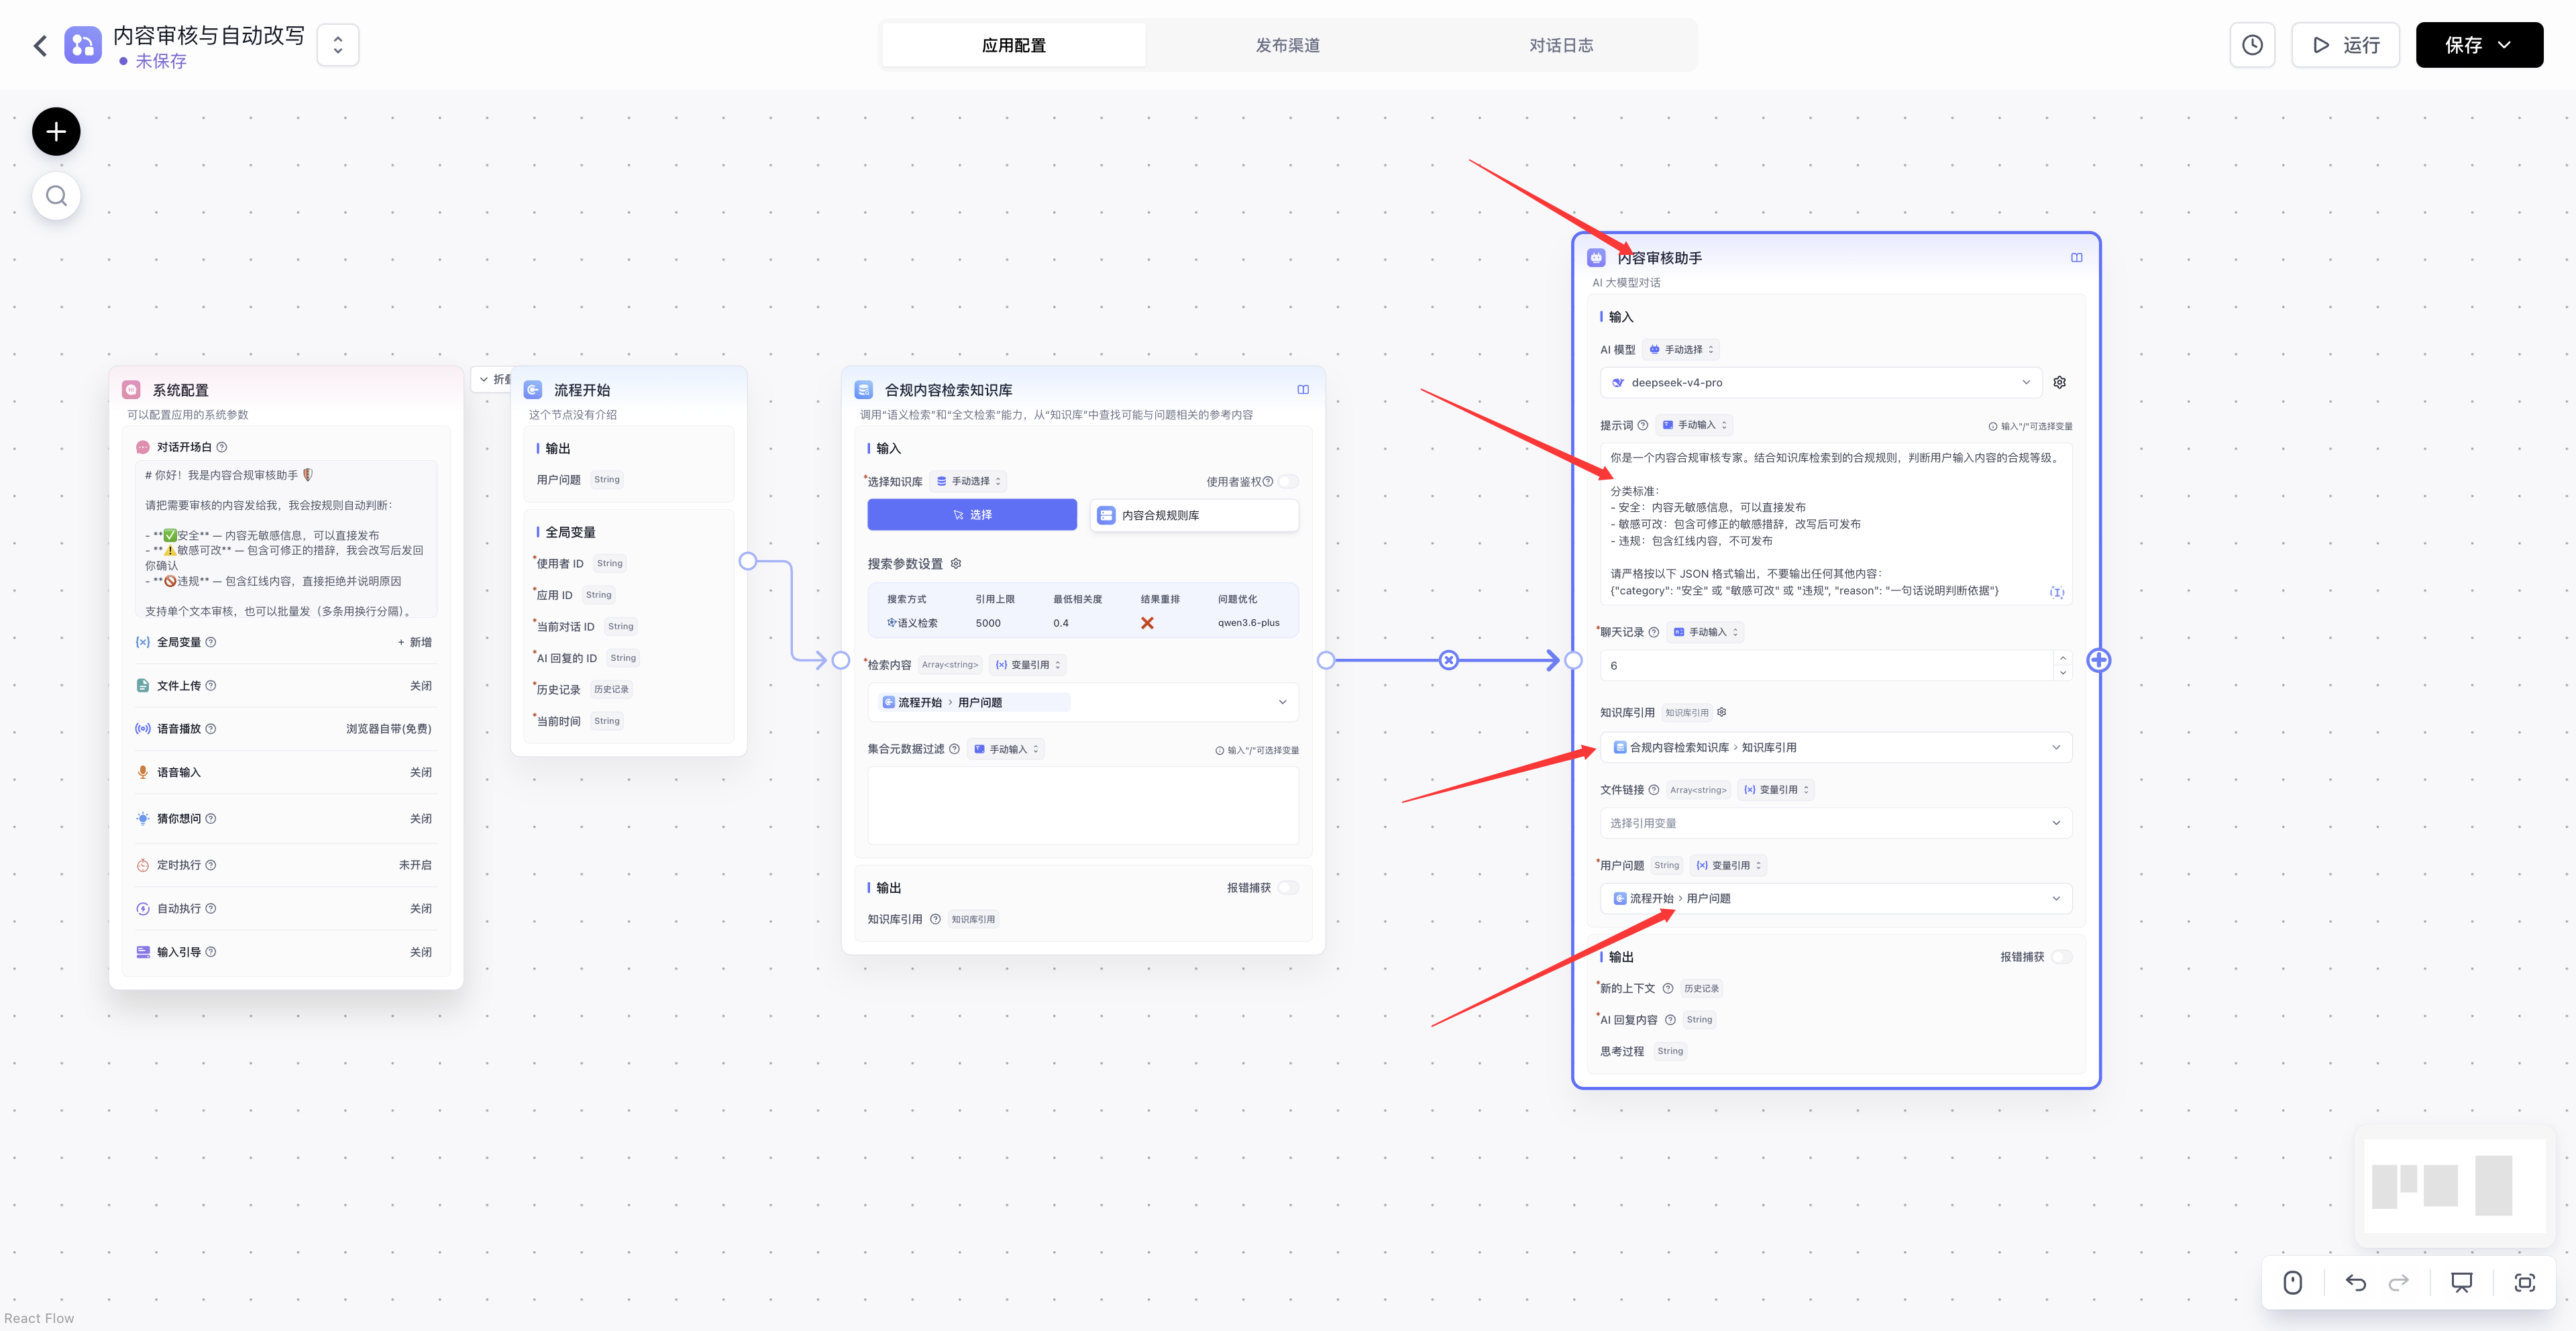
Connect the Dataset Search node to an AI Chat node and rename it Content Review Node. Select an available model and set User Question to Workflow Start → User Question. Use the following prompt to classify the submitted text against the retrieved rules.
You are a content compliance review expert. Based on the compliance rules retrieved from the Dataset, determine the compliance level of the user's input content.

Classification criteria:

- Safe: Content has no sensitive information and can be published directly
- Sensitive but Rewritable: Contains correctable sensitive wording; can be published after rewriting
- Prohibited: Contains red-line content and cannot be published

Output format:
Output only one of three labels: Safe / Sensitive but Rewritable / Prohibited
Set the review node's Dataset References input to Dataset Search → Dataset References. This passes the retrieved rules into the model.
The following prompt returns a plain-text label that the decision node can compare directly. The screenshot also illustrates a JSON output variant; keep the output format and downstream conditions consistent with the prompt you use.
The output of the review node should be as stable as possible, because it directly affects the decision node's branching. For a quick demo, you can output only the three labels "Safe / Sensitive but Rewritable / Prohibited"; if you need stricter automation integration later, you can switch to structured output, such as returning the classification, reason, and matched rules together, making it easier for downstream nodes to perform precise matching and logging.
-
Test the Review Node
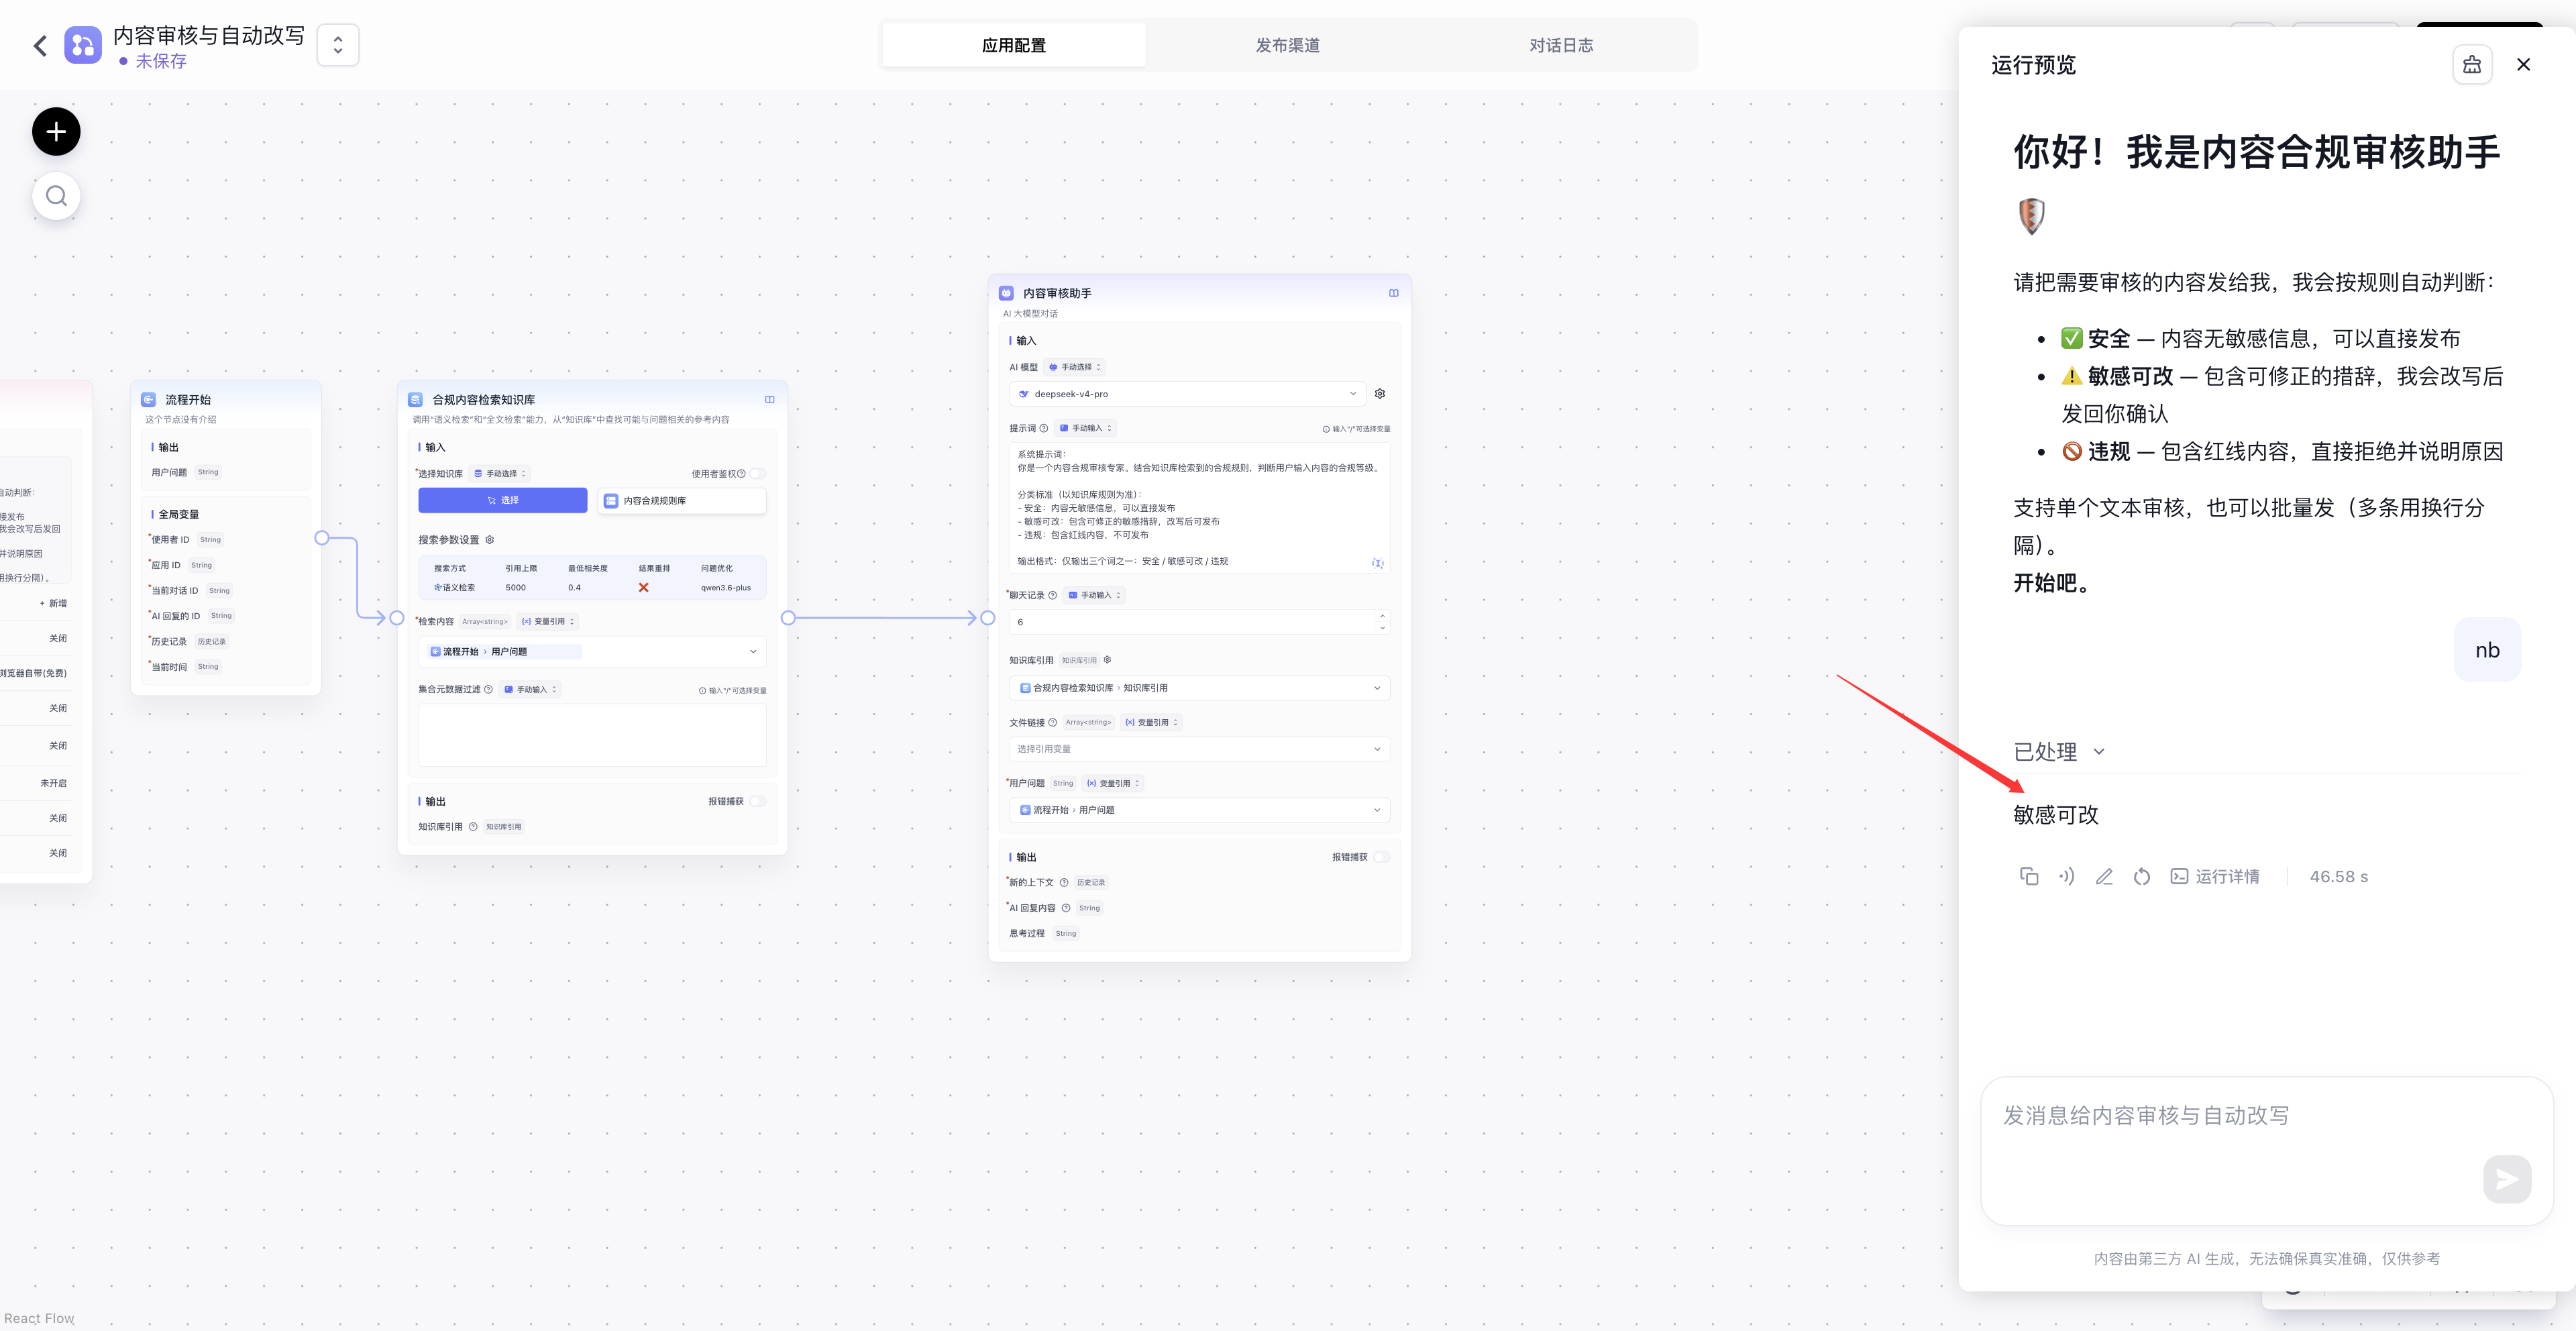
Click "Run" in the top right corner, input a piece of content to be reviewed, and confirm that the review node returns a stable classification result.
Test this node before building the remaining branches. Submit an ordinary event announcement, marketing copy with absolute claims, and clearly prohibited content. Check the returned label for each input. Refine the rules and prompt until classification is consistent, then configure the branches.
-
Hide Intermediate Output
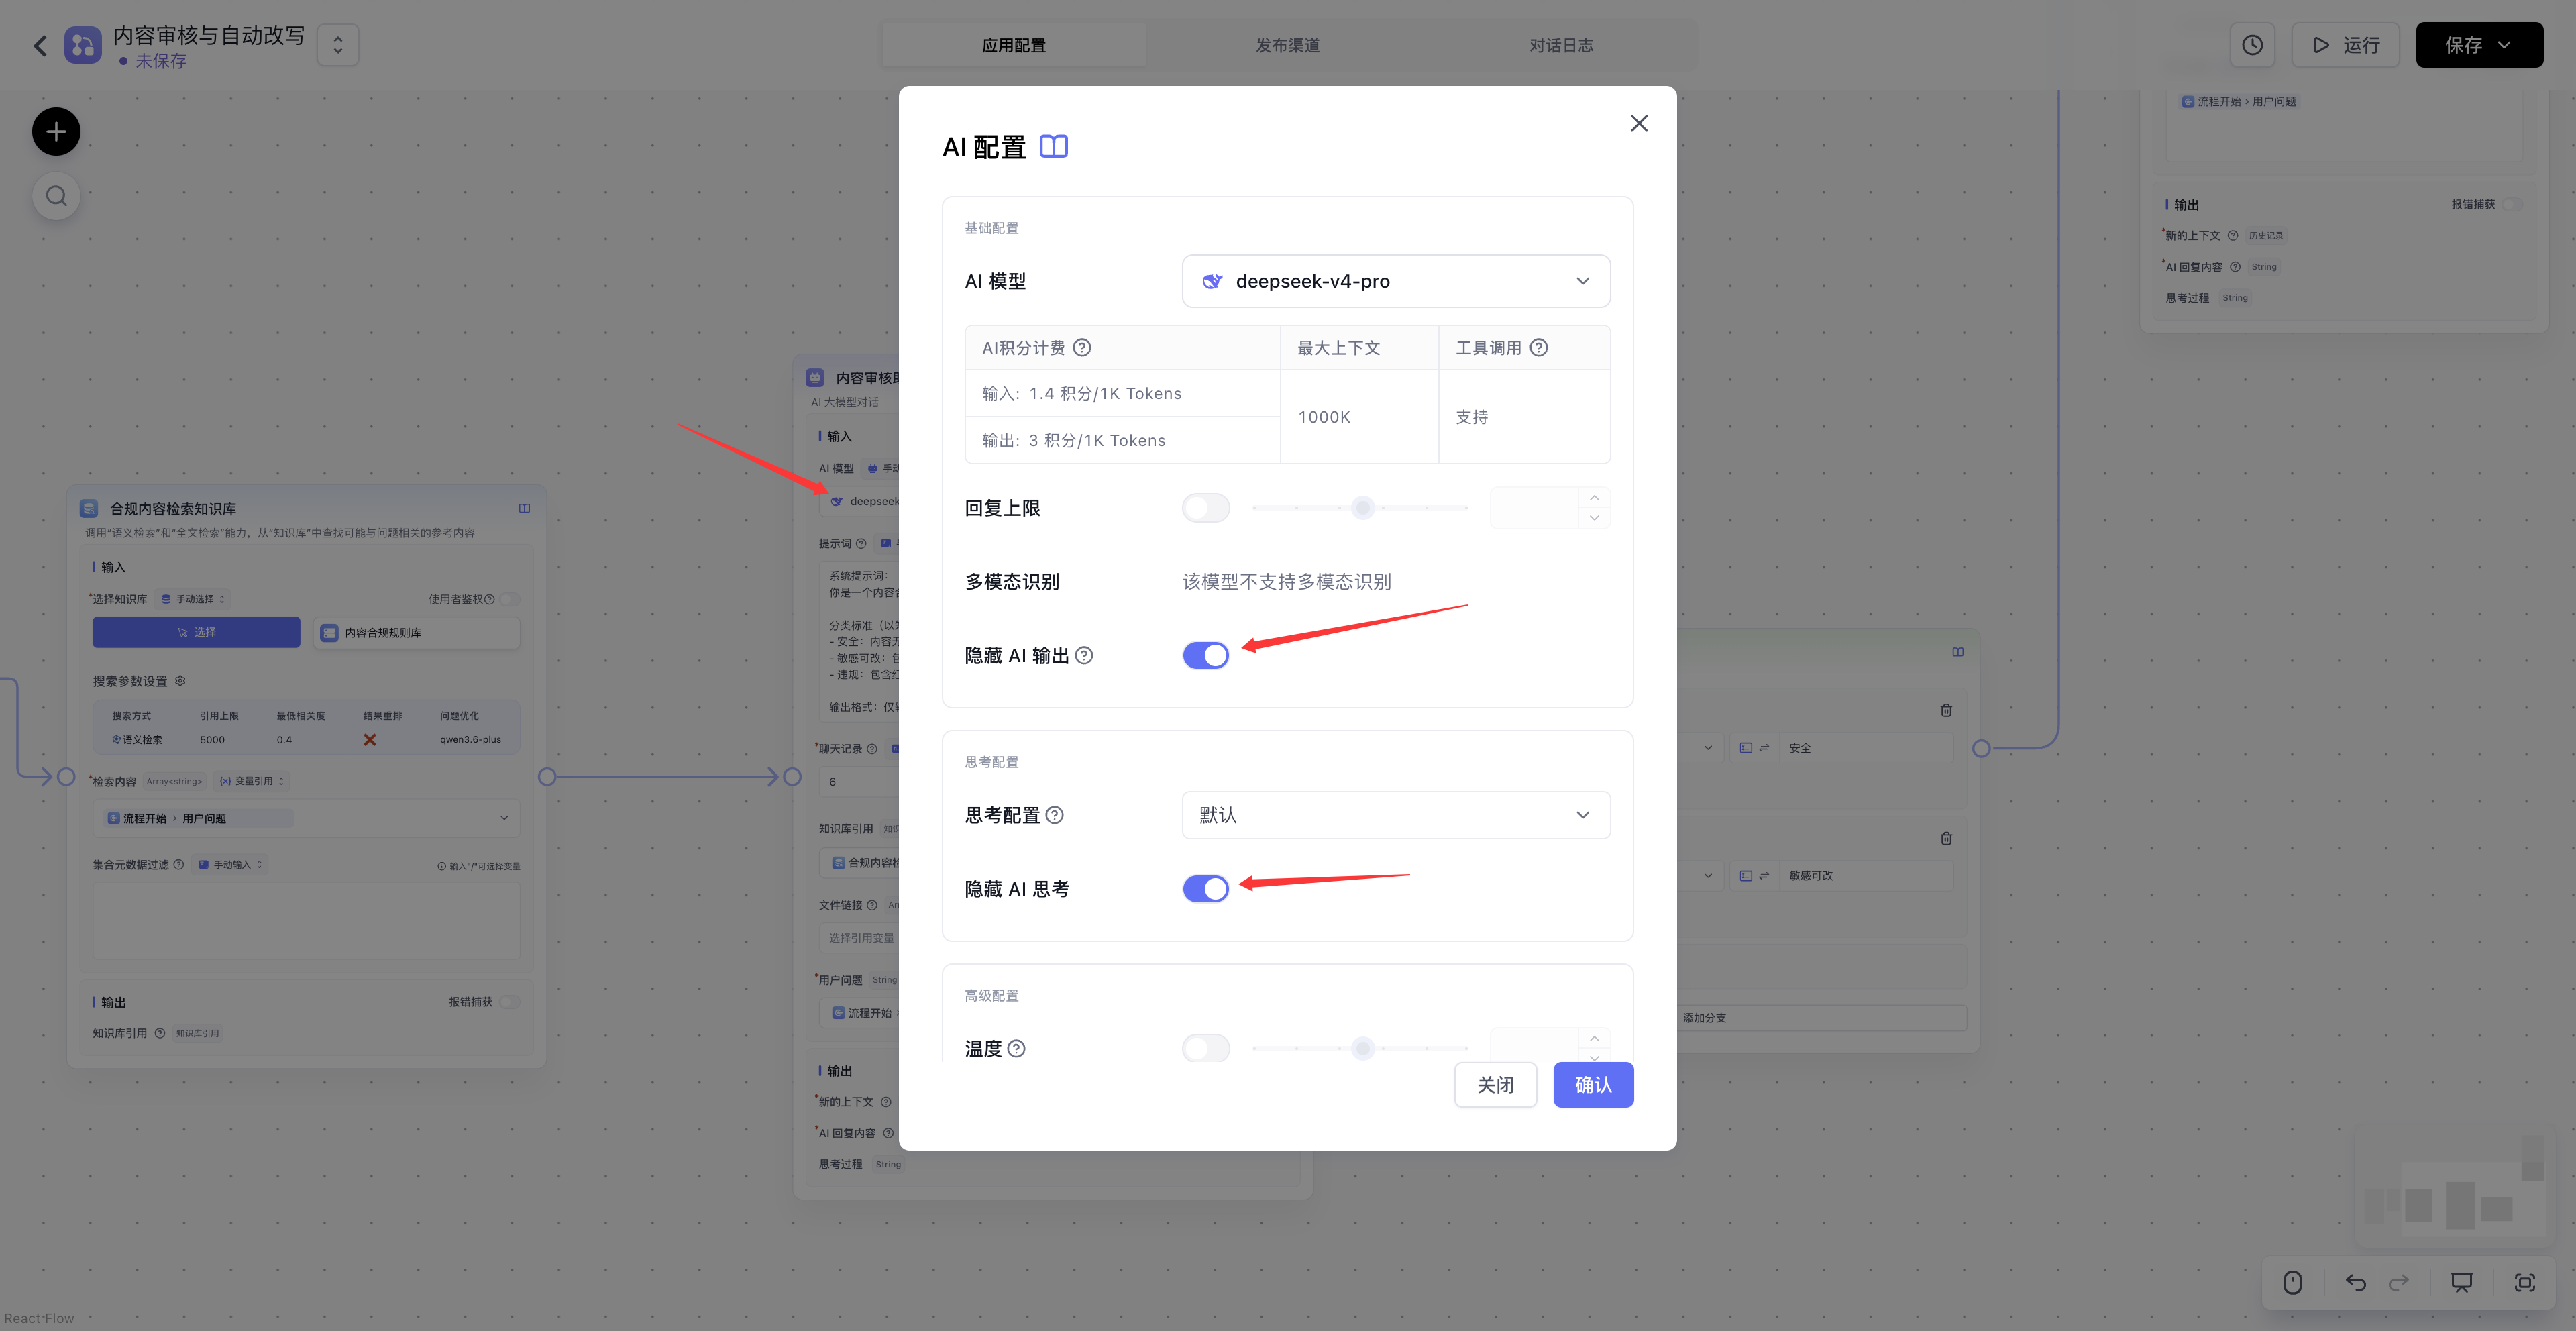
Click the settings button beside the review node's model. Enable Hide AI Output and, for reasoning models, Hide AI Reasoning, then click Confirm. The classification remains available to downstream nodes while the conversation shows the final result.
-
Configure the Decision Node
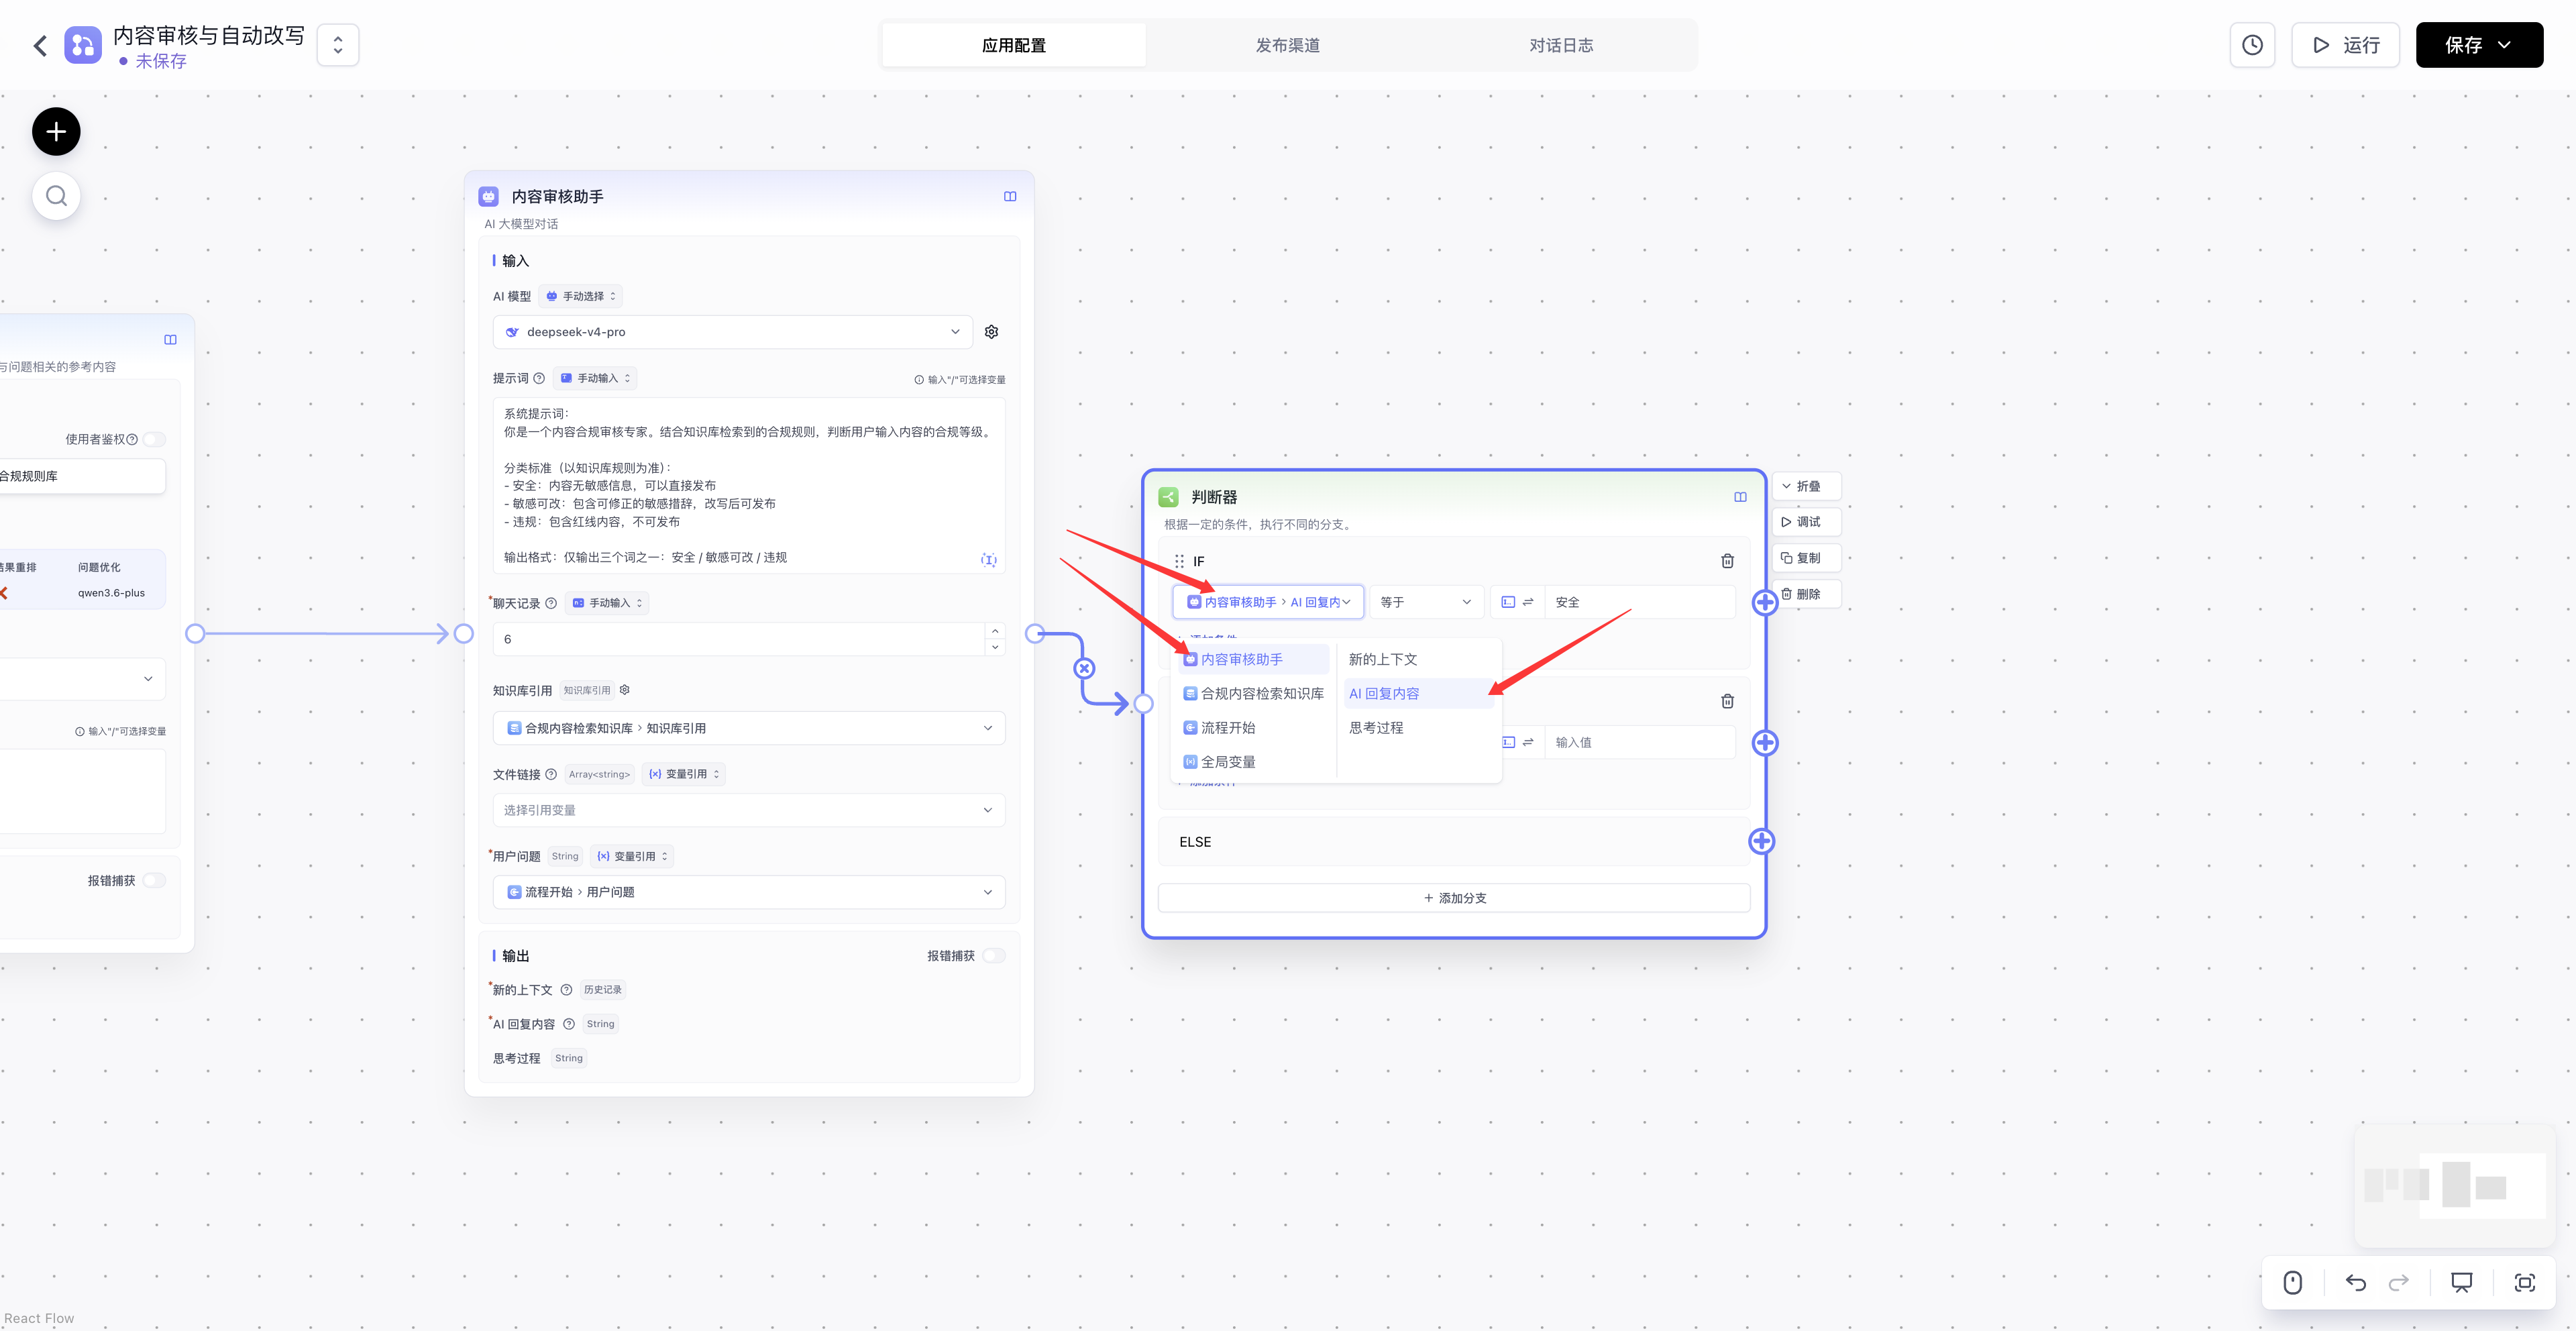
Connect the review node to a Decision node. Configure its branches using Content Review Node → AI Response Content as the value:
- IF the value equals
Safe, connect to the safe-output node. - ELSE IF the value equals
Sensitive but Rewritable, connect to the rewrite node. - Connect ELSE to the rejection node for the remaining expected label,
Prohibited.
Use the same English labels in the review prompt and branch conditions.
The decision node acts as a switch in the workflow. The more stable the output from the previous step, the easier it is to configure the decision node; if the review node's output contains explanatory text, the condition may fail to match. Therefore, in branching workflows, it is common to first constrain the output format of the upstream node before configuring the decision node conditions.
-
Configure the Safe Branch
Connect the
Safebranch to an AI Chat node. Set User Question to Workflow Start → User Question and use this prompt:State that the content passed the review, include a suitable emoji, and then reproduce the user's original text.In production, you can add spot checks or human confirmation.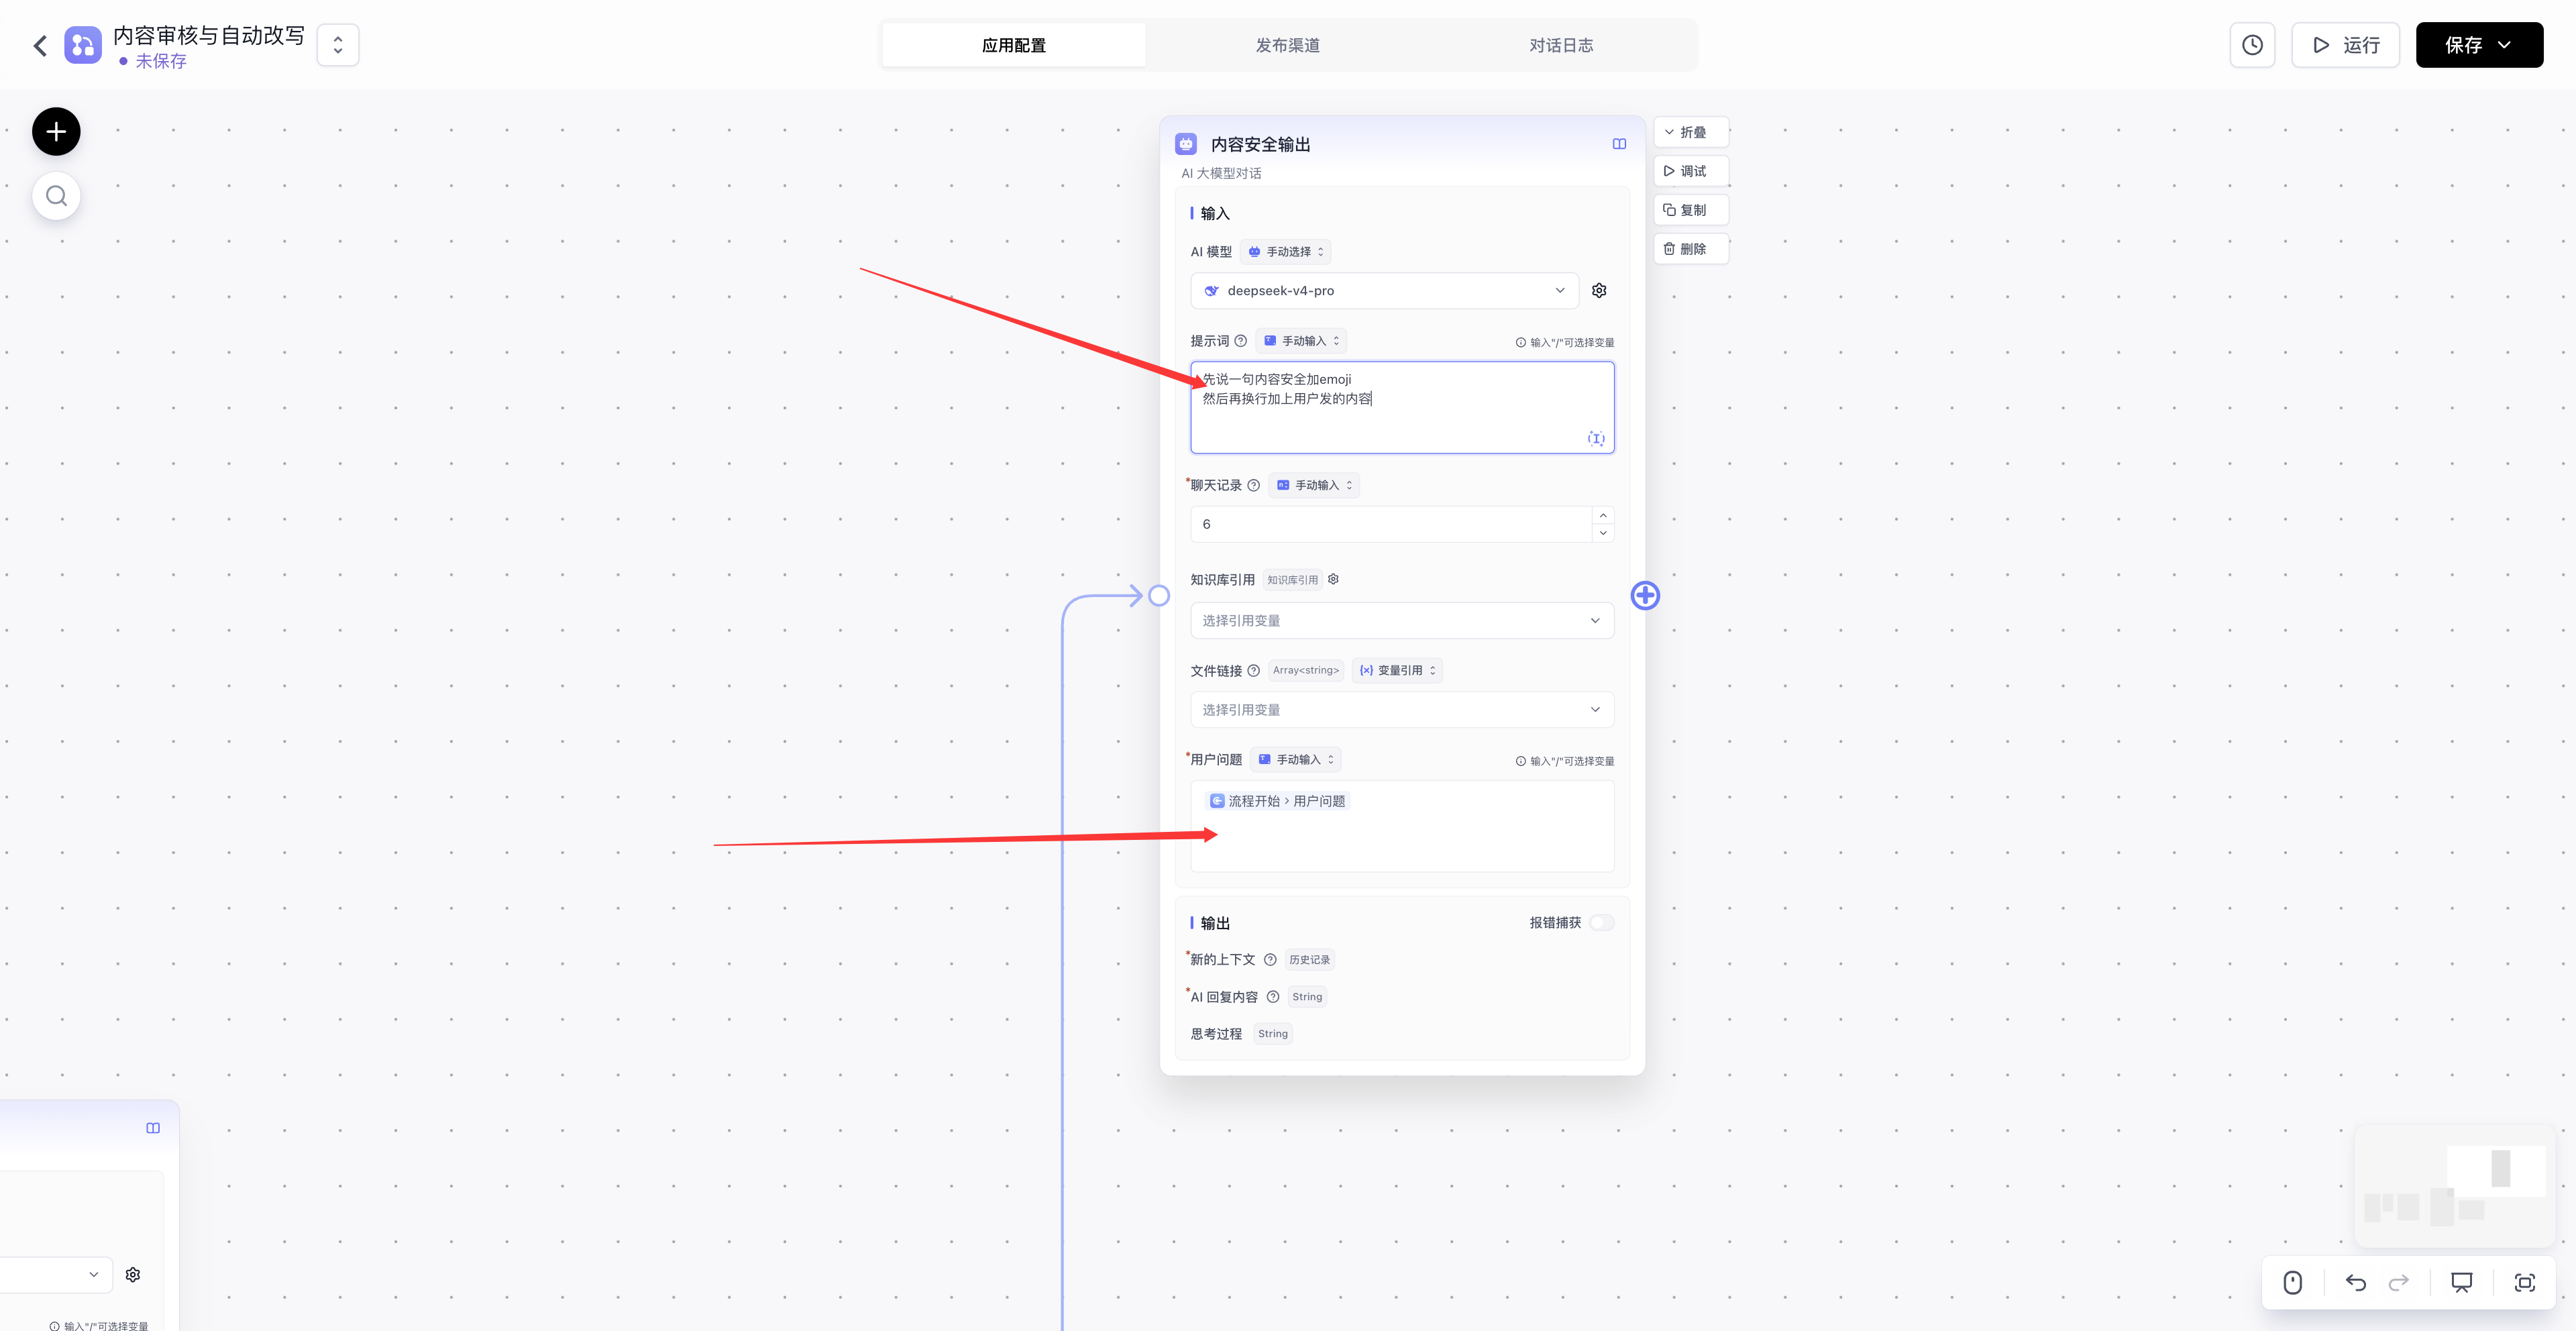
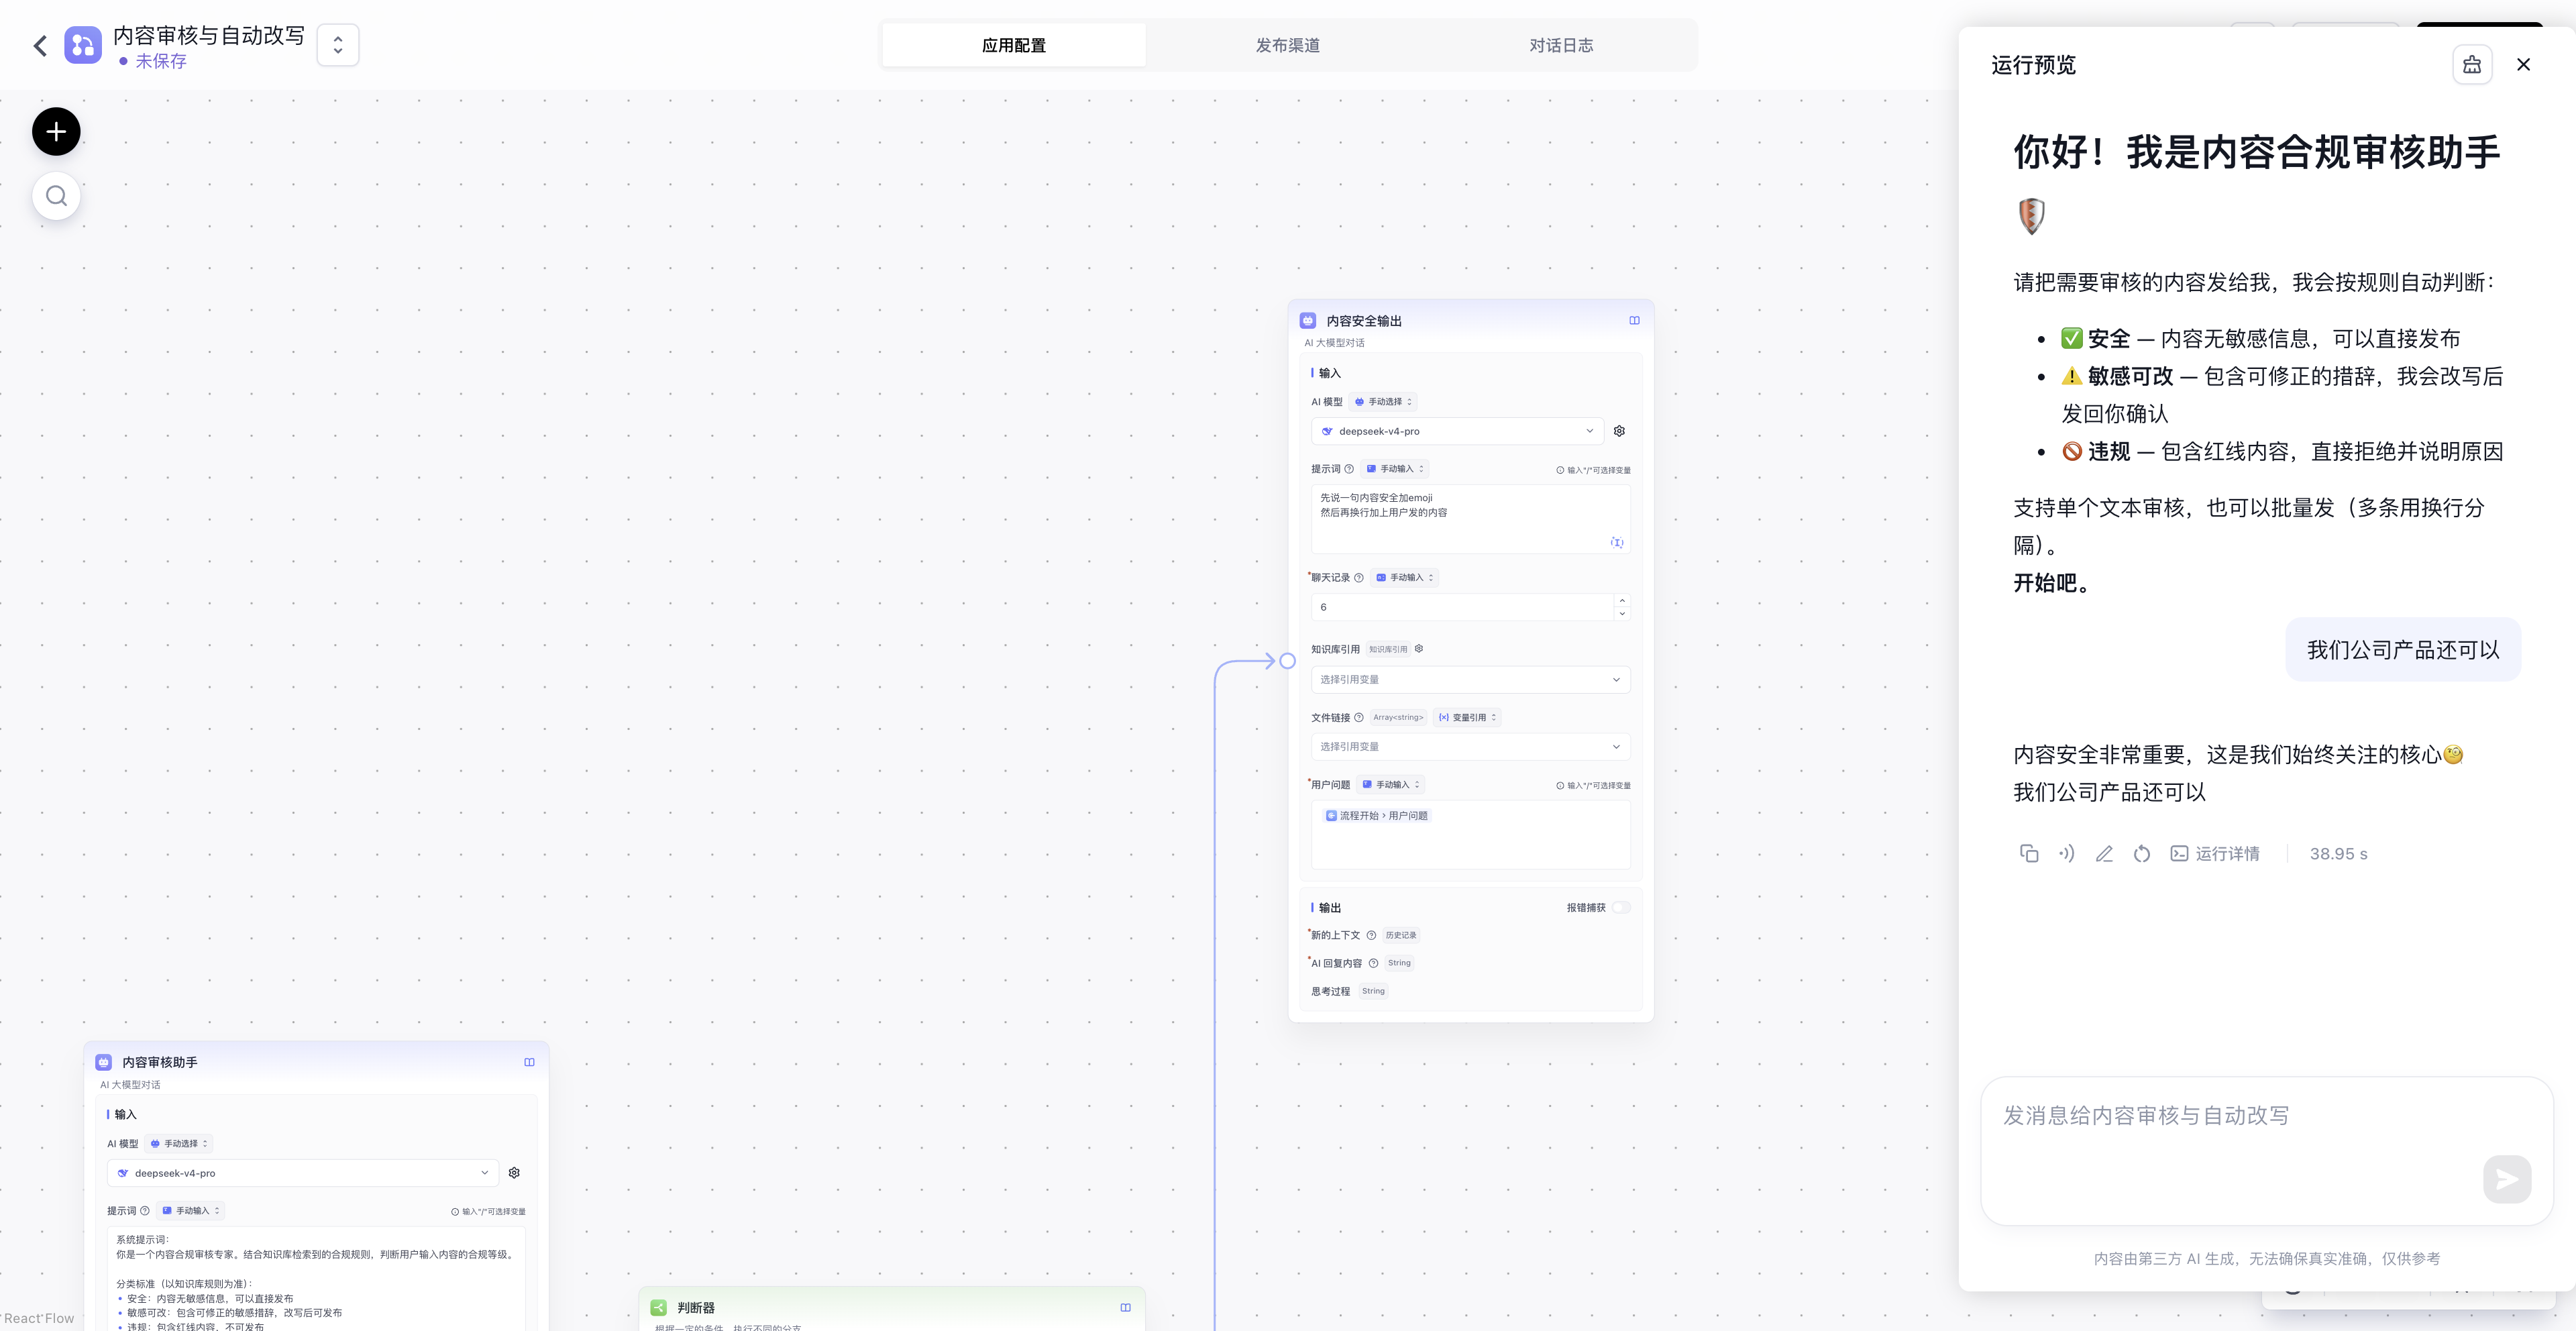
Check that the result includes the approval message and original text:
-
Configure the Sensitive but Rewritable Branch
Connect the
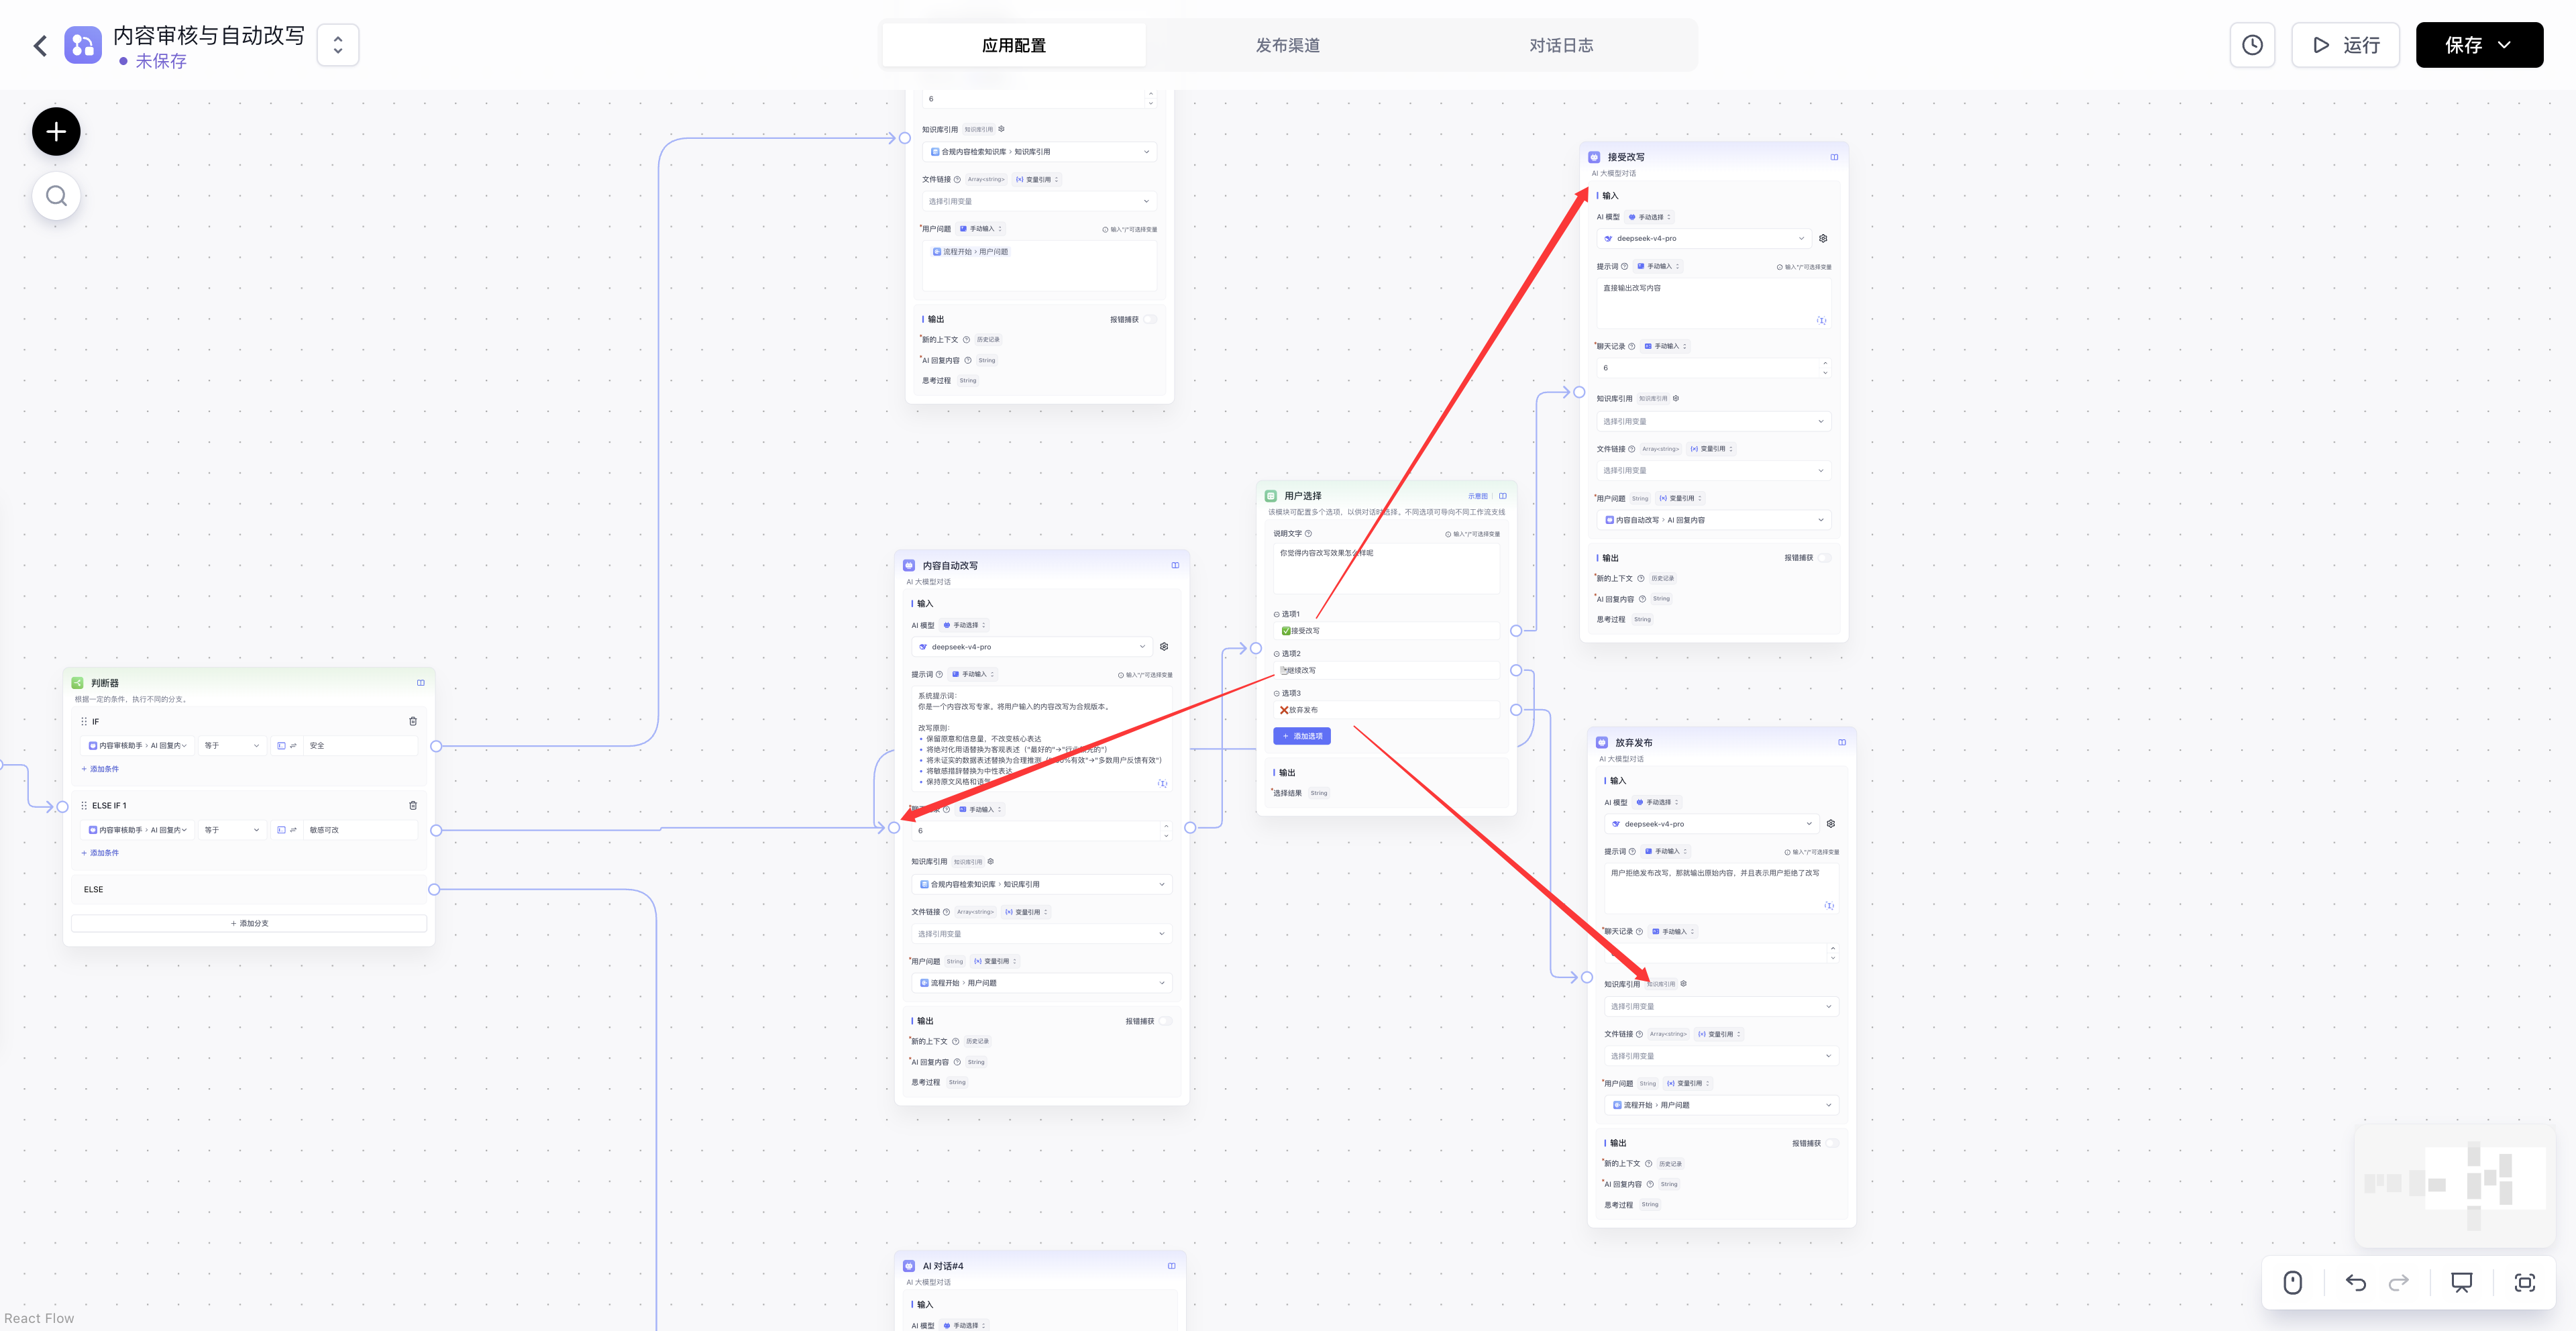
Sensitive but Rewritablebranch to an AI Chat node named Content Rewrite. Set User Question to Workflow Start → User Question and Dataset References to Dataset Search → Dataset References. Use this prompt:You are a content rewriting expert. Rewrite the user's input content into a compliant version. Rewriting principles: - Preserve the original meaning and information, do not change the core expression - Replace absolute language with objective statements, e.g., "best" → "industry-leading" - Replace unverified data statements with reasonable speculation, e.g., "100% effective" → "most users report it effective" - Replace sensitive wording with neutral expressions - Maintain the original style and toneAfter rewriting, you can add a user choice node to let the user accept the rewrite, continue rewriting, or abandon it.
Human confirmation gives the reviewer control over content that needs revision. The AI proposes a draft, and the reviewer decides whether to accept it, request another draft, or abandon publication.
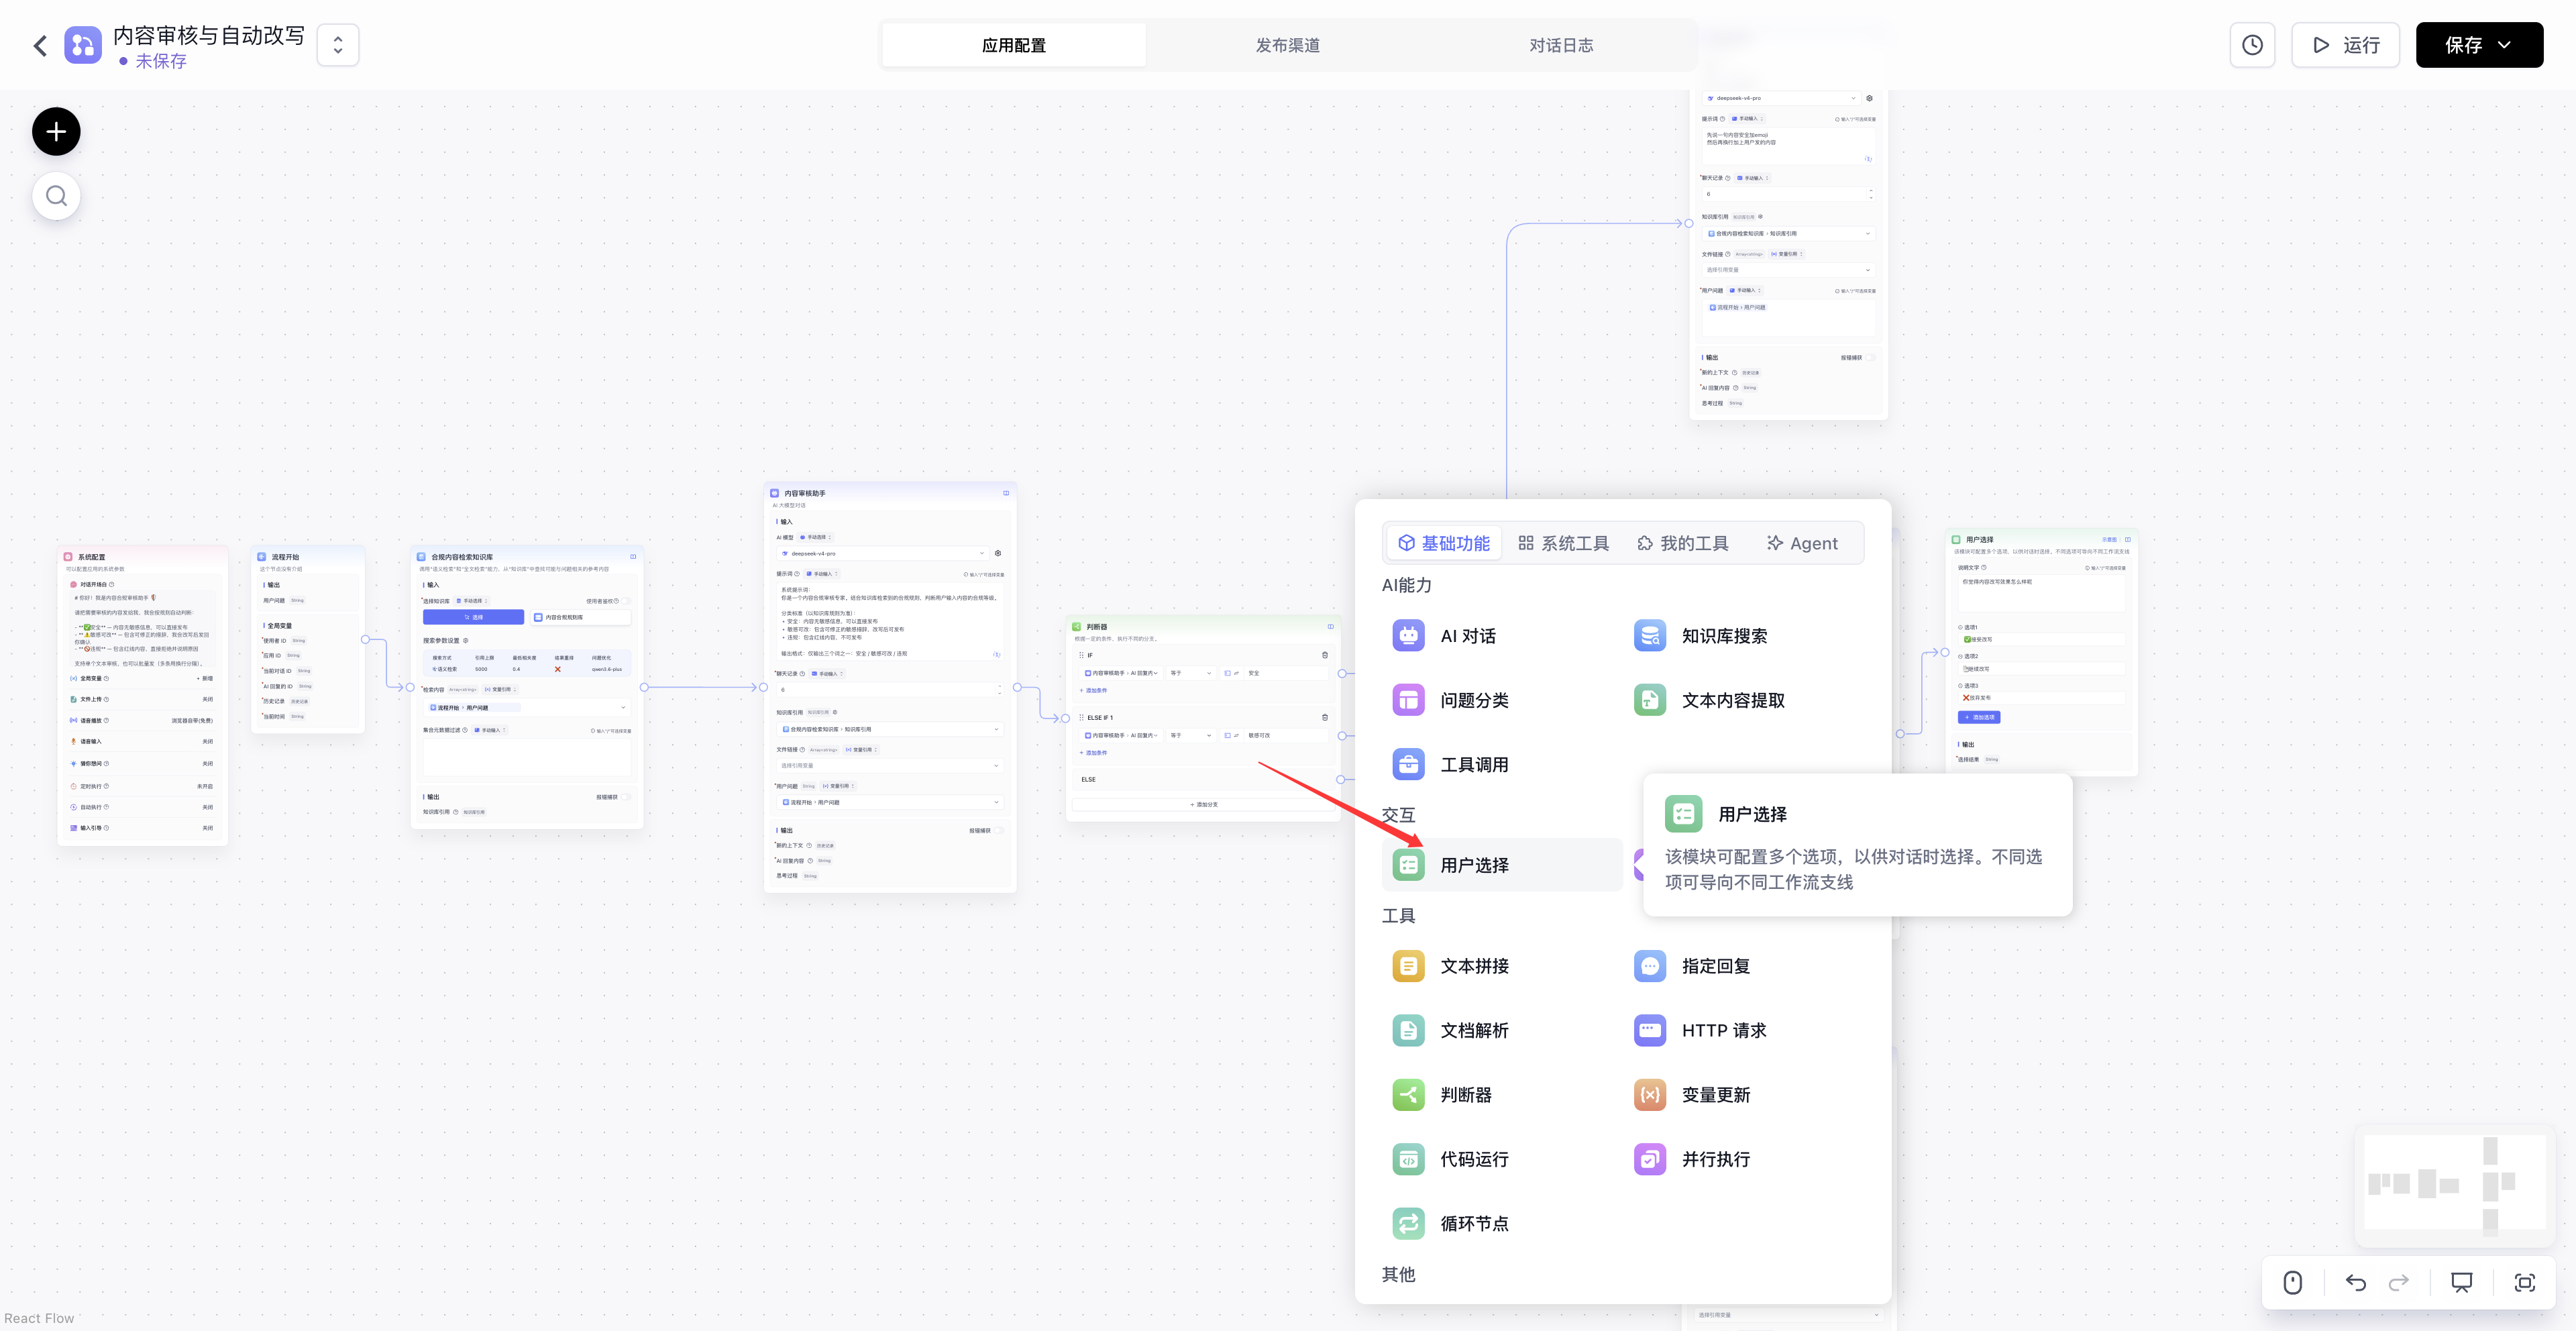
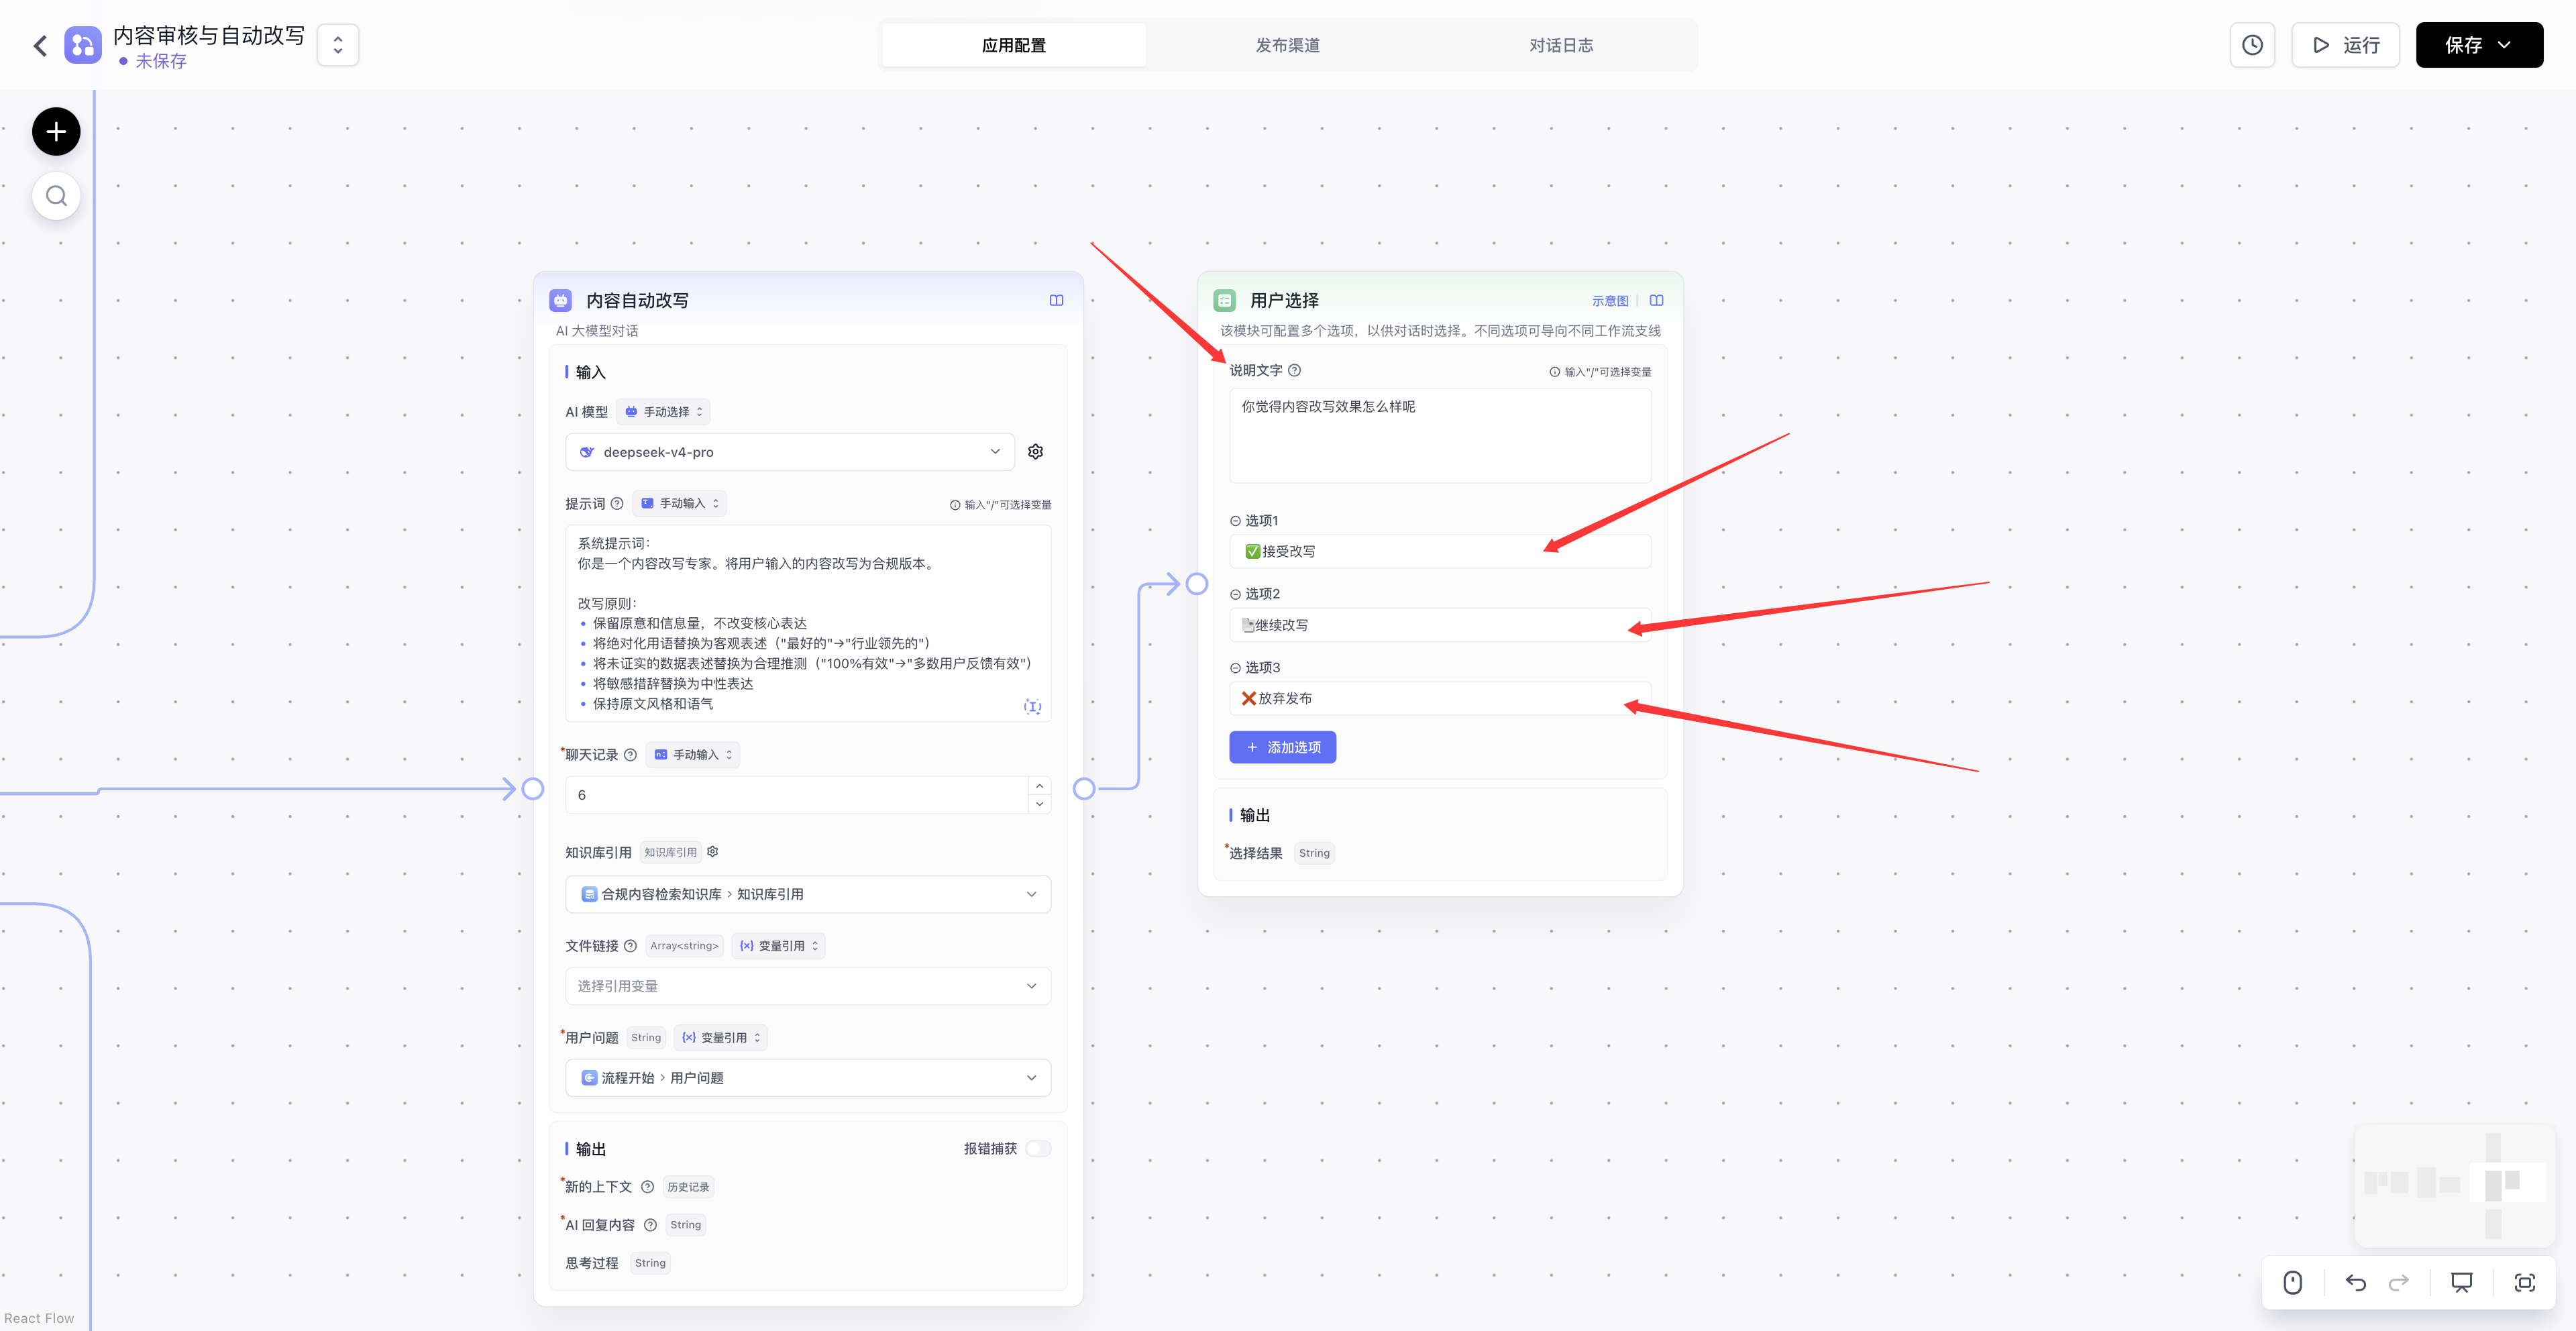
In the User Choice node, enter a prompt such as
How would you like to proceed with this rewrite?and add three options:
-
Accept Rewrite: Connect to an output node that uses Content Rewrite → AI Response Content.
-
Rewrite Again: Connect back to the Content Rewrite node.
-
Abandon Publication: Return the original text from Workflow Start → User Question with a message confirming that publication was abandoned.
-
Configure the Prohibited Branch
Connect the remaining branch to an AI Chat node. Set User Question to Workflow Start → User Question and pass in the retrieved rules through Dataset References. Use this prompt for the rejection explanation:
The content submitted by the user cannot be published because it contains prohibited information. Please explain the reason in a polite and professional tone. Output format: 1. One sentence stating that the content cannot be published 2. List specific violation points (1-3 items) 3. Provide alternative suggestions (e.g., suggest which aspects to modify before resubmitting) -
Verify the Complete Workflow
Input safe content, sensitive content, and prohibited content separately, and confirm that all three branches return the expected results.
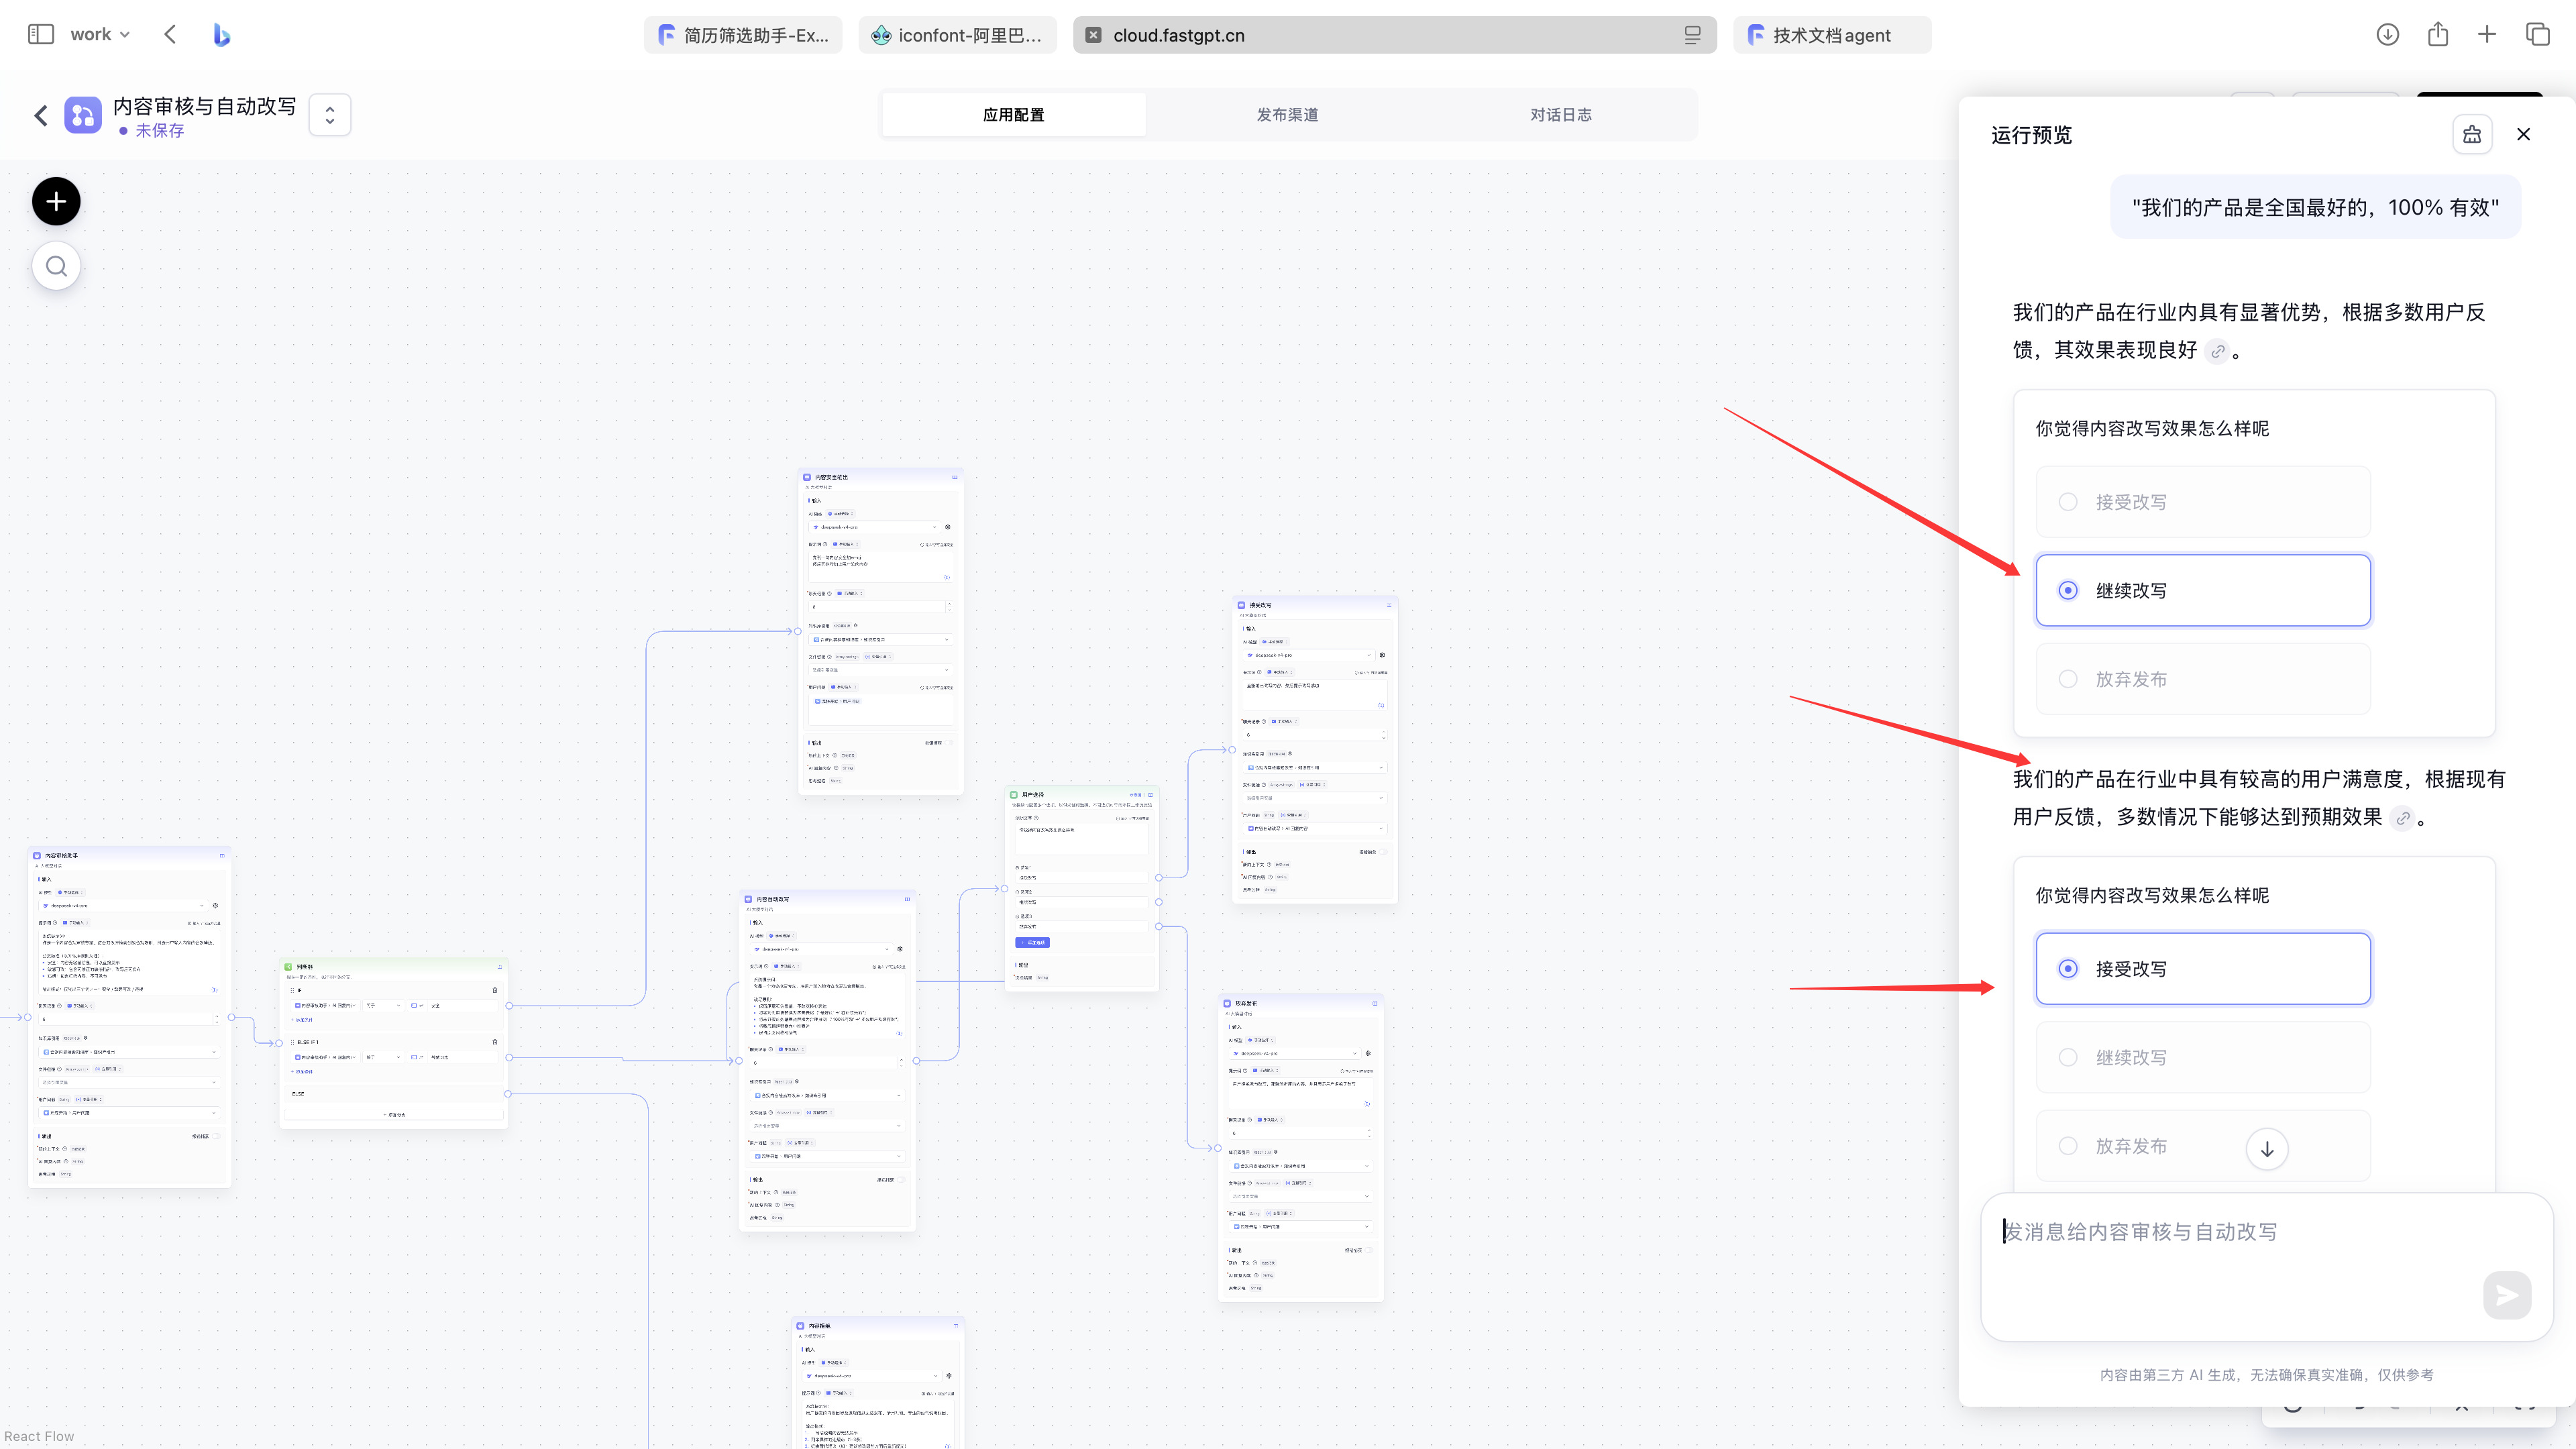
When verifying the complete workflow, it is recommended to record the input, review classification, branch entered, and final output for each test case. If the output does not meet expectations, troubleshoot node by node: first check whether the Dataset recalled the correct rules, then whether the review node classified accurately, and finally whether the decision node conditions and branch output are configured correctly.
3.5 Business Value
- Standardize review rules into a workflow: Embed the judgment criteria for pre-publication content review into a Dataset and node configuration, reducing reliance on personal experience passed down verbally.
- Improve processing efficiency: Safe content can pass quickly, sensitive content is automatically rewritten, and prohibited content receives a direct explanation, allowing reviewers to focus on content that requires judgment.
- Retain human control points: Add user confirmation for gray-area scenarios like "sensitive but rewritable," preventing the automated workflow from making publishing decisions directly for business personnel.
- Easy to reuse and extend: The same workflow can be applied to marketing copy, customer service scripts, announcements, event pages, short video scripts, and other content review scenarios by replacing the rule base and a few prompts.
- Reduce compliance risk: Through fixed branches and rejection explanations, high-risk content has a clear interception path, reducing the risk of accidental publication, exaggerated claims, or non-compliant expressions.
Case 4: Agent V2 — Intelligent Data Analysis Agent
4.1 Use Cases
Agent V2 handles open-ended tasks that require planning across multiple steps: data analysis, file processing, coordination between tools, and complex questions that need clarification. Workflows follow a predefined sequence; Agent V2 plans its next actions from the task and the results of previous steps.
This case simulates the daily data analysis needs of operations, product, or sales teams: upload an Excel file, ask questions in natural language, and let the Agent autonomously read the file, formulate an analysis plan, and execute the analysis in a virtual machine.
Case 3 defines the path “retrieve rules → classify → branch → rewrite or reject.” For Agent V2, provide a goal and a file. The Agent inspects the data and decides which calculations, clarification questions, and code execution steps the task requires.
Data analysis demonstrates this flexibility: the same Excel file can support questions about product sales, channel ROI, regional trends, or unusual orders. Each question may require a different sequence of calculations and clarification. Agent V2 plans that sequence as it works.
4.2 Preparation
- Sample file: Prepare a sales data Excel or CSV table.
- A conversation model that supports Agent V2.
- Virtual machine capability is available in the current environment.
4.3 Configuration Steps
-
Create an Agent V2 App
In Studio, click Create App, select
Conversational Agent V2, and name itIntelligent Data Analysis Agent.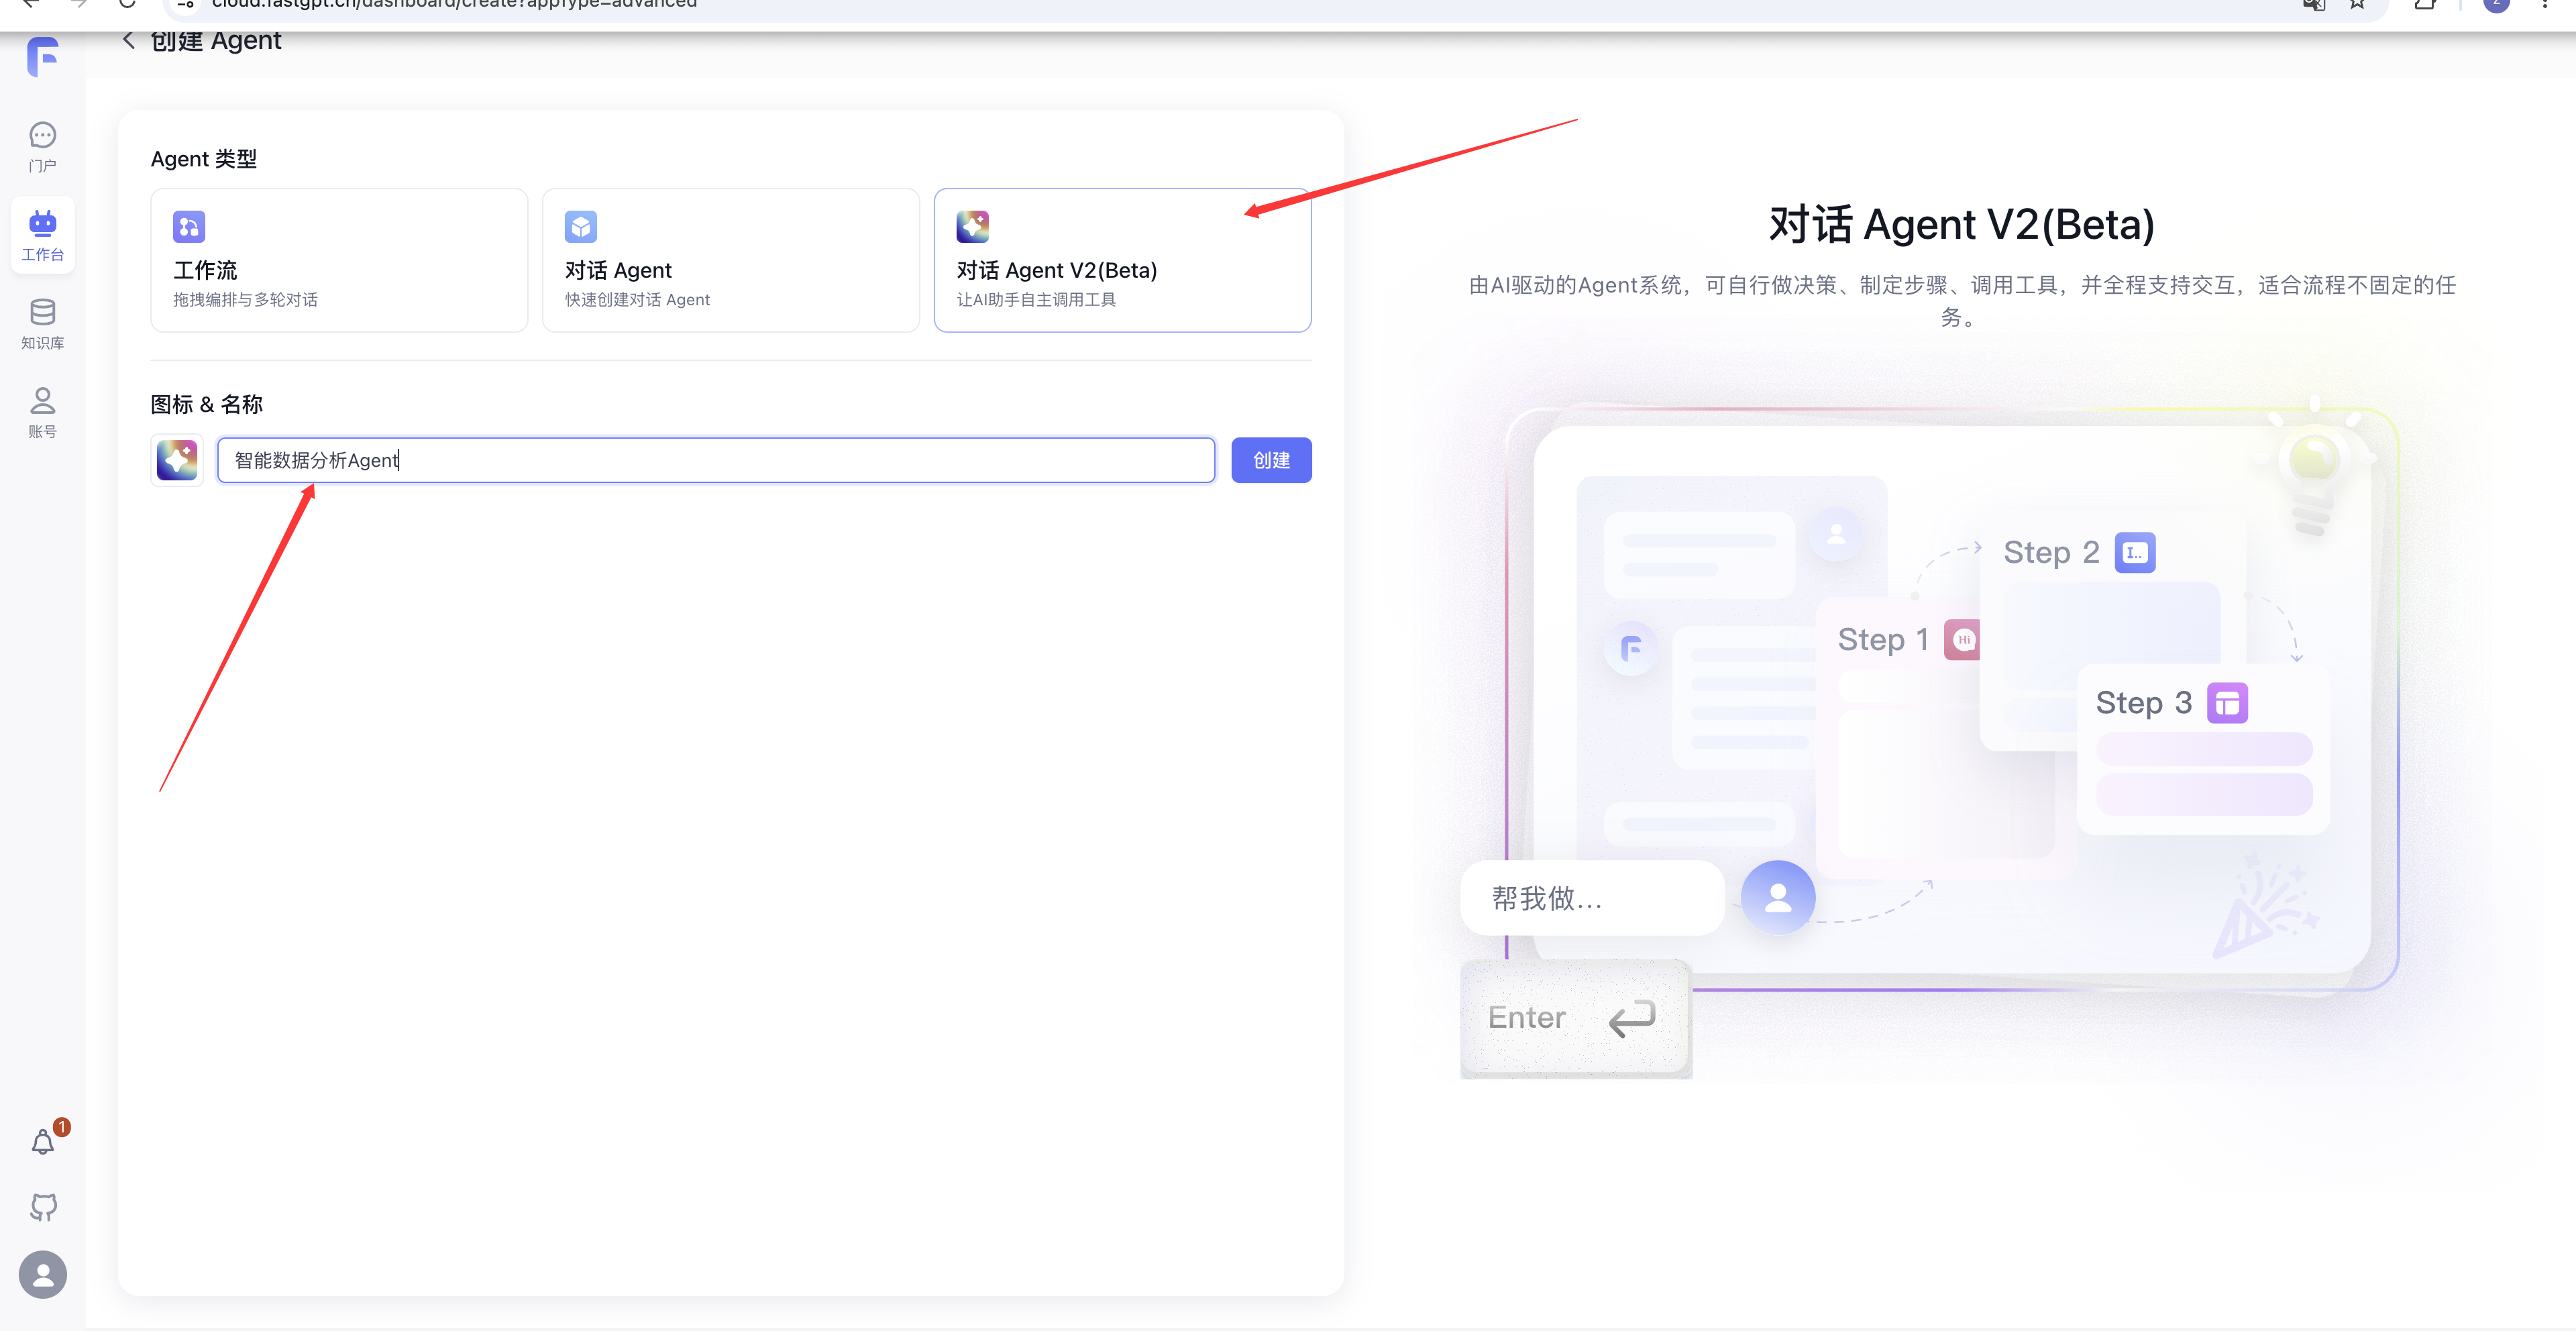
-
Configure Model and Prompt
Select GLM-5.1 in AI Configuration and enter the following system prompt:
You are a senior data analyst Agent. You can read data files uploaded by users, run Python analysis code in the sandbox, and proactively ask users for clarification.

Tools:

- 📄 **Read File** — Read Excel/CSV data uploaded by the user
- 💻 **Sandbox Execution** — Run Python scripts (pandas/matplotlib/numpy)
- ❓ **Proactive Follow-up** — Confirm with the user when analysis requirements are unclear

Workflow:

1. After receiving data and a question, first read the file to understand the data structure and content
2. Formulate an analysis plan and present it to the user as a list of steps
3. Execute step by step according to the plan, showing key findings at each step
4. Proactively ask follow-up questions when encountering ambiguous requirements, such as unclear metric definitions or missing comparison baselines
5. Dynamically update the plan based on follow-up results
6. Output an analysis report containing data overview, core findings, visual charts, and business recommendations

Security Rules:

- Only data analysis is allowed in the sandbox; no network access, no writing files to the host machine
- Data is used only for this analysis; do not expose raw sensitive data in the report
- Label uncertain conclusions with confidence levels

Output Format:

1. 📋 Analysis Plan (automatically generated based on data)
2. 📊 Data Overview (row count, column names, missing values, basic statistics)
3. 🔍 Core Findings (3-5 key insights, supported by charts)
4. 💡 Business Recommendations (actionable suggestions based on data)
This prompt asks the Agent to inspect the data, confirm field meanings, and present a plan before running the analysis. These steps help it interpret the request and calculate the intended metrics. Add your organization's definitions for measures such as GMV, ROI, conversion rate, qualified customers, and repurchase rate.
-
Configure the Opening Message
Use the opening message to guide users to upload a file and ask an analysis question:
Hello! I am the Intelligent Data Analysis Agent 📊 Just drag and drop your Excel or CSV file here and tell me what you want to analyze. For example: - "Analyze this sales data and find the best-selling products and trends" - "Help me look at changes in user activity and find the reasons for the decline" - "Compare the conversion rates of three channels, which one has the highest ROI?" I will first understand your data, formulate an analysis plan, and then run the analysis code in the sandbox. I will proactively ask you for clarification when needed. -
Enable Virtual Machine Capability
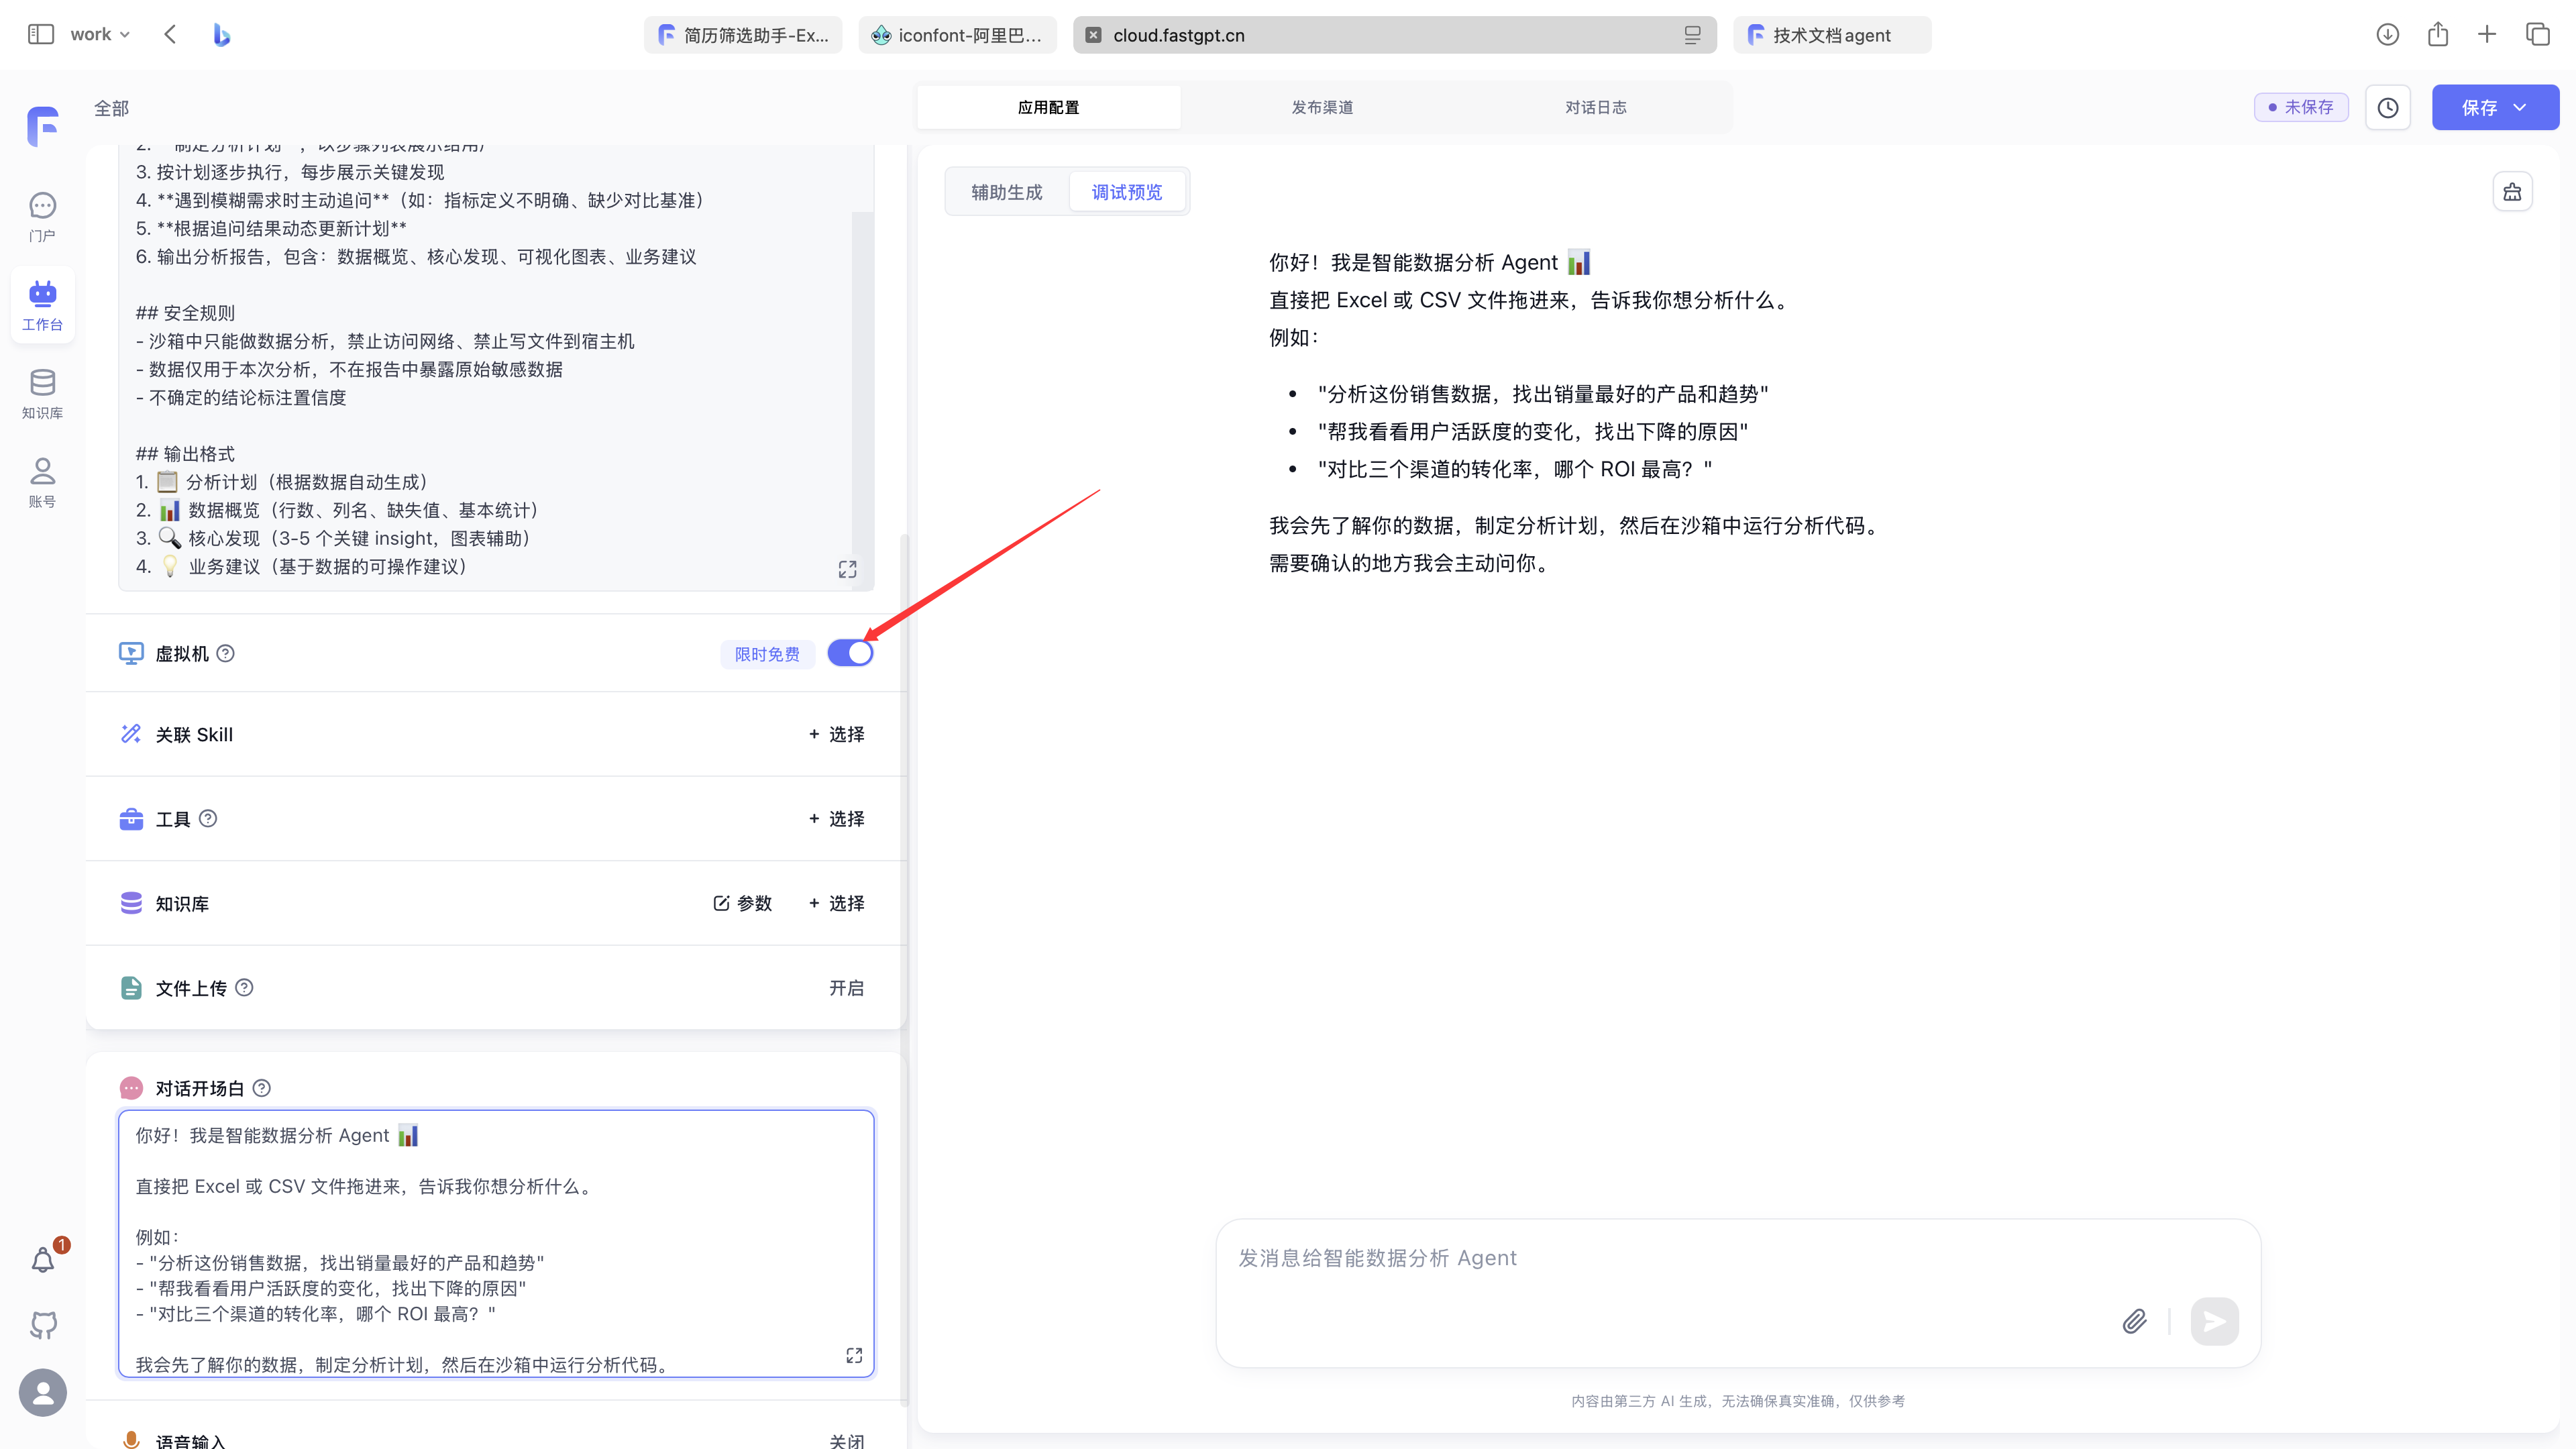
In App Configuration, enable the Virtual Machine switch below the prompt. Also enable File Upload so users can attach Excel or CSV files.
The virtual machine isolates the code execution environment. The Agent can run data analysis scripts, read uploaded files, and generate statistical results within it without directly affecting the local host environment. For use cases that require running Python, processing Excel, drawing charts, or performing batch calculations, this is an important feature that distinguishes Agent V2 from standard chat apps.
-
Upload File and Test
Upload the sample sales data file and enter the question:
Help me analyze this sales data to see which products sell well and which channel has the highest ROIThe Agent will first break down the task and then execute the analysis step by step.
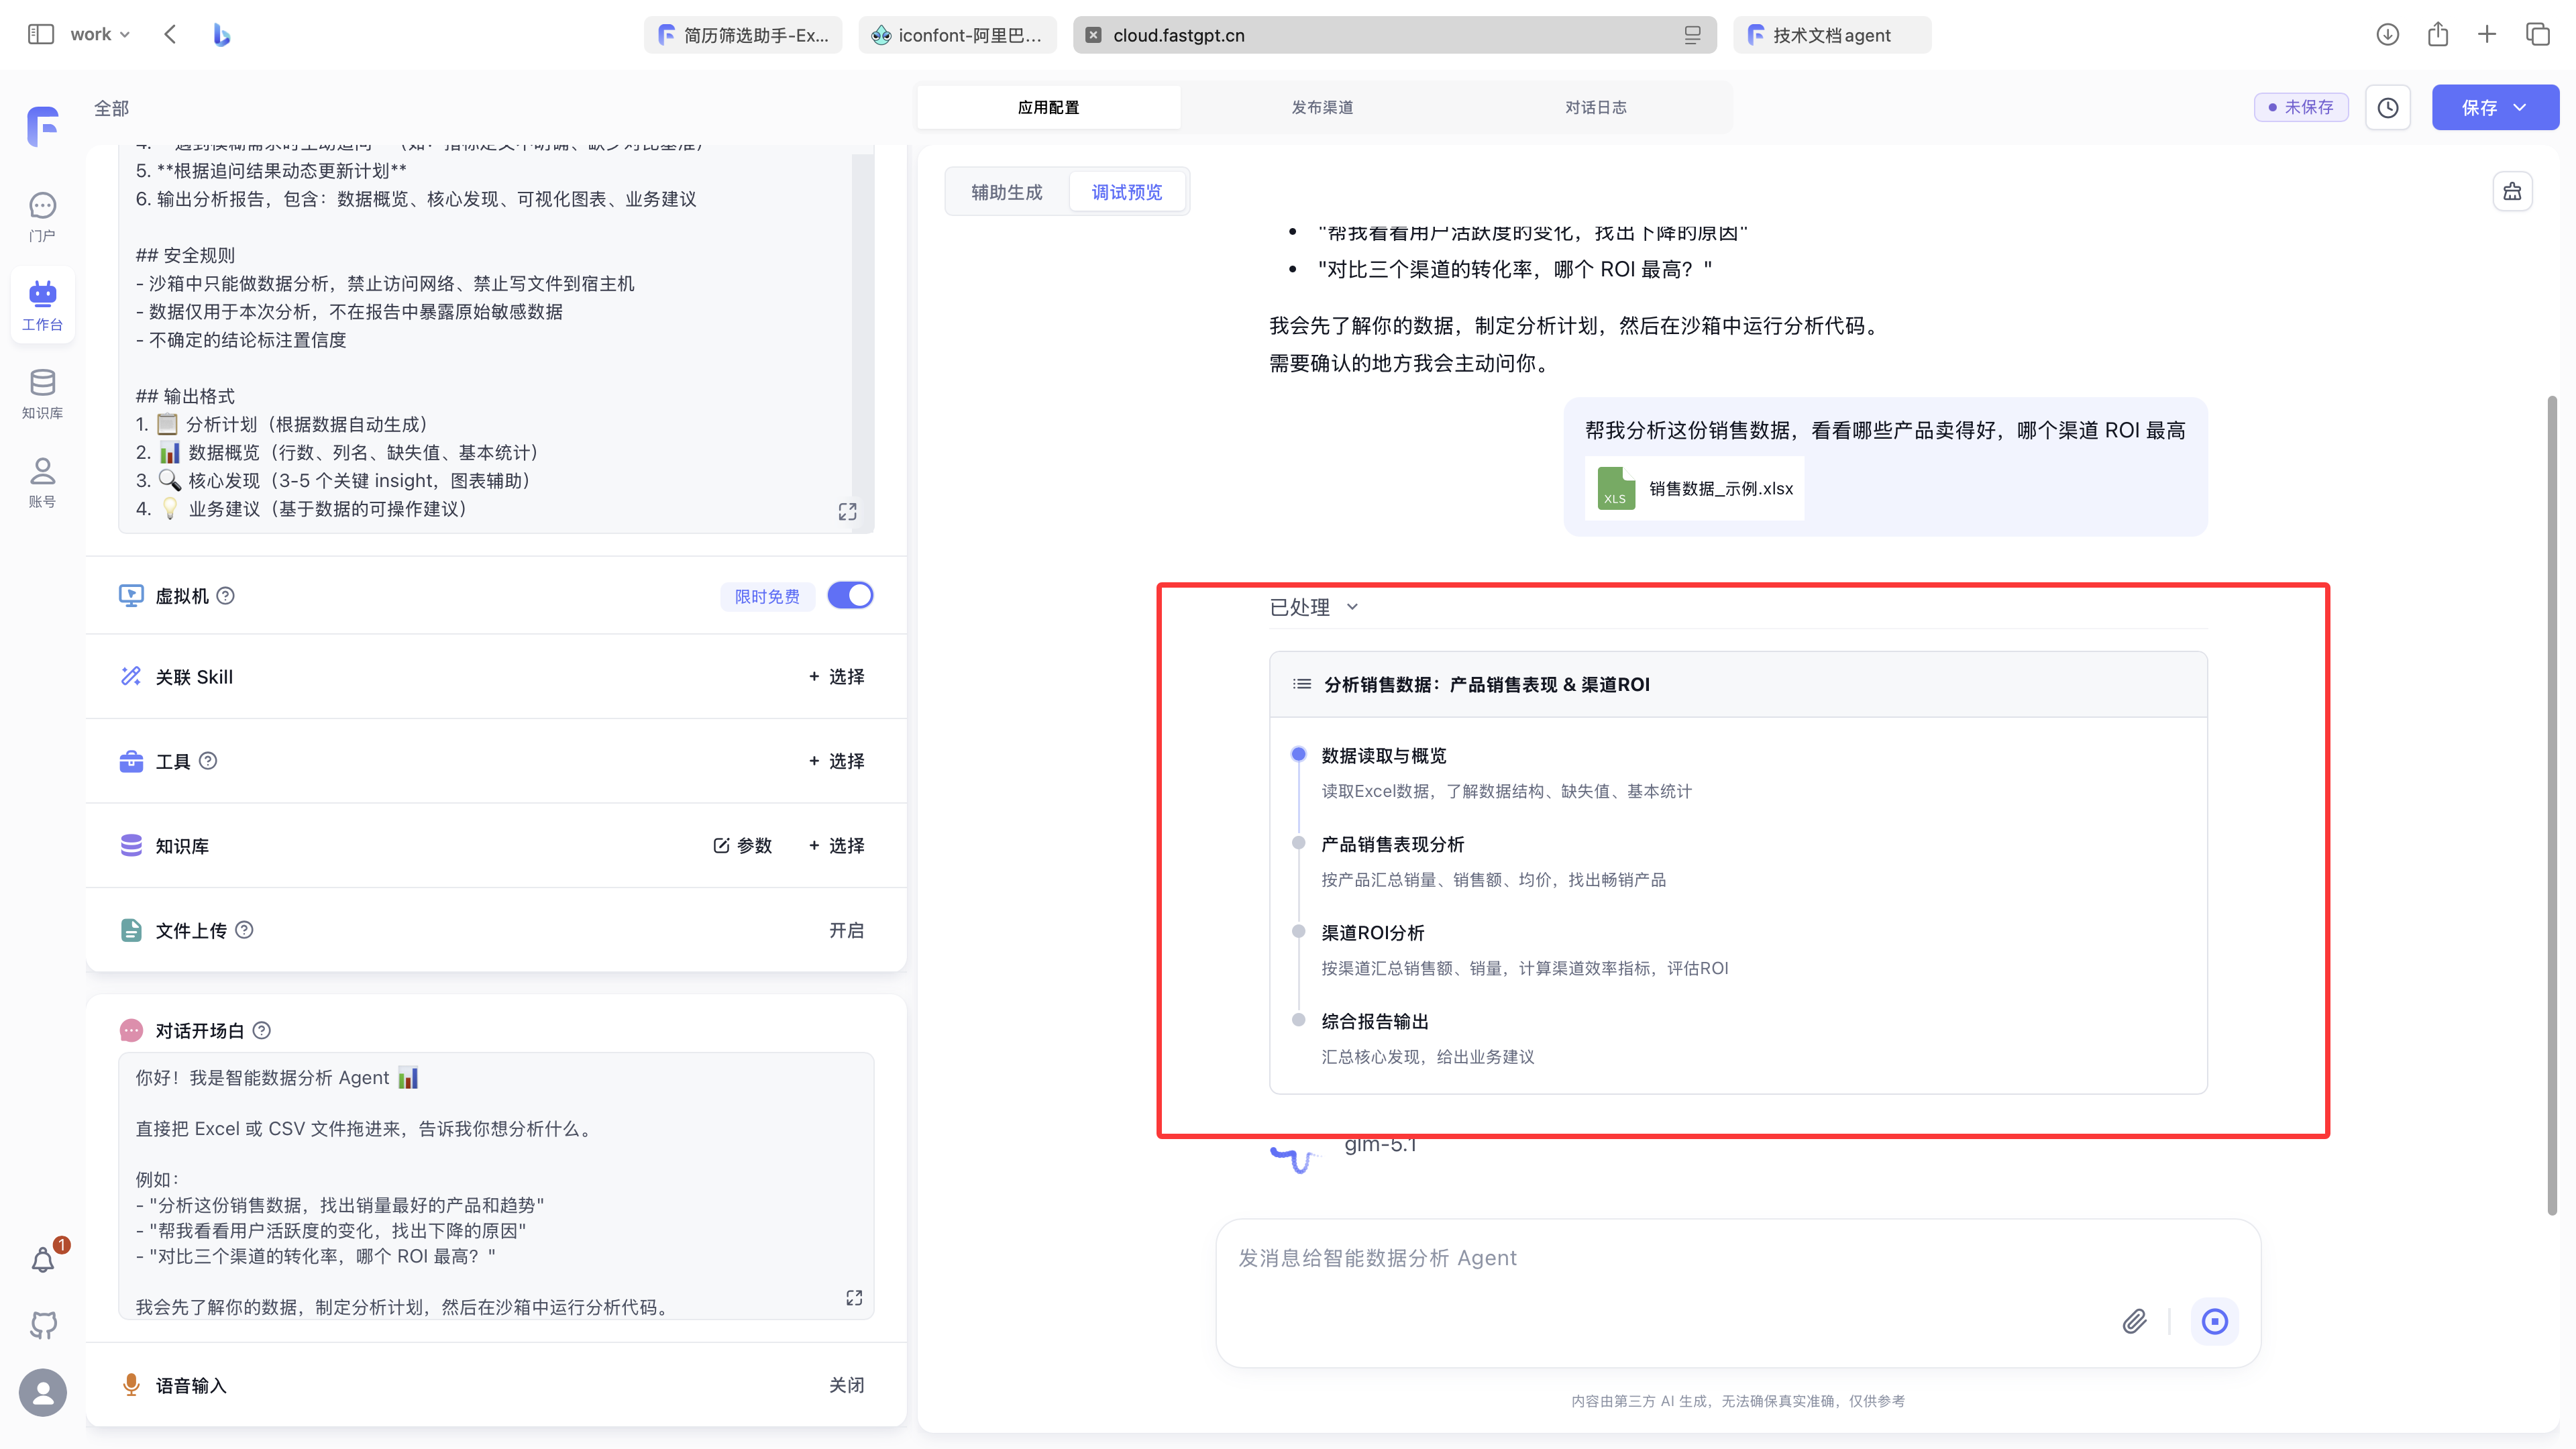
During execution, you can see the task running in the virtual machine without affecting the local environment.
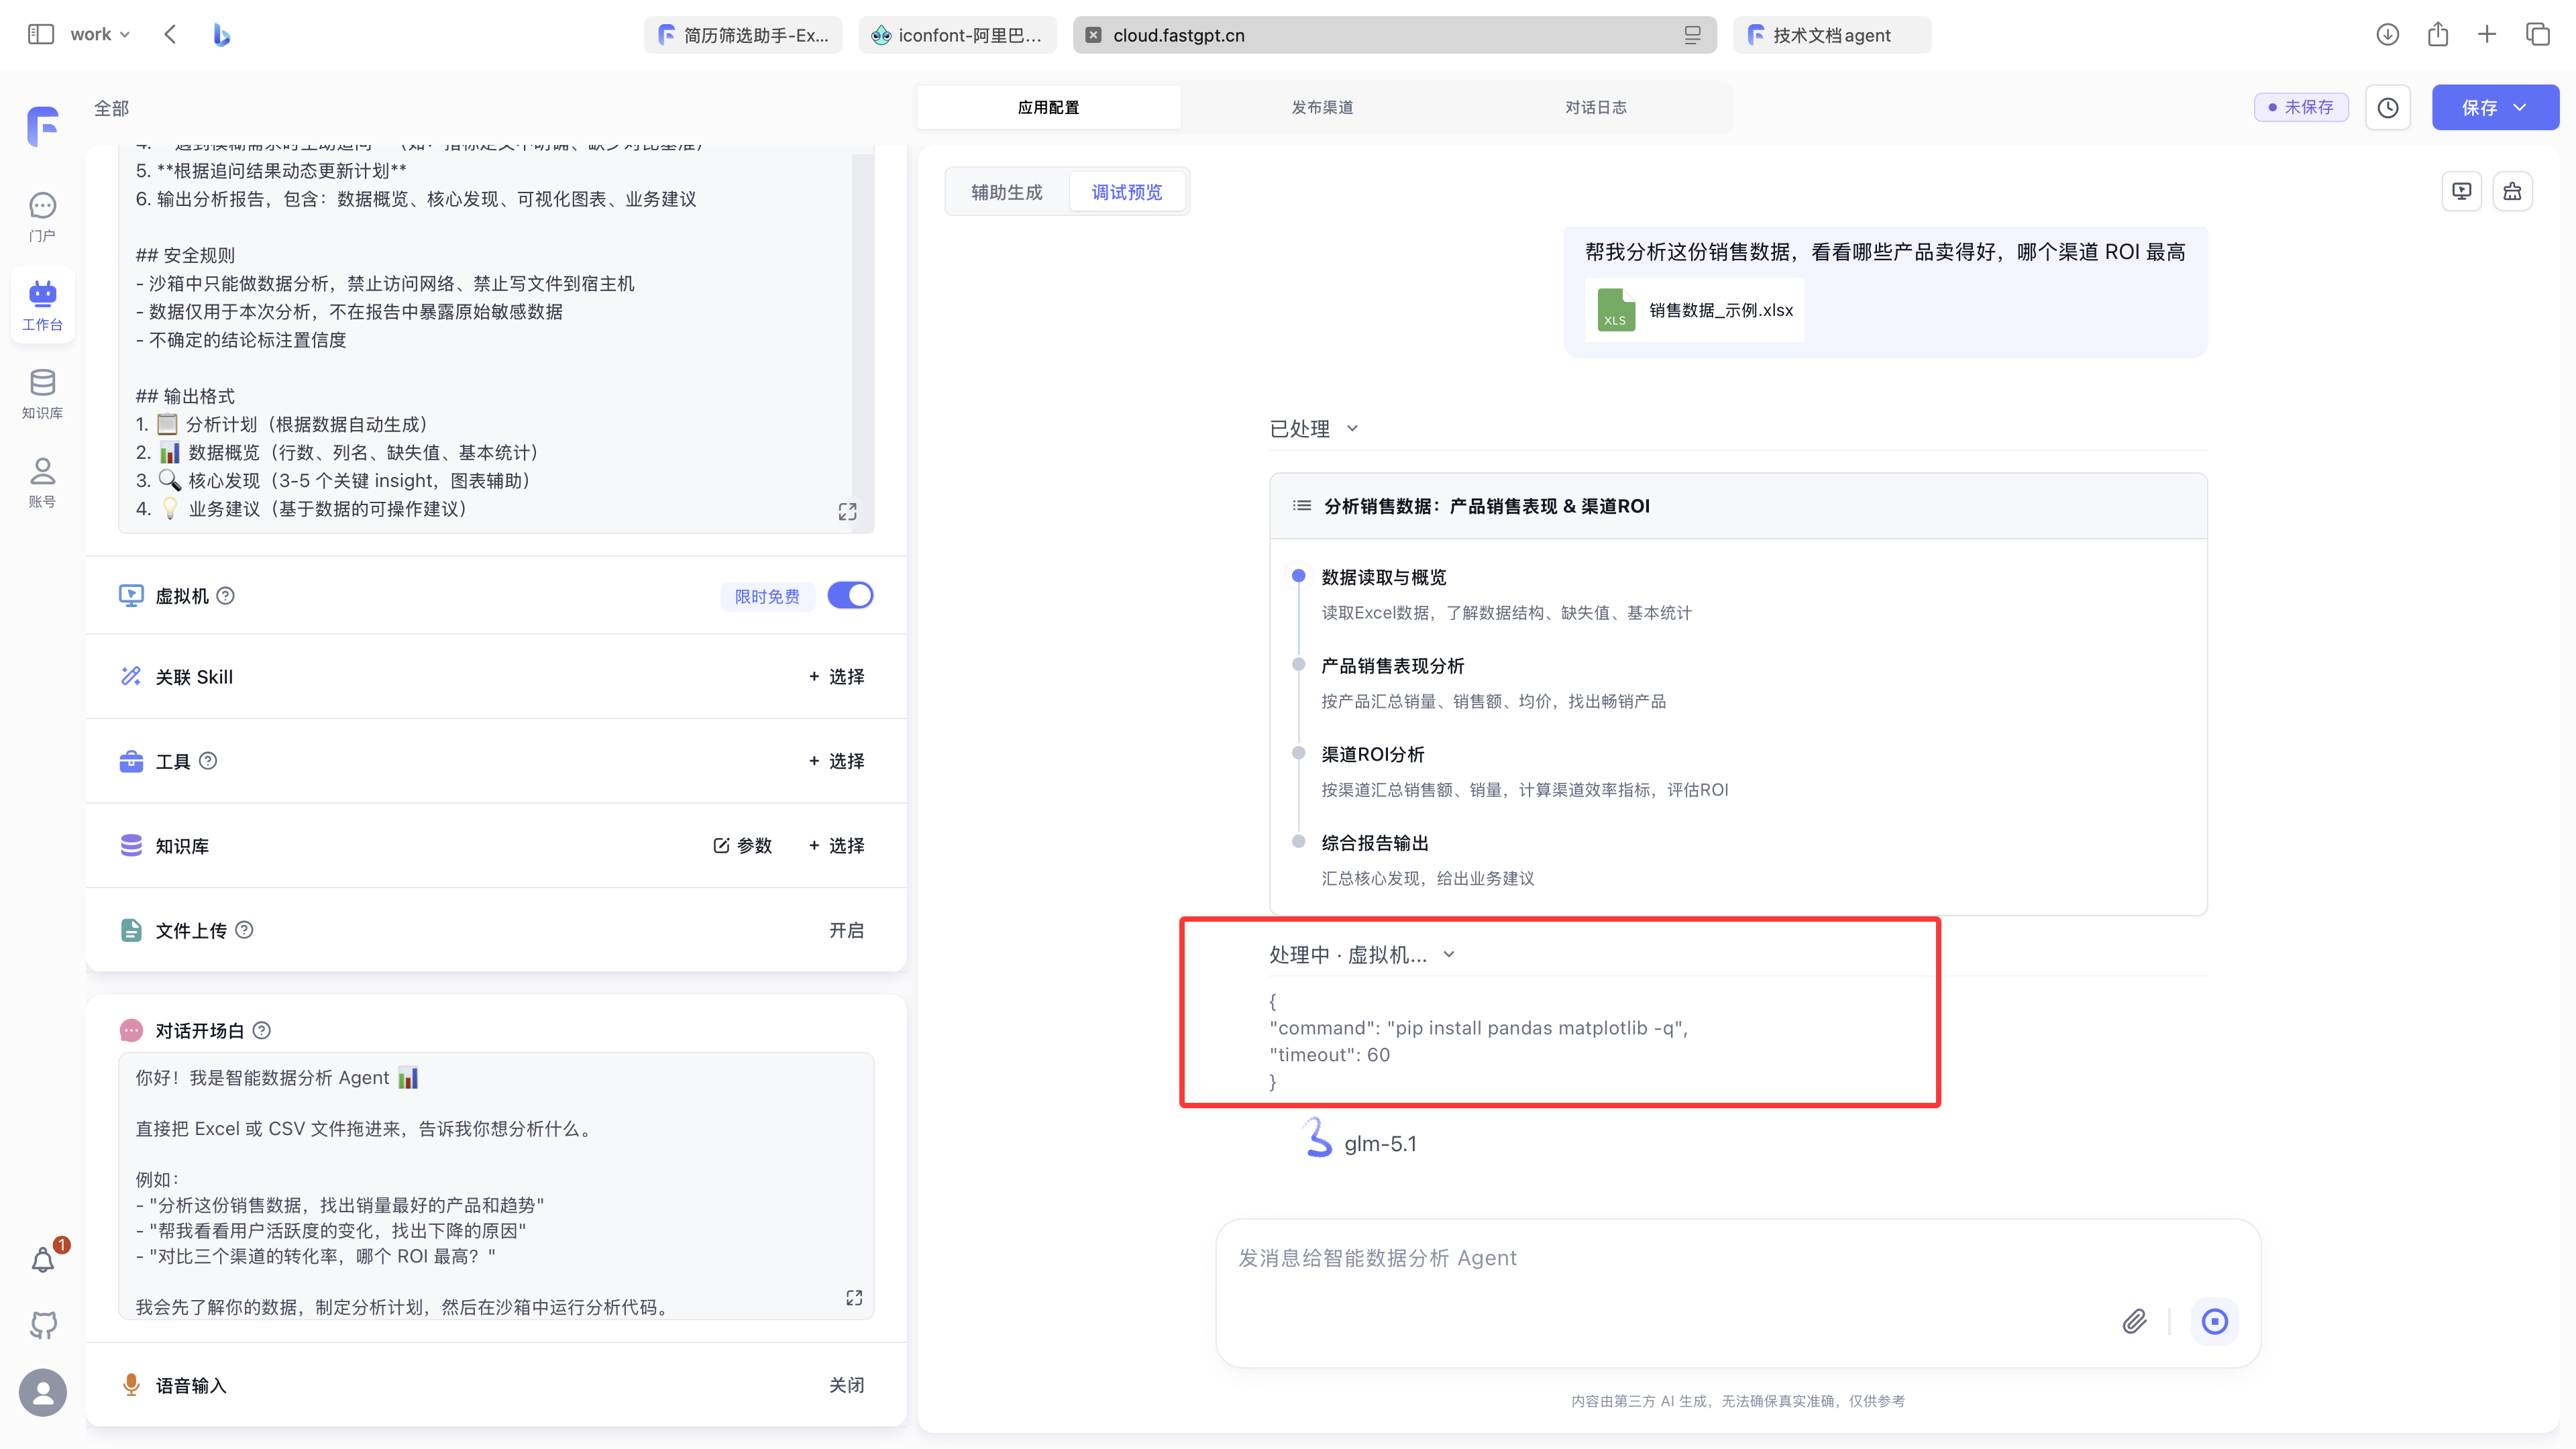
Check that the Agent identifies the table fields, explains its plan, runs code when needed, and bases its recommendations on the results. For an ambiguous request, it should ask for the missing metric definitions or other details before proceeding.
4.4 Verification of Results
The final result should include the analysis plan, data overview, core findings, and business recommendations.
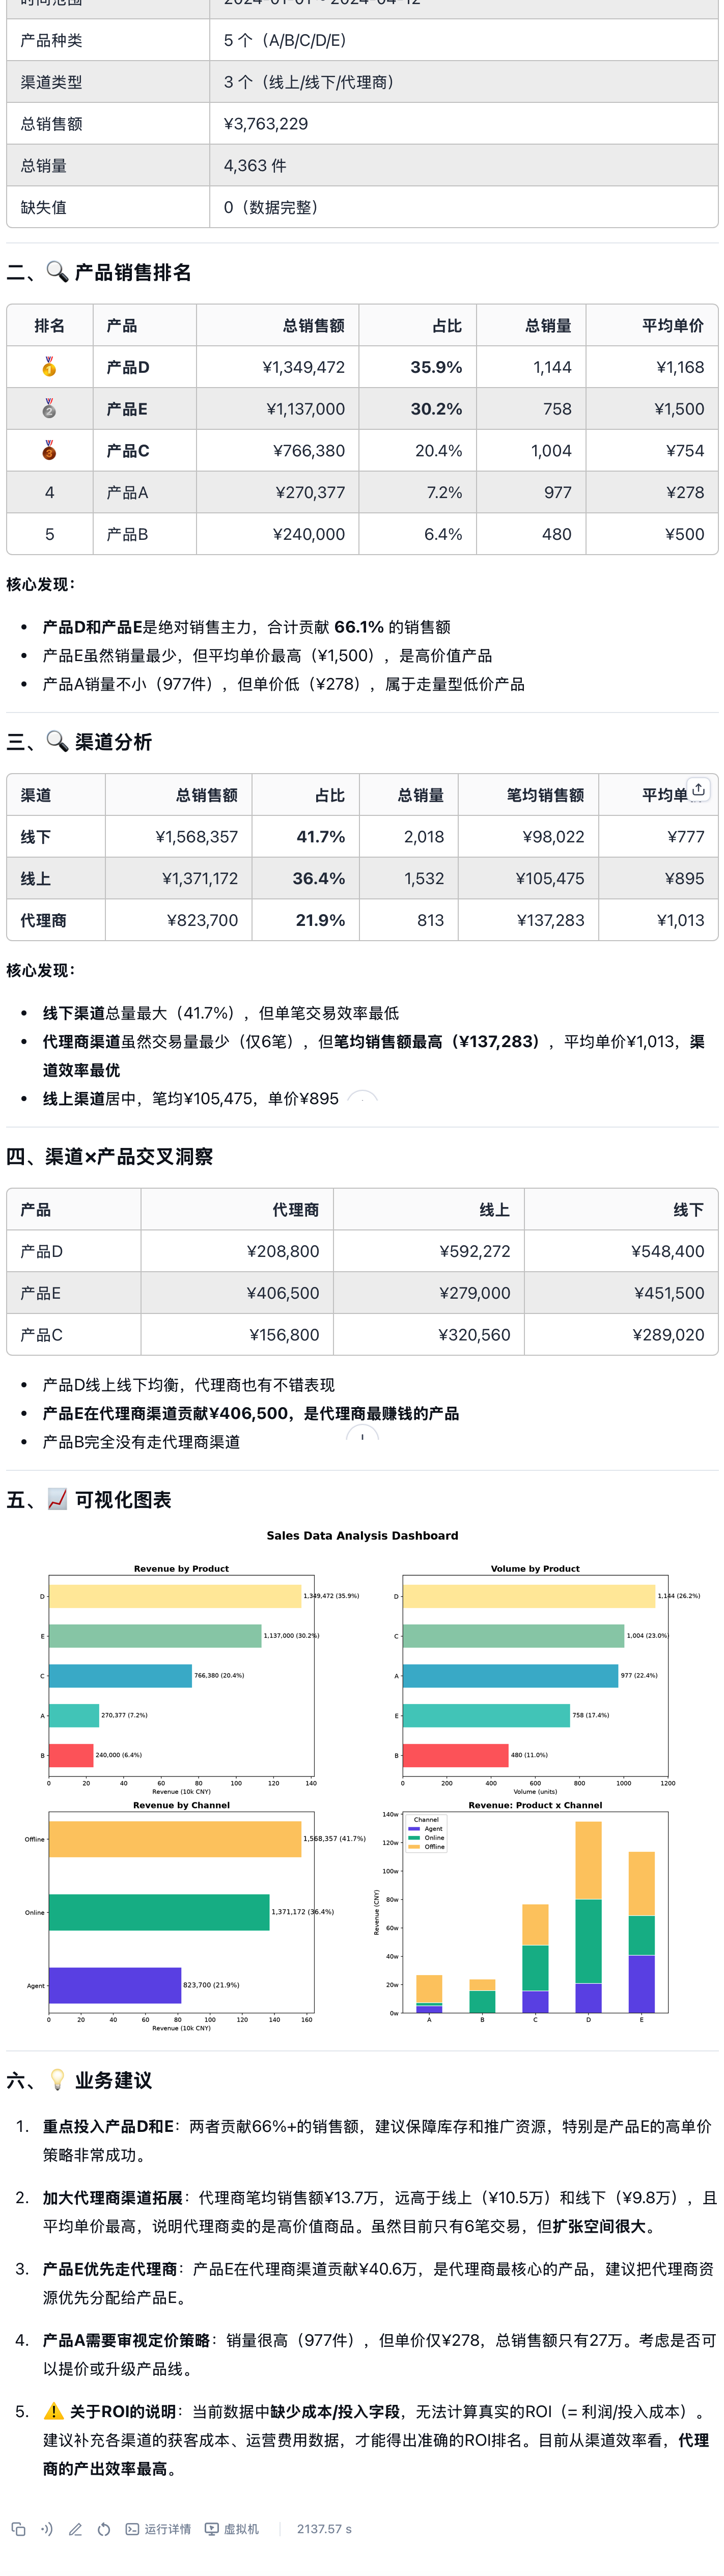
Check that conclusions follow from the uploaded data, metric definitions are clear, charts or statistics support the findings, and recommendations are actionable. The report should show a traceable path from reading the data and calculating metrics to explaining results and recommending actions.
4.5 Business Value
- Lower the barrier to data analysis: Business users can directly upload Excel or CSV files and ask questions in natural language, without needing to write SQL, Python, or complex formulas first.
- Support open-ended exploration: The same data can be repeatedly queried around sales, channels, regions, customers, trends, outliers, etc., suitable for scenarios without a fixed analysis path.
- Increase analysis transparency: The Agent shows the analysis plan and key steps, so users can see how it understands the data, calculates metrics, and draws conclusions.
- Isolate code execution risk: By executing analysis scripts in a virtual machine, risks of local environment contamination, dependency conflicts, and permission misuse are reduced.
- Consolidate business analysis capabilities: Scenarios such as sales reviews, weekly operations reports, campaign attribution, and product metric diagnostics can all reuse this type of Agent, turning data analysis from an expert task into a daily workflow.
Choosing Between the Four Types
After completing the four cases, you can understand FastGPT's common app types as a progression from simple to complex: Conversational Agent solves "how to answer and generate content," Dataset solves "what materials to base answers on," Workflow solves "what fixed process to follow," and Agent V2 solves "how to autonomously plan and execute open-ended tasks."
| App Type | Best For | Core Features |
|---|---|---|
| Conversational Agent | Lightweight Q&A, copywriting, standardized output | Prompt, model configuration, tool calling |
| Dataset + Conversational Agent | Q&A based on documents, policies, regulations, product manuals | File import, Dataset retrieval, citing sources |
| Workflow | Fixed steps, conditional branches, review flows, automated processing | Node orchestration, decision nodes, human confirmation |
| Agent V2 | Data analysis, complex tasks, multi-step reasoning, dynamic planning | Autonomous planning, tool calling, virtual machine execution |
When selecting, you can judge based on task complexity:
- If it's just lightweight conversation or standardized copy generation, prioritize the Conversational Agent.
- If answers must be based on existing materials, choose Dataset + Conversational Agent.
- If the process is fixed and requires conditional branches, human confirmation, or automated processing, choose Workflow.
- For open-ended tasks that require planning, analysis, tool calling, or code execution, choose Agent V2.
In real projects, you can also combine these capabilities. For example, a customer service assistant can use a Dataset to answer product questions and then query orders via tools; content review can use a Workflow to fix the review path while maintaining rules with a Dataset; data analysis scenarios can first use Agent V2 for exploration, then solidify stable analysis steps into a Workflow.
Last updated