How to Develop System Plugins
FastGPT system plugin development guide (Tools)
Introduction
Starting from version 4.10.0, the FastGPT system plugin project moved to the standalone fastgpt-plugin repository, using a pure code approach for tool development.
After the plugin marketplace update in version 4.14.0, the system tool development process changed — please follow the latest documentation when contributing code.
You can develop and debug plugins independently in the fastgpt-plugin project, then submit a PR directly to FastGPT without needing to run the main FastGPT service.
Currently, system plugins only support the "Tool" type.
Concepts
- Tool: The smallest execution unit. Each tool has a unique ID with specific inputs and outputs.
- Toolset: A collection of tools that can contain multiple tools.
In fastgpt-plugin, you can create one tool or toolset at a time. Each submission accepts only one tool/toolset. To develop multiple, create separate PRs.
1. Prepare the Development Environment
1.1 Install Bun
- Install Bun. FastGPT-plugin uses Bun as its package manager.
1.2 Fork the FastGPT-plugin Repository
Fork the repository at https://github.com/labring/fastgpt-plugin
1.3 Set Up the Development Scaffold
Note: Due to Bun-specific APIs, you must use bunx for installation. Using npx or pnpm will cause errors.
Create a new directory and run:
bunx @fastgpt-sdk/plugin-cliThis creates a fastgpt-plugin directory and adds two remotes:
- upstream pointing to the official repository
- origin pointing to your fork
Uses sparse-checkout by default to avoid pulling all official plugin code.
- Initialize a
gitrepository in a new local directory:
git initIf you have a Git SSH key configured:
git remote add origin git@github.com:[your-name]/fastgpt-plugin.git
git remote add upstream git@github.com:labring/fastgpt-plugin.git
Otherwise use HTTPS:
git remote add origin https://github.com/[your-name]/fastgpt-plugin.git
git remote add upstream https://github.com/labring/fastgpt-plugin.git- (Optional) Use sparse-checkout to avoid pulling all plugin code. Without this, all official plugins will be pulled:
git sparse-checkout init --no-cone
git sparse-checkout add "/*" "!/modules/tool/packages/*"
git pull
Create a new tool:
bun i
bun run new:tool
2. Write Tool Code
2.1 Tool Code Structure
Follow the prompts to choose between creating a tool or toolset, and enter a directory name (use camelCase).
System tool file structure:
src // Source code and processing logic
└── index.ts
test // Test cases
└── index.test.ts
config.ts // Configuration: tool name, description, type, icon, etc.
index.ts // Entry point — do not modify this file
logo.svg // Logo — replace with your tool's logo
README.md // (Optional) README with usage instructions and examples
assets/ // (Optional) Resource files such as images, audio, etc.
package.json // npm package
Toolset file structure:
children
└── tool // Same structure as a tool above, but without README and assets
config.ts
index.ts
logo.svg
README.md
assets/
package.json
2.2 Modify config.ts
- name and description fields support both Chinese and English
- courseUrl (optional) — Link for obtaining keys, official website, tutorial, etc. If you provide a README.md, you can include it there instead
- author — Developer name
- tags — Default tags for the tool. Available tags (enum):
- tools: Tools
- search: Search
- multimodal: Multimodal
- communication: Communication
- finance: Finance
- design: Design
- productivity: Productivity
- news: News
- entertainment: Entertainment
- social: Social
- scientific: Scientific
- other: Other
- secretInputList — Secret input list for configuring tool
activation information, typically includingkeys,Endpoint,Port, etc. (see secretInputList format below) - versionList (configured per tool) — For version management. Each element has:
- value: Version number (semver recommended)
- description: Description
- inputs: Input parameters (see inputs format below)
- outputs: Return values (see outputs format below)
For tools within a Toolset, type, courseUrl, and author are inherited from the Toolset configuration and don't need to be specified.
secretInputList Format
General format:
{
  key: 'key', // Unique key
  label: 'Frontend display label',
  description: 'Frontend display description', // Optional
  inputType: 'input' | 'secret' | 'switch' | 'select' | 'numberInput', // Frontend input type
  // secret: Encrypted input — the value is symmetrically encrypted when saved
  // switch: Toggle switch
  // select: Dropdown select
  // numberInput: Number input
  // input: Plain text input
}
Here's an example from the dalle3 configuration. See dalle3's config.ts for the full file.
{
  // Other configuration
  secretInputConfig: [
    {
      key: 'url',
      label: 'Dalle3 API Base URL',
      description: 'e.g., https://api.openai.com',
      inputType: 'input',
      required: true
    },
    {
      key: 'authorization',
      label: 'API Credential (without Bearer prefix)',
      description: 'sk-xxxx',
      required: true,
      inputType: 'secret'
    }
  ]
}
inputs Format
General format:
{
  key: 'Unique key within this tool, matching the InputType definition in src/index.ts',
  label: 'Frontend display label',
  renderTypeList: [FlowNodeInputTypeEnum.input, FlowNodeInputTypeEnum.reference], // Frontend input type
  valueType: WorkflowIOValueTypeEnum.string, // Data type
  toolDescription: 'Description used during tool invocation' // Required if this is a tool call parameter
}
dalle3 inputs example:
{
//...
  versionList: [
    {
      // Other configuration
      inputs: [
        {
          key: 'prompt',
          label: 'Drawing Prompt',
          valueType: WorkflowIOValueTypeEnum.string,
          renderTypeList: [FlowNodeInputTypeEnum.reference, FlowNodeInputTypeEnum.input],
          toolDescription: 'Drawing prompt'
        }
      ],
    }
    // ...
  ]
}
outputs Format
{
  key: 'link', // Unique key
  valueType: WorkflowIOValueTypeEnum.string, // See the Enum type definition for options
  label: 'Image Access Link', // Display name
  description: 'Image access link' // Description (optional)
}
dalle3 outputs example:
{
  // ...
  versionList: [
    {
      // ...
      outputs: [
        {
          valueType: WorkflowIOValueTypeEnum.string,
          key: 'link',
          label: 'Image Access Link',
          description: 'Image access link'
        },
        {
          type: FlowNodeOutputTypeEnum.error,
          valueType: WorkflowIOValueTypeEnum.string,
          key: 'system_error',
          label: 'Error Message'
        }
      ]
    }
  ],
}
2.3 Write the Processing Logic
Write your processing logic in [your-tool-name]/src/index.ts as the entry point. Key requirements:
- Use zod for type definitions, exported as
InputTypeandOutputTypeschemas. - The entry function must be named
tool. You can define additional helper functions.
import { format } from 'date-fns';
import { z } from 'zod';

export const InputType = z.object({
  formatStr: z.string().optional()
});

export const OutputType = z.object({
  time: z.string()
});

export async function tool(props: z.infer<typeof InputType>): Promise<z.infer<typeof OutputType>> {
  const formatStr = props.formatStr || 'yyyy-MM-dd HH:mm:ss';

  return {
    time: format(new Date(), formatStr)
  };
}
The example above takes a formatStr (format string) and returns the current time. To install packages, run bun install PACKAGE from the /modules/tools/packages/[your-tool-name] directory.
4. Build / Package
Starting from FastGPT v4.14.0, system plugins are packaged as .pkg files. Run:
bun run build:pkgThis builds and packages all local plugins as .pkg files in the dist/pkgs directory.
5. Unit Testing
FastGPT-plugin uses Vitest as its testing framework.
5.1 Write Test Cases
Write test cases in test/index.test.ts. Run them with bun run test index.test.ts <full-path>.
Note: Never include secret keys in test cases.
When using AI agent tools to write test cases, the agent may modify your processing logic or even the testing framework itself.
5.2 View Test Coverage
Open coverage/index.html in a browser to view coverage for each plugin module.
To submit plugins to the official repository, you must write unit tests that achieve:
- 90%+ code coverage
- 100% function coverage
- 100% branch condition coverage
6. E2E (End-to-End) Testing
Simple tools may not need E2E testing. For complex tools, the review team may require it.
6.1 Deploy the E2E Test Environment
- Follow Quick Start Local Development to set up a local FastGPT development environment
- Run
cd runtime && cp .env.template .env.localto copy the environment variable template, then connect to the Minio, Mongo, and Redis instances from step 1 - Run
bun run devto start the development environment, then update FastGPT's environment variables to connect to your fastgpt-plugin instance
6.2 Test via Scalar
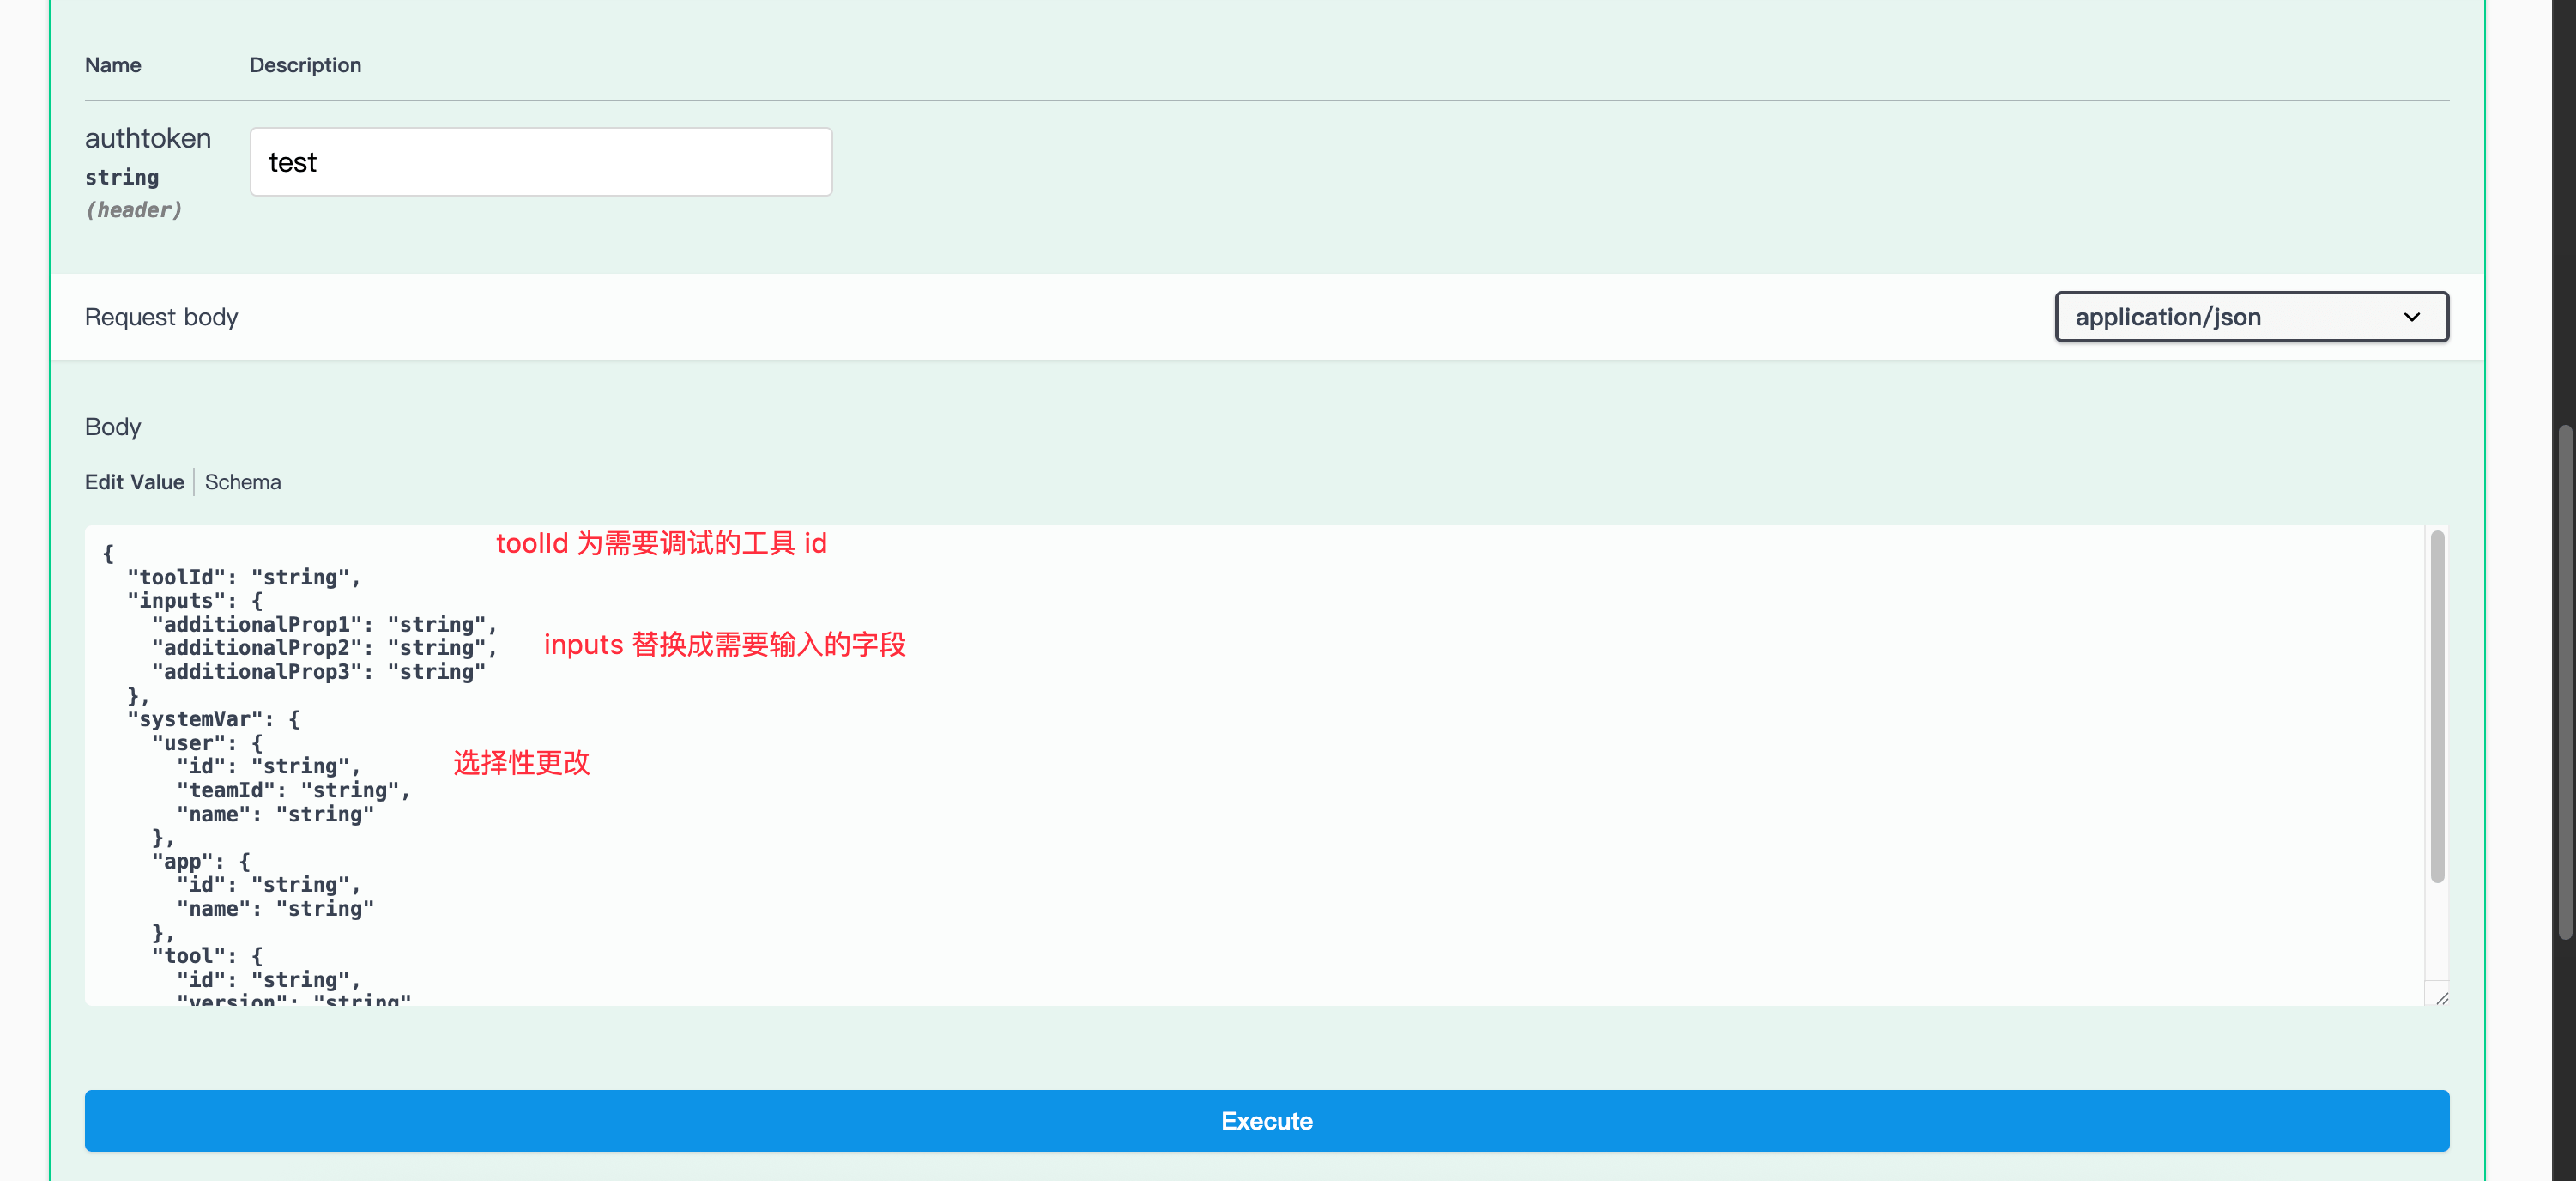
Start the fastgpt-plugin development environment.
Open http://localhost:PORT/openapi in a browser to access the fastgpt-plugin OpenAPI page for API debugging. Replace PORT with your fastgpt-plugin port number.

First, use the /tool/list endpoint to get the tool list and find the toolId of the tool you want to debug. Then use /tool/runStream to run the tool and get results.
6.3 E2E Testing in Dev Mode (with Hot Reload)
By default, fastgpt-plugin automatically loads all tools under modules/tool/packages/ and watches for file changes with hot reload. You can use these tools directly in FastGPT.
6.4 Upload Tools for E2E Testing in Dev Mode (without Hot Reload)
Set the FastGPT-plugin environment variable DISABLE_DEV_TOOLS=true to disable automatic loading of development tools, allowing you to test tool uploads instead.
7. Submit Your Tool to the Official Repository
After completing all the steps above, submit a PR to the official repository at https://github.com/labring/fastgpt-plugin. Once reviewed and approved, your tool will be included as an official FastGPT plugin.
If you don't need official inclusion, refer to Upload System Tool to use it in your own FastGPT deployment.
File Updated