Commercial Admin

SSO & External Member Sync

FastGPT External Member System Integration and Configuration

If you don't need SSO or member sync, or only need quick login via GitHub, Google, Microsoft, or WeChat Official Account, you can skip this section. This guide is for users who need to integrate their own member systems or mainstream office IMs.

Overview

To simplify integration with external member systems, FastGPT provides a set of standard interfaces for connecting to external systems, along with a FastGPT-SSO-Service image that serves as an adapter.

Through these standard interfaces, you can:

  1. SSO login. After a callback from an external system, create a user in FastGPT.
  2. Member and organizational structure sync (referred to as "member sync" below).
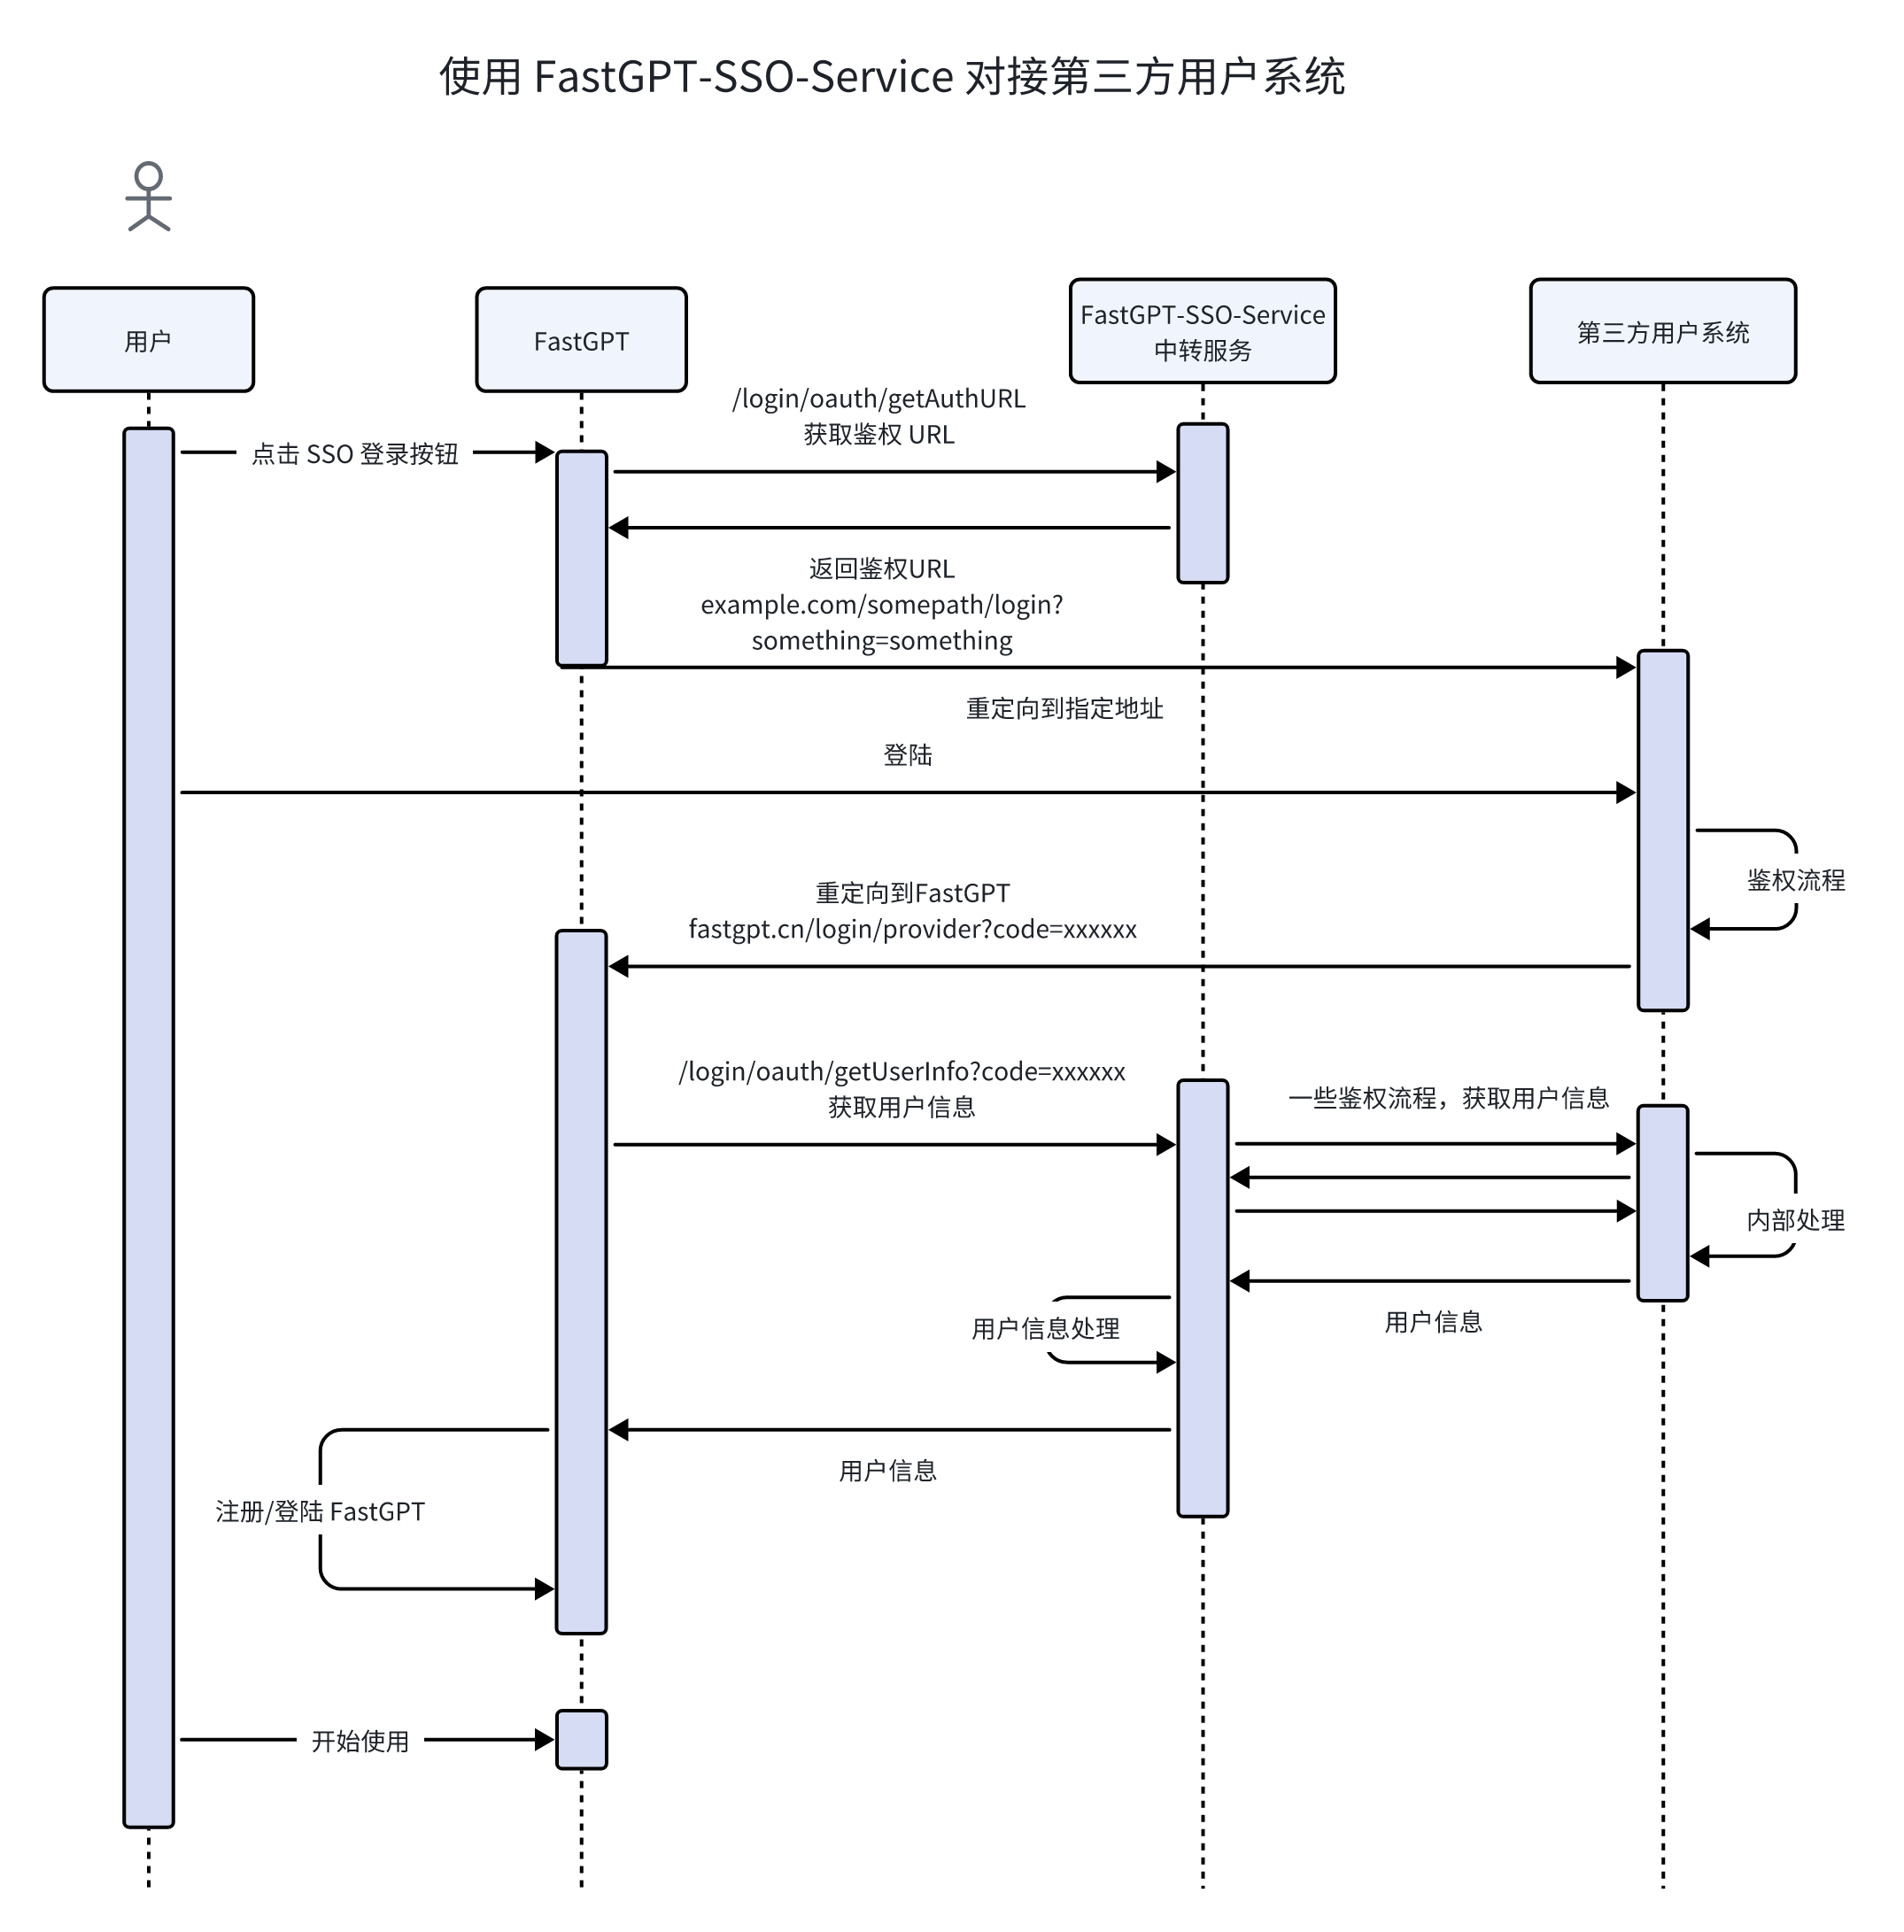
How It Works

FastGPT-pro includes a standard set of SSO and member sync interfaces. The system performs SSO and member sync operations based on these interfaces.

FastGPT-SSO-Service aggregates SSO and member sync interfaces from different sources and converts them into the format recognized by fastgpt-pro.

System Configuration Tutorial

1. Deploy the SSO-Service Image

Deploy using docker-compose:

  fastgpt-sso:
    image: registry.cn-hangzhou.aliyuncs.com/fastgpt/fastgpt-sso-service:v4.9.0  # This version must match the FastGPT image version
    container_name: fastgpt-sso
    restart: always
    networks:
      - fastgpt
    environment:
      - SSO_PROVIDER=example
      - AUTH_TOKEN=xxxxx # Auth token, used by fastgpt-pro
      # Provider-specific environment variables below

Depending on the provider, you'll need different environment variables. Below are the built-in protocols/IMs:

Protocol/FeatureSSOMember Sync Support
LarkYesYes
WeComYesYes
DingTalkYesNo
SAML 2.0YesNo
OAuth 2.0YesNo

2. Configure fastgpt-pro

1. Configure Environment Variables

The EXTERNAL_USER_SYSTEM_BASE_URL environment variable should be set to the internal network address. For example, with the configuration above:

env:
   - EXTERNAL_USER_SYSTEM_BASE_URL=http://fastgpt-sso:3000
   - EXTERNAL_USER_SYSTEM_AUTH_TOKEN=xxxxx

2. Configure button text, icons, etc. in the commercial version admin panel.

WeComDingTalkLark
WeComDingTalkLark

3. Enable Member Sync (Optional)

If you need to sync members from an external system, you can enable member sync. For team mode details, see: Team Mode Documentation

4. Optional Configuration

  1. Automatic scheduled member sync

Set the fastgpt-pro environment variable to enable automatic member sync:

env:
   - "SYNC_MEMBER_CRON=0 0 * * *" # Cron expression, runs daily at 00:00. Note: uses UTC (timezone 0). For example, to sync at 12:00 Beijing time, set this to "0 4 * * *" (UTC 04:00)

Built-in Protocol/IM Configuration Examples

Lark

1. Get Parameters

App ID and App Secret

Go to the developer console, click on your enterprise self-built app, and view the app credentials on the Credentials & Basic Info page.

2. Permission Configuration

Go to the developer console, click on your enterprise self-built app, and enable permissions on the Permission Management page under Development Configuration.

You can use the Batch Import/Export Permissions feature to import the following permission configuration:

{
  "scopes": {
    "tenant": [
      "contact:user.phone:readonly",
      "contact:contact.base:readonly",
      "contact:department.base:readonly",
      "contact:department.organize:readonly",
      "contact:user.base:readonly",
      "contact:user.department:readonly",
      "contact:user.email:readonly",
      "contact:user.employee_id:readonly"
    ],
    "user": []
  }
}

Note: The accessible data scope must be set to visible to all members.

3. Redirect URL

Go to the developer console, click on your enterprise self-built app, and set the redirect URL in Security Settings under Development Configuration. The redirect URL should follow the format https://www.fastgpt.cn/login/provider — replace the domain with your publicly accessible FastGPT domain.

4. yml Configuration Example

fastgpt-sso:
    image: registry.cn-hangzhou.aliyuncs.com/fastgpt/fastgpt-sso-service:v4.9.0
    container_name: fastgpt-sso
    restart: always
    networks:
      - fastgpt
    environment:
      - SSO_PROVIDER=feishu
      - AUTH_TOKEN=xxxxx
      # OAuth endpoint (for private Lark deployments, replace with your private address; same below)
      - SSO_TARGET_URL=https://accounts.feishu.cn/open-apis/authen/v1/authorize
      # Token endpoint
      - FEISHU_TOKEN_URL=https://open.feishu.cn/open-apis/authen/v2/oauth/token
      # User info endpoint
      - FEISHU_GET_USER_INFO_URL=https://open.feishu.cn/open-apis/authen/v1/user_info
      # Redirect address — must match the URL from step 3 exactly
      - FEISHU_REDIRECT_URI=https://fastgpt.cn/login/provider
      # Lark App ID, usually starts with cli
      - FEISHU_APP_ID=xxx
      # Lark App Secret
      - FEISHU_APP_SECRET=xxx

DingTalk

1. Get Parameters

CLIENT_ID and CLIENT_SECRET

Go to the DingTalk Open Platform, click App Development, select your app, and record the Client ID and Client Secret on the Credentials & Basic Info page.

2. Permission Configuration

Go to the DingTalk Open Platform, click App Development, select your app, and manage permissions on the Permission Management page under Development Configuration. Required permissions:

  1. Personal phone number information
  2. Contact personal information read permission
  3. Basic permission to obtain DingTalk open interface user access credentials

3. Redirect URL

Go to the DingTalk Open Platform, click App Development, select your app, and configure on the Security Settings page under Development Configuration. Two items need to be filled in:

  1. Server egress IP (list of server IPs calling DingTalk server-side APIs)
  2. Redirect URL (callback domain)

4. yml Configuration Example

fastgpt-sso:
   image: registry.cn-hangzhou.aliyuncs.com/fastgpt/fastgpt-sso-service:v4.9.0
   container_name: fastgpt-sso
   restart: always
   networks:
      - fastgpt
   environment:
      - SSO_PROVIDER=dingtalk
      - AUTH_TOKEN=xxxxx
      # OAuth endpoint
      - SSO_TARGET_URL=https://login.dingtalk.com/oauth2/auth
      # Token endpoint
      - DINGTALK_TOKEN_URL=https://api.dingtalk.com/v1.0/oauth2/userAccessToken
      # User info endpoint
      - DINGTALK_GET_USER_INFO_URL=https://oapi.dingtalk.com/v1.0/contact/users/me
      # DingTalk App ID
      - DINGTALK_CLIENT_ID=xxx
      # DingTalk App Secret
      - DINGTALK_CLIENT_SECRET=xxx

WeCom

1. Get Parameters

  1. Enterprise CorpID

    a. Log in to the WeCom admin console with an admin account: https://work.weixin.qq.com/wework_admin/loginpage_wx

    b. Go to the "My Enterprise" page and find the Enterprise ID

  2. Create an internal app for FastGPT:

    a. Get the app's AgentID and Secret

    b. Ensure the app's visibility scope is set to all (i.e., root department)

  3. A domain name with the following requirements:

    a. Resolves to a publicly accessible server

    b. Can serve static files at the root path (for domain ownership verification — follow the prompts, you only need to host one static file, which can be removed after verification)

    c. Configure web authorization, JS-SDK, and WeCom authorization login

    d. You can set "Hide app in workbench" at the bottom of the WeCom Authorization Login page

  4. Get the "Contact Sync Assistant" secret

    Retrieving contacts and organization member IDs requires the "Contact Sync Assistant" secret

    Security & Management -- Management Tools -- Contact Sync

  5. Enable interface sync

  6. Get the Secret

  7. Configure enterprise trusted IPs

2. yml Configuration Example

fastgpt-sso:
   image: registry.cn-hangzhou.aliyuncs.com/fastgpt/fastgpt-sso-service:v4.9.0
   container_name: fastgpt-sso
   restart: always
   networks:
      - fastgpt
   environment:
      - AUTH_TOKEN=xxxxx
      - SSO_PROVIDER=wecom
      # OAuth endpoint, used in WeCom client
      - WECOM_TARGET_URL_OAUTH=https://open.weixin.qq.com/connect/oauth2/authorize
      # SSO endpoint, QR code scan
      - WECOM_TARGET_URL_SSO=https://login.work.weixin.qq.com/wwlogin/sso/login
      # Get user ID (returns ID only)
      - WECOM_GET_USER_ID_URL=https://qyapi.weixin.qq.com/cgi-bin/auth/getuserinfo
      # Get detailed user info (everything except name)
      - WECOM_GET_USER_INFO_URL=https://qyapi.weixin.qq.com/cgi-bin/auth/getuserdetail
      # Get user info (has name, no other info)
      - WECOM_GET_USER_NAME_URL=https://qyapi.weixin.qq.com/cgi-bin/user/get
      # Get department ID list
      - WECOM_GET_DEPARTMENT_LIST_URL=https://qyapi.weixin.qq.com/cgi-bin/department/list
      # Get user ID list
      - WECOM_GET_USER_LIST_URL=https://qyapi.weixin.qq.com/cgi-bin/user/list_id
      # WeCom CorpId
      - WECOM_CORPID=
      # WeCom App AgentId, usually 1000xxx
      - WECOM_AGENTID=
      # WeCom App Secret
      - WECOM_APP_SECRET=
      # Contact Sync Assistant Secret
      - WECOM_SYNC_SECRET=

Standard OAuth 2.0

We provide OAuth 2.0 integration support using the authorization code grant from RFC 6749. References:

Parameter Requirements

Three Endpoints

We provide a standard OAuth 2.0 integration flow requiring three endpoints:

  1. Login authorization endpoint (users are redirected here with parameters after clicking the SSO button), e.g., http://example.com/oauth/authorize
    curl -X GET\
    "http://example.com/oauth/authorize?response_type=code&client_id=s6BhdRkqt3&state=xyz&redirect_uri=https%3A%2F%2Ffastgpt.cn%2Flogin%2Fprovider"
    After entering credentials, users are redirected to redirect_uri with a code parameter: https://fastgpt.cn/login/provider?code=4/P7qD2qAz4&state=xyz
  2. Access token endpoint. After obtaining the code, make a server-side request to this endpoint to get the access_token, e.g., http://example.com/oauth/access_token
    curl -X POST\
        -H "Content-Type: application/x-www-form-urlencoded"\
    "http://example.com/oauth/access_token?grant_type=authorization_code&client_id=s6BhdRkqt3&client_secret=xxx&code=4/P7qD2qAz4&redirect_uri=https%3A%2F%2Ffastgpt.cn%2Flogin%2Fprovider"
    Note: Content-Type must be application/x-www-form-urlencoded, not application/json
  3. User info endpoint, requires passing the access_token, e.g., http://example.com/oauth/user_info
    curl -X GET\
        -H "Authorization: Bearer 4/P7qD2qAz4"\
        "http://example.com/oauth/user_info"
    Note: access_token is passed as the Authorization header in the format: Bearer xxxx
Parameter Configuration
  • CLIENT_ID: Required
  • CLIENT_SECRET: Optional, skip if not needed
  • SCOPE: Optional, skip if not needed

The redirect_uri parameter is auto-populated based on the runtime environment

Other fixed parameters like grant_type and response_type are auto-populated

Configuration Example

fastgpt-sso:
    image: registry.cn-hangzhou.aliyuncs.com/fastgpt/fastgpt-sso-service:v4.9.0
    container_name: fastgpt-sso
    restart: always
    networks:
        - fastgpt
    environment:
        - SSO_PROVIDER=oauth2
        - AUTH_TOKEN=xxxxx
        # OAuth2.0
        # === Request URLs ===
        # 1. OAuth2 login authorization URL (required)
        - OAUTH2_AUTHORIZE_URL=
        # 2. OAuth2 access token URL (required)
        - OAUTH2_TOKEN_URL=
        # 3. OAuth2 user info URL (required)
        - OAUTH2_USER_INFO_URL=
        # === Parameters ===
        # 1. client_id (required)
        - OAUTH2_CLIENT_ID=
        # 2. client_secret (optional)
        - OAUTH2_CLIENT_SECRET=
        # 3. scope (optional)
        - OAUTH2_SCOPE=
        # === Field Mapping ===
        # OAuth2 username field mapping (required)
        - OAUTH2_USERNAME_MAP=
        # OAuth2 avatar field mapping (optional)
        - OAUTH2_AVATAR_MAP=
        # OAuth2 member name field mapping (optional)
        - OAUTH2_MEMBER_NAME_MAP=
        # OAuth2 contact field mapping (optional)
        - OAUTH2_CONTACT_MAP=

Standard Interface Documentation

Below is the standard interface documentation for SSO and member sync in FastGPT-pro. If you need to integrate with a non-standard system, refer to this section for development.

FastGPT provides the following standard interfaces:

  1. https://example.com/login/oauth/getAuthURL - Get the authorization redirect URL
  2. https://example.com/login/oauth/getUserInfo?code=xxxxx - Consume the code and exchange it for user info
  3. https://example.com/org/list - Get the organization list
  4. https://example.com/user/list - Get the member list

Get SSO Login Redirect URL

Returns a redirect login URL. FastGPT will automatically redirect to this URL. The redirect_uri is automatically appended to the URL query string.

curl -X GET "https://redict.example/login/oauth/getAuthURL?redirect_uri=xxx&state=xxxx" \
-H "Authorization: Bearer your_token_here" \
-H "Content-Type: application/json"

Success:

{
  "success": true,
  "message": "",
  "authURL": "https://example.com/somepath/login/oauth?redirect_uri=https%3A%2F%2Ffastgpt.cn%2Flogin%2Fprovider%0A"
}

Failure:

{
   "success": false,
   "message": "Error message",
   "authURL": ""
}

SSO Get User Info

This interface accepts a code parameter for authentication, consumes the code, and returns user info.

curl -X GET "https://oauth.example/login/oauth/getUserInfo?code=xxxxxx" \
-H "Authorization: Bearer your_token_here" \
-H "Content-Type: application/json"

Success:

{
  "success": true,
  "message": "",
  "username": "fastgpt-123456789",
  "avatar": "https://example.webp",
  "contact": "+861234567890",
  "memberName": "Member name (optional)",
}

Failure:

{
  "success": false,
  "message": "Error message",
  "username": "",
  "avatar": "",
  "contact": ""
}

Get Organizations

curl -X GET "https://example.com/org/list" \
-H "Authorization: Bearer your_token_here" \
-H "Content-Type: application/json"

Warning: Only one root department can exist. If your system has multiple root departments, you need to add a virtual root department first. Return type:

type OrgListResponseType = {
    message?: string; // Error message
    success: boolean;
    orgList: {
        id: string; // Unique department ID
        name: string; // Name
        parentId: string; // parentId — empty string for root department
    }[];
}
{
  "success": true,
  "message": "",
   "orgList": [
      {
         "id": "od-125151515",
         "name": "Root Department",
         "parentId": ""
      },
      {
         "id": "od-51516152",
         "name": "Sub Department",
         "parentId": "od-125151515"
      }
   ]
}

Get Members

curl -X GET "https://example.com/user/list" \
-H "Authorization: Bearer your_token_here" \
-H "Content-Type: application/json"

Return type:

type UserListResponseListType = {
    message?: string; // Error message
    success: boolean;
    userList: {
      username: string; // Unique ID. username must match the username returned by the SSO interface. Must include a prefix, e.g., sync-aaaaa, consistent with the SSO interface prefix
      memberName?: string; // Name, used as tmbname
      avatar?: string;
      contact?: string; // email or phone number
      orgs?: string[]; // IDs of organizations the member belongs to. Pass [] if no organization
    }[];
}

curl example

{
  "success": true,
  "message": "",
  "userList": [
    {
      "username": "fastgpt-123456789",
      "memberName": "John Doe",
      "avatar": "https://example.webp",
      "contact": "+861234567890",
      "orgs": ["od-125151515", "od-51516152"]
    },
    {
      "username": "fastgpt-12345678999",
      "memberName": "Jane Smith",
      "avatar": "",
      "contact": "",
      "orgs": ["od-125151515"]
    }
  ]

}

How to Integrate Non-Standard Systems

  1. Self-development: Build according to the standard interfaces provided by FastGPT, then enter the deployed service address into fastgpt-pro. You can use this template repository as a starting point: fastgpt-sso-template
  2. Custom development by the FastGPT team: a. Provide the system's SSO documentation, member and organization retrieval documentation, and an external test address. b. In fastgpt-sso-service, add the corresponding provider and environment variables, and write the integration code.
Edit on GitHub

File Updated